

微信小程序与Vue中实现店铺评分组件的方法
本文介绍如何在微信小程序和Vue项目中实现店铺评分及商品评价的星星展示组件。针对微信不支持直接SVG的限制,采用图片转Base64或图片资源方式实现可点击及半星显示。同时讲解在Vue中利用SVG symbol定义星星形状,通过占比实现精确评分显示,并包含完整的子组件、父组件引用及样式代码示例。
微信小程序与Vue评分组件概述
在微信小程序开发中,常需展示店铺评分或订单完成后的商品评价,通常采用星星图标进行展示。由于微信小程序环境限制,无法直接渲染SVG图片,需将SVG转换为Base64格式或使用图片资源来显示。因此,本文分别介绍在Vue环境中利用SVG实现评分显示的方法。
微信小程序评分组件实现
1. 效果图展示
在微信小程序中,评分组件支持点击交互及静态显示。当评分为4.2分或4点多分时,组件能够准确渲染出半颗星的效果。
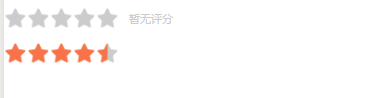
在Vue环境中,由于采用SVG实现,评分显示基于占比计算,因此可以精确展示包含小数部分的星星数量。


2. 微信小程序实现店铺评分显示及商品评价星星展示
子组件 index.wxml,支持动态控制星星的大小。
<!-- (size * stars.length + (size/2) * 4 + 20 )这里的话,是在可以点击的时候,加上了好评的字体的长度 -->
<view class='starsBox' style='width:{{isClick?(size * stars.length + (size/2) * 4 + 20 ):(size * stars.length)}}rpx;height:{{size}}rpx;'>
 <view class='stars' style='width:{{size * stars.length}}rpx;height:{{size}}rpx;'>
 <block wx:for="{{stars}}" wx:key="{{index}}">
  <image src="/images/{{item == 0 ? 'grayStar':item}}.png" style='width:{{size}}rpx;height:{{size}}rpx;' data-index="{{index}}" catchtap="computeScore"></image>
 </block>
 </view>
 <view wx:if="{{isClick}}" class='text' style='font-size:{{size/2}}rpx;'>
 <text wx:if="{{value=='0'}}" class='pointText'>暂无评分</text>
 <text wx:elif="{{value=='1'}}" class='pointText'>差评</text>
 <text wx:elif="{{value<'4'}}" class='pointText'>中评</text>
 <text wx:else class='pointText'>好评</text>
 </view>
</view>
子组件 index.wxss 样式定义。
.starsBox{
 display: flex;
 align-items: center;
 justify-content: flex-start;
}
.stars{
 width: 150rpx;
 height: 50rpx;
 display: flex;
 align-items: center;
 justify-content: flex-start;
}
.stars image{
 width: 30rpx;
 height: 30rpx;
}
.text{
 color: #ccc;
 margin-left: 20rpx;
}
子组件 index.js 逻辑实现。
Component({
 properties: {
 /* 显示有色星星的个数 */
 value: {
  type: Number,
  value: 0,
  /* 监听value值的变化 */
  observer: function (newVal, oldVal, changedPath) {
  this.init()
  }
 },
 /* 设置星星大小 */
 size: {
  type: Number,
  value: 30
 },
 /* 是否可点击,type为null表示值可以是任意类型 */
 isClick: {
  type: null,
  value: false
 }
 },
 attached() {
 /* 组件生命周期函数,在组件实例进入页面节点树时执行 */
 this.init();
 },
 data: {
 stars: [0, 0, 0, 0, 0]
 },
 methods: {
 init() {
  let star = this.properties.value;
  let stars = [0, 0, 0, 0, 0];
  /* 图片名称,通过设置图片名称来动态的改变图片显示 */
  for (let i = 0; i < Math.floor(star); i++) {
  stars[i] = 'star';
  }
  if (star > Math.floor(star)) {
  stars[Math.floor(star)] = 'halfStar';
  }
  for (let i = 0; i < stars.length; i++) {
  if (stars[i] == 0) {
   stars[i] = 'grayStar';
  }
  }
  this.setData({
  stars
  })
 },
 /* 可点击时,用于计算分数 */
 computeScore(e) {
  let index = e.currentTarget.dataset.index;
  let isClick = this.data.isClick;
  if (isClick) {
  let score = index + 1;
  this.triggerEvent('compute', {
   score
  });
  }
 }
 }
})
3. 父组件中引用评分组件
父组件 index.wxml 结构。
<view class="score">
 <view class="scoreItem">
  <score value="{{shopGrade}}" size="46" isClick="true" bindcompute="computeGrade" />
 </view>
 <view class="scoreItem">
  <score value="{{shopGrade1}}" size="46" />
 </view>
</view>
父组件 index.json 配置。
{
 "usingComponents": {
  "score": "/component/score/index"
 }
}
父组件 index.js 数据与事件处理。
data: {
 shopGrade: 0,
 shopGrade1: 4.6,
},
/* 评分处理事件 */
computeGrade(e) {
 let score = e.detail.score;
 this.setData({
  shopGrade: score
 })
},
Vue中SVG评分组件实现
4. Vue中使用SVG实现评分显示
首先在Vue项目的 index.html 模板文件中添加rem转换算法,因为后续使用的单位是rem。
/* 在头部添加 */
<script type="text/javascript">
   document.getElementsByTagName("html")[0].style.fontSize = 100 / 750 * window.screen.width + "px";
  </script>
然后添加 svg.vue 文件,该SVG文件可自行查找图片生成,并设置对应的id。
<template>
  <svg xmlns="http://www.w3.org/2000/svg" xmlns:xlink="http://www.w3.org/1999/xlink" style="position:absolute;width:0;height:0;visibility:hidden">
    <defs>
      <symbol id="star" viewBox="0 0 32 32">
        <path class="path1" d="M16 26.382l-8.16 4.992c-1.5 0.918-2.382 0.264-1.975-1.435l2.226-9.303-7.269-6.218c-1.337-1.143-0.987-2.184 0.755-2.322l9.536-0.758 3.667-8.835c0.674-1.624 1.772-1.613 2.442 0l3.667 8.835 9.536 0.758c1.753 0.139 2.082 1.187 0.755 2.322l-7.269 6.218 2.226 9.303c0.409 1.71-0.485 2.347-1.975 1.435l-8.16-4.992z">
        </path>
      </symbol>
    </defs>
  </svg>
</template>
<script></script>
<style></style>
rating.vue 文件引用 svg.vue 组件。
<template>
  <div class="ratingstar">
    <section class="star_container">
      <svg class="grey_fill" v-for="(num,index) in 5" :key="index">
        <use xmlns:xlink="http://www.w3.org/1999/xlink" xlink:href="#star" rel="external nofollow" rel="external nofollow" ></use>
      </svg>
    </section>
    <div class="star_overflow" :style="'width:'+rating*2/10+'rem'">
      <section class="star_container">
        <svg class="orange_fill" v-for="(num,index) in 5" :key="index">
          <use xmlns:xlink="http://www.w3.org/1999/xlink" xlink:href="#star" rel="external nofollow" rel="external nofollow" ></use>
        </svg>
      </section>
    </div>
    <svgIcon></svgIcon>
  </div>
</template>

<script>
 import svgIcon from '@/components/svg'
 export default {
  components: {
   svgIcon
  },
  data() {
    return {
      rating: 4.2
    }
  },
 }
</script>
<style lang="less" rel="stylesheet/less" scoped>
  .ratingstar {
    position: relative;
    width: 100%;
    .star_overflow {
      overflow: hidden;
      position: relative;
      height: 0.65rem;
    }
    .star_container {
      position: absolute;
      top: 0.05rem;
      width: 1rem;
      display: flex;
      justify-content: flex-start;
      align-items: center;
      .grey_fill {
        width: 0.94rem;
        height: 0.2rem;
        fill: #d1d1d1;
      }
      .orange_fill {
        width: 0.94rem;
        height: 0.2rem;
        fill: #ff9a0d;
      }
    }
  }
</style>
总结
以上介绍了微信小程序中的店铺评分组件及Vue中用SVG实现的评分显示组件,希望对大家有所帮助。如果大家有任何疑问请留言,小编会及时回复。感谢支持。
Vue.js官网地址是多少?区分国际站与中文文档入口
2026-11-05 16:29:53
Vue/React 项目中怎么封装复用 flv.js 播放器组件
2026-11-03 19:42:36
Vue.js 动态路由权限控制与菜单生成实战方案
2026-11-03 13:46:47
Vue.js 企业级项目架构搭建与目录规范实战
2026-11-03 12:25:32
Vue 或 React 项目中集成 Swiper.js 的最佳实践
2026-11-02 10:29:42