纯JavaScript编写网页轮播图与弹窗效果的实现步骤
系统讲解使用纯JavaScript、HTML5与CSS3从零实现高性能网页轮播图与模态弹窗效果的完整步骤。包含DOM分层、位移计算、防抖控制、键盘无障碍支持与常见避坑指南。
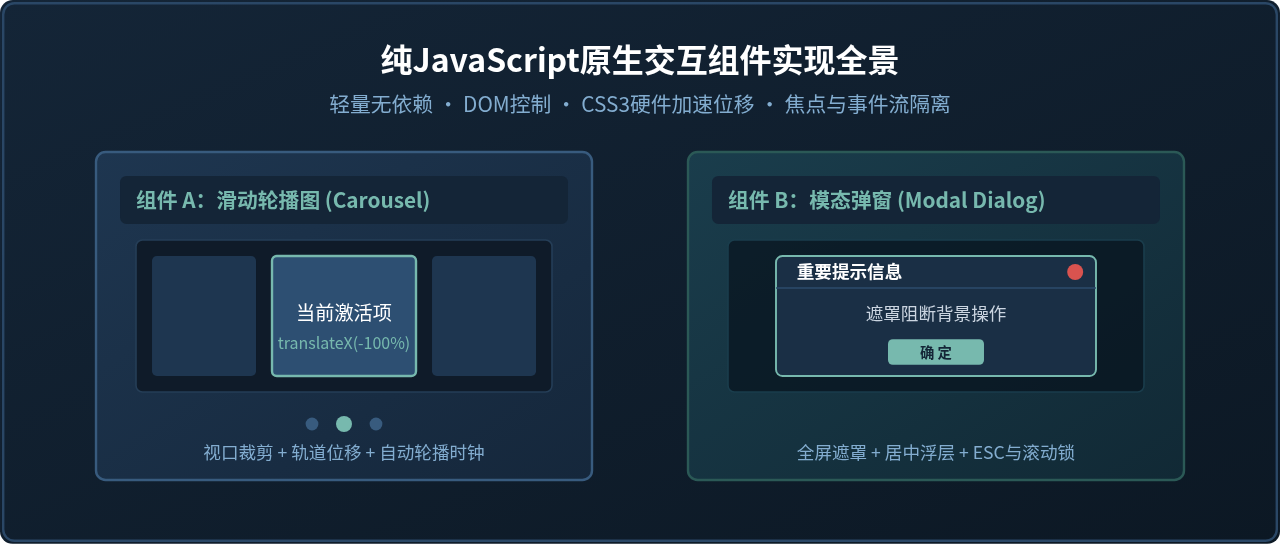
一、基础认知与准备工作
初学前端时,许多人习惯直接引入重量级第三方组件库。然而,在轻量级展示页、嵌入式微前端以及严苛的性能优化场景中,第三方库的体积与不可控的样式覆盖往往带来不必要的负担。通过纯JavaScript编写这两个核心组件,不仅能产出极其紧凑的代码(体积仅几KB),更能夯实对DOM树操作、CSS定位与流式布局、异步定时器及事件委托的深层认知。
在开始编码前,我们先明确两个组件的运行环境与定位:
- 运行环境:现代浏览器(Chrome、Firefox、Safari、Edge等),全面支持原生ES6+语法、Flexbox布局以及CSS3过渡属性(
transition/transform)。 - 轮播图(Carousel)核心要素:视口容器(遮挡溢出内容)、水平轨道(容纳所有幻灯片并平移)、切换控制(左右箭头按钮)、位置指示器(小圆点)以及自动化运行时钟(定时播放与鼠标悬停暂停)。
- 模态弹窗(Modal)核心要素:半透明遮罩层(阻隔底层鼠标点击)、主对话框容器(视口居中且高层叠级别)、关闭控制(关闭图标、遮罩区域点击、ESC键盘按键)以及页面滚动穿透锁定。
二、纯JavaScript编写网页轮播图的实现步骤
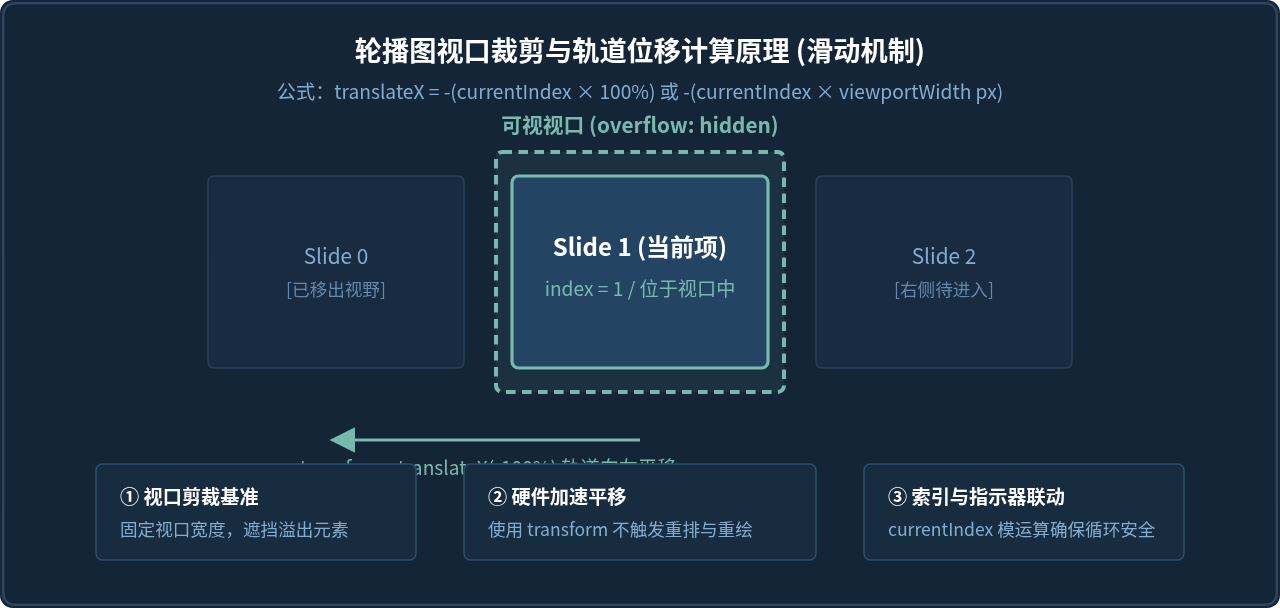
实现轮播图最可靠、性能最高的方法是“滑动视口法”:外层容器固定宽度并隐藏溢出,内层轨道包含所有子项并横向排列,通过改变轨道的 transform: translateX(...) 属性实现平滑切换。
第 1 步:搭建语义化HTML结构
轮播图的DOM结构应当层次分明:最外层为视口,内部包含可滑动的轨道、左右切换按钮以及底部的圆点容器。
<!-- 轮播图外部视口容器 -->
<div class="carousel-viewport" id="myCarousel">
<!-- 横向滑动轨道 -->
<div class="carousel-track" id="carouselTrack">
<div class="carousel-slide" style="background-color: #2c3e50;"><span>幻灯片 1</span></div>
<div class="carousel-slide" style="background-color: #1e3a5f;"><span>幻灯片 2</span></div>
<div class="carousel-slide" style="background-color: #164e63;"><span>幻灯片 3</span></div>
<div class="carousel-slide" style="background-color: #1e293b;"><span>幻灯片 4</span></div>
</div>
<!-- 左右翻页按钮 -->
<button class="carousel-btn prev" id="prevBtn" aria-label="上一张">❮</button>
<button class="carousel-btn next" id="nextBtn" aria-label="下一张">❯</button>
<!-- 底部小圆点指示器容器 -->
<div class="carousel-dots" id="carouselDots"></div>
</div>第 2 步:编写精准高效的CSS样式
为了实现平滑动画并避免重排(Reflow),位移操作必须使用 transform 而非 left。同时,轨道设置 display: flex,每个子项宽度占满100%容器宽度。
/* 轮播图视口:限制宽度、隐藏超出部分、作为定位参照基准 */
.carousel-viewport {
  position: relative;
  width: 100%;
  max-width: 720px;
  height: 360px;
  margin: 20px auto;
  overflow: hidden;
  border-radius: 8px;
  box-shadow: 0 4px 16px rgba(0, 0, 0, 0.3);
  user-select: none;
}

/* 滑动轨道:flex横向排列,利用transform平滑滑动 */
.carousel-track {
  display: flex;
  height: 100%;
  width: 100%;
  transition: transform 0.45s cubic-bezier(0.25, 1, 0.5, 1);
  will-change: transform;
}

/* 幻灯片单项:不可缩放,固定占满一个视口 */
.carousel-slide {
  flex: 0 0 100%;
  width: 100%;
  height: 100%;
  display: flex;
  align-items: center;
  justify-content: center;
  font-size: 26px;
  font-weight: bold;
  color: #ffffff;
}

/* 翻页按钮样式 */
.carousel-btn {
  position: absolute;
  top: 50%;
  transform: translateY(-50%);
  width: 44px;
  height: 44px;
  background-color: rgba(20, 37, 55, 0.65);
  color: #ffffff;
  border: 1px solid rgba(131, 173, 208, 0.3);
  border-radius: 50%;
  cursor: pointer;
  font-size: 18px;
  display: flex;
  align-items: center;
  justify-content: center;
  transition: background-color 0.2s, transform 0.2s;
  z-index: 10;
}

.carousel-btn:hover {
  background-color: rgba(119, 185, 174, 0.85);
  color: #142537;
}

.carousel-btn.prev { left: 16px; }
.carousel-btn.next { right: 16px; }

/* 底部圆点容器及圆点项 */
.carousel-dots {
  position: absolute;
  bottom: 14px;
  left: 50%;
  transform: translateX(-50%);
  display: flex;
  gap: 10px;
  z-index: 10;
}

.dot {
  width: 10px;
  height: 10px;
  border-radius: 50%;
  background-color: rgba(255, 255, 255, 0.4);
  cursor: pointer;
  transition: all 0.3s ease;
}

.dot.active {
  background-color: #77B9AE;
  transform: scale(1.3);
  width: 22px;
  border-radius: 5px;
}
第 3 步:编写纯JavaScript核心逻辑
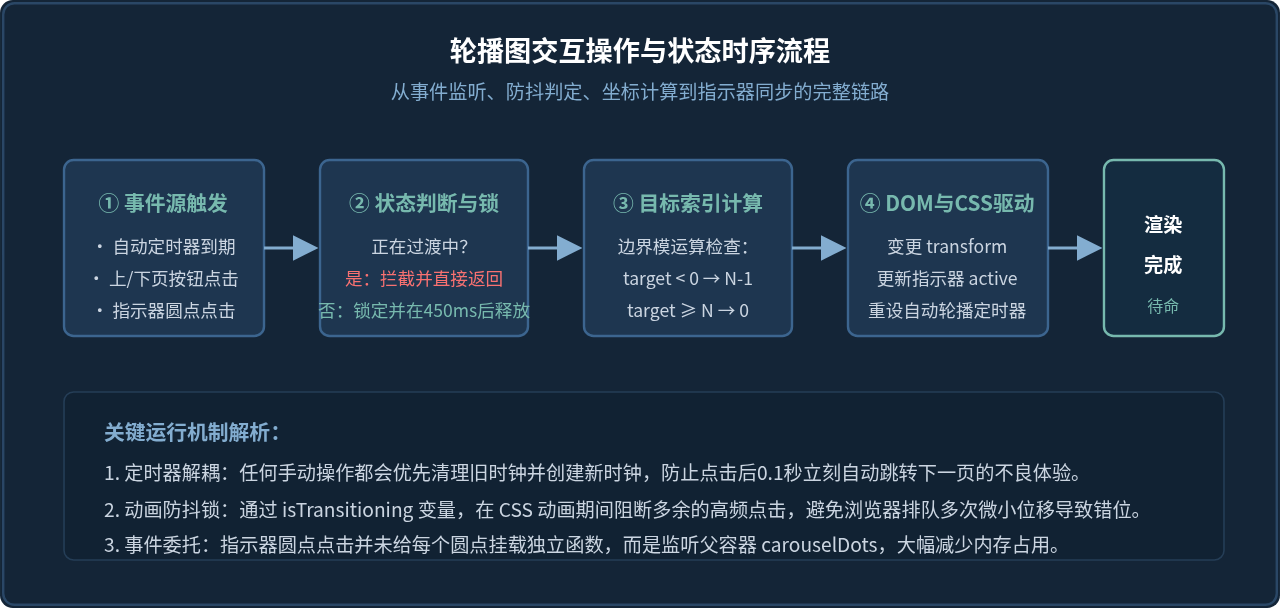
JavaScript负责控制当前索引变化、平移轨道、同步高亮圆点,并处理定时器在鼠标移入时的挂起与恢复。
// 纯原生 JavaScript 轮播图控制模块
class PureCarousel {
  constructor(containerId) {
    this.container = document.getElementById(containerId);
    if (!this.container) return;

    this.track = this.container.querySelector('#carouselTrack');
    this.slides = this.container.querySelectorAll('.carousel-slide');
    this.prevBtn = this.container.querySelector('#prevBtn');
    this.nextBtn = this.container.querySelector('#nextBtn');
    this.dotsContainer = this.container.querySelector('#carouselDots');

    this.currentIndex = 0;
    this.totalSlides = this.slides.length;
    this.autoPlayInterval = 3500; // 自动轮播间隔 (ms)
    this.timer = null;
    this.isTransitioning = false; // 防抖锁

    this.init();
  }

  init() {
    this.createDots();
    this.bindEvents();
    this.updateCarousel(0);
    this.startAutoPlay();
  }

  // 动态创建与幻灯片数量一致的指示器圆点
  createDots() {
    this.dotsContainer.innerHTML = '';
    for (let i = 0; i < this.totalSlides; i++) {
      const dot = document.createElement('div');
      dot.classList.add('dot');
      if (i === 0) dot.classList.add('active');
      dot.dataset.index = i;
      this.dotsContainer.appendChild(dot);
    }
    this.dots = this.dotsContainer.querySelectorAll('.dot');
  }

  // 核心滑动与状态同步函数
  updateCarousel(targetIndex) {
    // 边界循环处理:小于0跳转最后一张,大于等于总量跳回第0张
    if (targetIndex < 0) {
      this.currentIndex = this.totalSlides - 1;
    } else if (targetIndex >= this.totalSlides) {
      this.currentIndex = 0;
    } else {
      this.currentIndex = targetIndex;
    }

    // 利用 CSS transform 进行百分比位移
    this.track.style.transform = `translateX(-${this.currentIndex * 100}%)`;

    // 同步激活对应的指示器小圆点
    this.dots.forEach((dot, idx) => {
      dot.classList.toggle('active', idx === this.currentIndex);
    });
  }

  next() {
    if (this.isTransitioning) return;
    this.setTransitionLock();
    this.updateCarousel(this.currentIndex + 1);
  }

  prev() {
    if (this.isTransitioning) return;
    this.setTransitionLock();
    this.updateCarousel(this.currentIndex - 1);
  }

  // 防止快速连击导致动画错乱的防抖锁
  setTransitionLock() {
    this.isTransitioning = true;
    setTimeout(() => {
      this.isTransitioning = false;
    }, 450); // 与 CSS transition 动画时间保持一致
  }

  startAutoPlay() {
    this.stopAutoPlay();
    this.timer = setInterval(() => {
      this.next();
    }, this.autoPlayInterval);
  }

  stopAutoPlay() {
    if (this.timer) {
      clearInterval(this.timer);
      this.timer = null;
    }
  }

  bindEvents() {
    // 左右按钮点击
    this.nextBtn.addEventListener('click', () => {
      this.next();
      this.startAutoPlay(); // 用户操作后重置计时器
    });

    this.prevBtn.addEventListener('click', () => {
      this.prev();
      this.startAutoPlay();
    });

    // 指示器圆点点击切换(事件委托)
    this.dotsContainer.addEventListener('click', (e) => {
      if (e.target.classList.contains('dot')) {
        const index = parseInt(e.target.dataset.index, 10);
        if (index !== this.currentIndex) {
          this.updateCarousel(index);
          this.startAutoPlay();
        }
      }
    });

    // 鼠标悬停暂停自动轮播,移出继续
    this.container.addEventListener('mouseenter', () => this.stopAutoPlay());
    this.container.addEventListener('mouseleave', () => this.startAutoPlay());
  }
}

// 页面加载完成后实例化
document.addEventListener('DOMContentLoaded', () => {
  window.carouselInstance = new PureCarousel('myCarousel');
});
三、纯JavaScript编写模态弹窗的实现步骤
模态弹窗(Modal)要求在弹出时打断用户的其他操作,并在用户完成确认、取消或按下键盘ESC时平滑退出。很多初学者常犯的错误是直接使用 display: none / block 暴力切换,导致无法播放进出场过渡动画,或者忘记锁定主页面背景滚动,导致用户滑动弹窗时底层页面疯狂滚动(滚动穿透)。
第 1 步:弹窗DOM结构设计
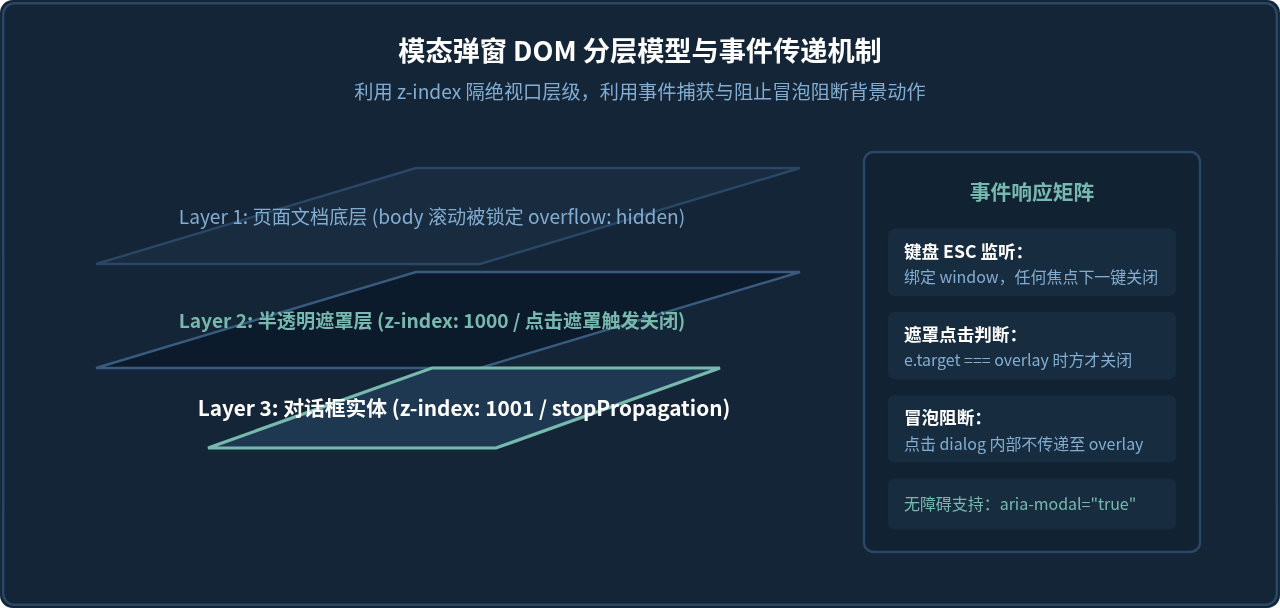
弹窗结构分为两大层:全屏遮罩层(modal-backdrop)与浮动内容主体(modal-dialog)。
<!-- 触发弹窗的按钮 -->
<button type="button" class="action-btn" id="openModalBtn">打开弹窗详情</button>
<!-- 模态弹窗外层容器 (默认隐藏) -->
<div class="modal-overlay" id="customModal" aria-hidden="true" role="dialog" aria-modal="true">
<!-- 半透明暗色遮罩背景 -->
<div class="modal-backdrop"></div>
<!-- 居中弹窗主体卡片 -->
<div class="modal-dialog">
<div class="modal-header">
<h3 class="modal-title">操作确认提示</h3>
<button type="button" class="modal-close" id="closeModalBtn" aria-label="关闭">×</button>
</div>
<div class="modal-body">
<p>这是一个纯原生JavaScript构建的无依赖模态弹窗。</p>
<p>特性支持:点击遮罩层关闭、按键盘 ESC 键关闭、背景防滚动穿透以及平滑淡入位移动画。</p>
</div>
<div class="modal-footer">
<button type="button" class="btn btn-secondary" id="modalCancelBtn">取消</button>
<button type="button" class="btn btn-primary" id="modalConfirmBtn">确认提交</button>
</div>
</div>
</div>第 2 步:CSS样式控制与分层过渡
为了实现平滑淡入淡出,我们不使用 display: none,而是使用 visibility: hidden 与 opacity: 0。当激活时追加 active 类,让透明度平滑变为1,同时让弹窗本体从轻微缩放状态弹入。
/* 触发按钮基本美化 */
.action-btn {
  padding: 10px 22px;
  background-color: #83ADD0;
  color: #0f172a;
  border: none;
  border-radius: 6px;
  font-weight: 600;
  cursor: pointer;
  transition: background-color 0.2s, transform 0.1s;
}

.action-btn:hover {
  background-color: #77B9AE;
}

/* 模态外层容器:固定全屏定位 */
.modal-overlay {
  position: fixed;
  top: 0;
  left: 0;
  width: 100vw;
  height: 100vh;
  z-index: 1000;
  display: flex;
  align-items: center;
  justify-content: center;
  visibility: hidden;
  opacity: 0;
  transition: opacity 0.3s ease, visibility 0.3s ease;
}

/* 激活状态 */
.modal-overlay.active {
  visibility: visible;
  opacity: 1;
}

/* 遮罩背景 */
.modal-backdrop {
  position: absolute;
  top: 0;
  left: 0;
  width: 100%;
  height: 100%;
  background-color: rgba(10, 20, 32, 0.75);
  backdrop-filter: blur(4px); /* 现代浏览器毛玻璃支持 */
}

/* 弹窗主体卡片:入场缩放动画 */
.modal-dialog {
  position: relative;
  z-index: 1001;
  width: 90%;
  max-width: 500px;
  background-color: #142537;
  border: 1px solid #2d4c6d;
  border-radius: 8px;
  box-shadow: 0 20px 40px rgba(0, 0, 0, 0.6);
  transform: scale(0.92) translateY(-20px);
  transition: transform 0.3s cubic-bezier(0.16, 1, 0.3, 1);
  overflow: hidden;
}

.modal-overlay.active .modal-dialog {
  transform: scale(1) translateY(0);
}

/* 弹窗头部、主体及尾部 */
.modal-header {
  padding: 18px 24px;
  display: flex;
  align-items: center;
  justify-content: space-between;
  border-bottom: 1px solid #243c55;
}

.modal-title {
  margin: 0;
  font-size: 1.25rem;
  color: #ffffff;
}

.modal-close {
  background: none;
  border: none;
  font-size: 24px;
  color: #83ADD0;
  cursor: pointer;
  line-height: 1;
}

.modal-close:hover {
  color: #ffffff;
}

.modal-body {
  padding: 20px 24px;
  color: #cbd5e1;
  font-size: 0.95rem;
  line-height: 1.6;
}

.modal-footer {
  padding: 16px 24px;
  display: flex;
  justify-content: flex-end;
  gap: 12px;
  border-top: 1px solid #243c55;
  background-color: #0f1c2a;
}

/* 弹窗按钮组 */
.btn {
  padding: 8px 18px;
  border-radius: 4px;
  font-size: 0.9rem;
  cursor: pointer;
  border: 1px solid transparent;
}

.btn-secondary {
  background-color: transparent;
  color: #83ADD0;
  border-color: #385b7e;
}

.btn-secondary:hover {
  background-color: rgba(131, 173, 208, 0.1);
  color: #ffffff;
}

.btn-primary {
  background-color: #77B9AE;
  color: #0f172a;
  font-weight: 600;
}

.btn-primary:hover {
  background-color: #64a69b;
}

/* 锁定主页面滚动的辅助类 */
body.modal-open {
  overflow: hidden !important;
}
第 3 步:编写纯JavaScript弹窗控制类
为了实现弹窗在各种业务情景中的复用,我们将其封装为一个干净的类,提供 open() 和 close() 两个简洁API。
// 纯原生 JavaScript 模态弹窗控制模块
class PureModal {
  constructor(overlayId) {
    this.overlay = document.getElementById(overlayId);
    if (!this.overlay) return;

    this.dialog = this.overlay.querySelector('.modal-dialog');
    this.closeBtn = this.overlay.querySelector('.modal-close');
    this.cancelBtn = this.overlay.querySelector('#modalCancelBtn');
    this.confirmBtn = this.overlay.querySelector('#modalConfirmBtn');

    // 存储ESC事件引用的函数指针,以便精准移除监听
    this.handleKeyDown = this.handleKeyDown.bind(this);

    this.init();
  }

  init() {
    // 监听右上角关闭按钮
    if (this.closeBtn) {
      this.closeBtn.addEventListener('click', () => this.close());
    }

    // 监听取消按钮
    if (this.cancelBtn) {
      this.cancelBtn.addEventListener('click', () => this.close());
    }

    // 监听确认按钮
    if (this.confirmBtn) {
      this.confirmBtn.addEventListener('click', () => {
        // 执行业务确认逻辑...
        this.close();
      });
    }

    // 点击遮罩区域(但不是弹窗主体)时关闭
    this.overlay.addEventListener('click', (e) => {
      // 只有直接点击 overlay 自身或遮罩层时才关闭,点击 dialog 内部不关闭
      if (e.target === this.overlay || e.target.classList.contains('modal-backdrop')) {
        this.close();
      }
    });

    // 阻止弹窗主体内容的点击事件向上传递至 overlay
    if (this.dialog) {
      this.dialog.addEventListener('click', (e) => {
        e.stopPropagation();
      });
    }
  }

  open() {
    this.overlay.classList.add('active');
    this.overlay.setAttribute('aria-hidden', 'false');
    document.body.classList.add('modal-open'); // 锁定底层页面滚动

    // 绑定全局 ESC 键退出监听
    window.addEventListener('keydown', this.handleKeyDown);
  }

  close() {
    this.overlay.classList.remove('active');
    this.overlay.setAttribute('aria-hidden', 'true');
    document.body.classList.remove('modal-open'); // 恢复主页面滚动

    // 移除全局键盘监听,避免页面其它地方产生事件污染与内存泄露
    window.removeEventListener('keydown', this.handleKeyDown);
  }

  handleKeyDown(e) {
    if (e.key === 'Escape' || e.keyCode === 27) {
      this.close();
    }
  }
}

// 页面绑定触发
document.addEventListener('DOMContentLoaded', () => {
  const modalInstance = new PureModal('customModal');
  const openBtn = document.getElementById('openModalBtn');

  if (openBtn) {
    openBtn.addEventListener('click', () => {
      modalInstance.open();
    });
  }
});
四、轮播图与弹窗的联动实战
在实际项目中,这两个组件经常需要协同工作。例如:在轮播图中点击某张幻灯片的“查看大图/详情”按钮弹出模态弹窗。此时,必须在弹窗打开时主动暂停轮播图的时钟,并在弹窗关闭后重新启动轮播图。否则当用户在弹窗中浏览时,背景轮播图仍在持续切换,容易产生多余的资源开销与视觉干扰。
// 轮播图与弹窗的协同联动示例
const carousel = new PureCarousel('myCarousel');
const modal = new PureModal('customModal');

// 监听弹窗打开时暂停轮播图
document.getElementById('openModalBtn').addEventListener('click', () => {
  carousel.stopAutoPlay();
  modal.open();
});

// 在弹窗的关闭回调中恢复轮播图
// 为 modalCancelBtn、closeModalBtn 等绑定恢复逻辑
function onModalClosed() {
  carousel.startAutoPlay();
}

document.getElementById('closeModalBtn').addEventListener('click', onModalClosed);
document.getElementById('modalCancelBtn').addEventListener('click', onModalClosed);
document.getElementById('modalConfirmBtn').addEventListener('click', onModalClosed);
五、生产环境核心避坑指南
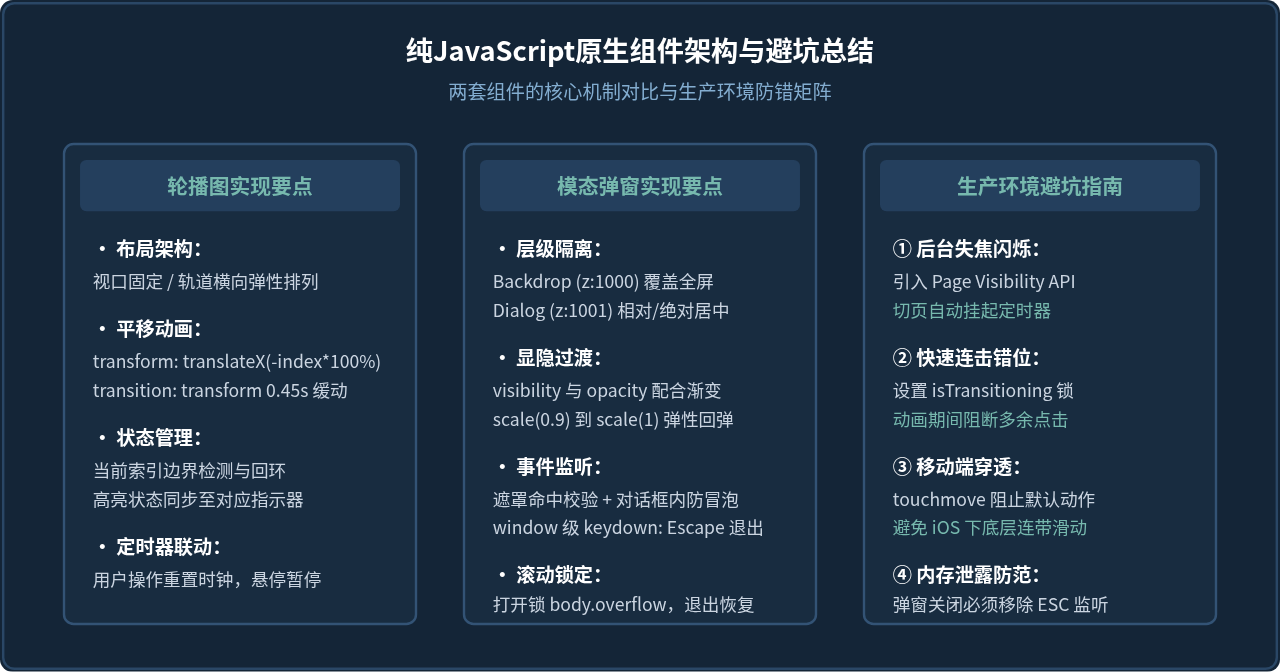
在纯JavaScript开发中,以下4个陷阱是很多新手甚至有经验的工程师常遇到的问题,需要特别注意:
setInterval 的调度频率。如果切回时积压的任务瞬间被执行,轮播图会出现极其疯狂的连续快闪。
解决方案:监听
document.addEventListener('visibilitychange'),当 document.hidden === true 时暂停时钟,切回时恢复。
transition 尚未走完便被新的 translateX 冲刷,会导致轨道在半截位置抽搐。
解决方案:维护
isTransitioning 标志位,或者监听轨道的 transitionend 事件,确保上一次位移结束后才接受下一次翻页指令。
body 增加 overflow: hidden 仍然可能无法完全阻止底层页面的手势拖拽。
解决方案:在弹窗打开期间,监听
document 的 touchmove 事件并 preventDefault(),或者记录当前 window.scrollY 并在弹窗期间将 body 设为 position: fixed。
window 绑定了 keydown 监听,如果只在 open() 时绑定,关闭时却未 removeEventListener,多次打开关闭后会产生大量的孤立监听器。
解决方案:将处理函数使用
bind(this) 保存为对象属性,在弹窗关闭(包括ESC关闭、遮罩点击关闭、确定取消关闭)时统一销毁。
六、总结与延伸思考
通过本文的讲解与实践,我们运用纯JavaScript完成了轮播图与模态弹窗两套核心交互:
- 轮播图的核心是视口几何与变换:通过外层
overflow: hidden裁剪边界,利用内层transform: translateX触发GPU加速位移,结合合理的防抖锁和时钟调度,实现平滑稳定的循环滚动。 - 模态弹窗的核心是分层与事件控制:通过固定定位构建独立于常规流的视觉层级,运用
stopPropagation和e.target区分遮罩点击,并严谨地管理页面滚动锁定与键盘无障碍监听。
在此坚实的基础之上,读者可以根据具体业务场景进一步拓展进阶能力,例如为轮播图增加触摸手势拖拽(监听 touchstart / touchmove / touchend),或者为模态弹窗增加内部表单异步验证与焦点锁定(Focus Trap),从而打造出功能更加完善、极致轻量的原生交互组件库。
网页开发三者分工:HTML结构、CSS样式与JavaScript交互怎么协作
2026-11-05 12:51:22
JS解析URL参数时怎么处理中文乱码和特殊字符
2026-11-05 12:47:23
js-cookie 存储 JSON 对象:自动序列化与反序列化技巧
2026-11-05 12:36:26
marked.js 快速上手:安装与基础 Markdown 转 HTML 示例
2026-11-05 09:32:53
Phaser.js 与 PixiJS、Cocos Creator 的技术选型对比
2026-11-05 08:36:30