使用 Jest 和 Supertest 编写 NestJS 单元测试与端到端测试
深入讲解如何在 NestJS 框架中使用 Jest 和 Supertest 编写高质量的单元测试与端到端(E2E)测试。涵盖依赖注入 Mock 技巧、Service 与 Controller 测试、HTTP 全链路断言、生命周期管理与排坑指南。
在构建企业级 Node.js 服务端应用时,自动化测试是保障代码健壮性与可维护性的关键防线。NestJS 官方脚手架开箱集成了 Jest 测试框架,并提供了专用的测试辅助工具包 @nestjs/testing 与 HTTP 仿真库 Supertest。通过单元测试(Unit Test),我们可以在微秒级时间内验证独立类与方法的业务分支;通过端到端测试(E2E Test),我们能够完整模拟真实客户端发起的 HTTP 请求,检验守卫、管道、拦截器与控制器的集成协作。本文将通过具体的项目实例,完整演示两类测试的设计规范、Mock 替换策略与最佳实践。
一、核心认知:NestJS 测试体系与分层边界
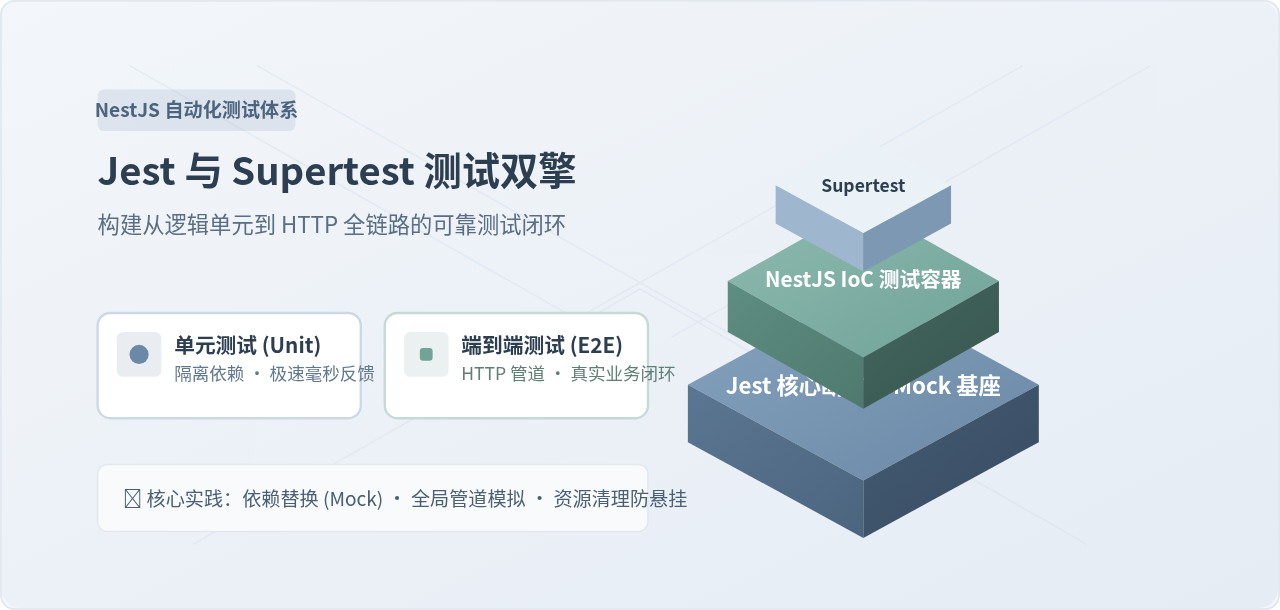
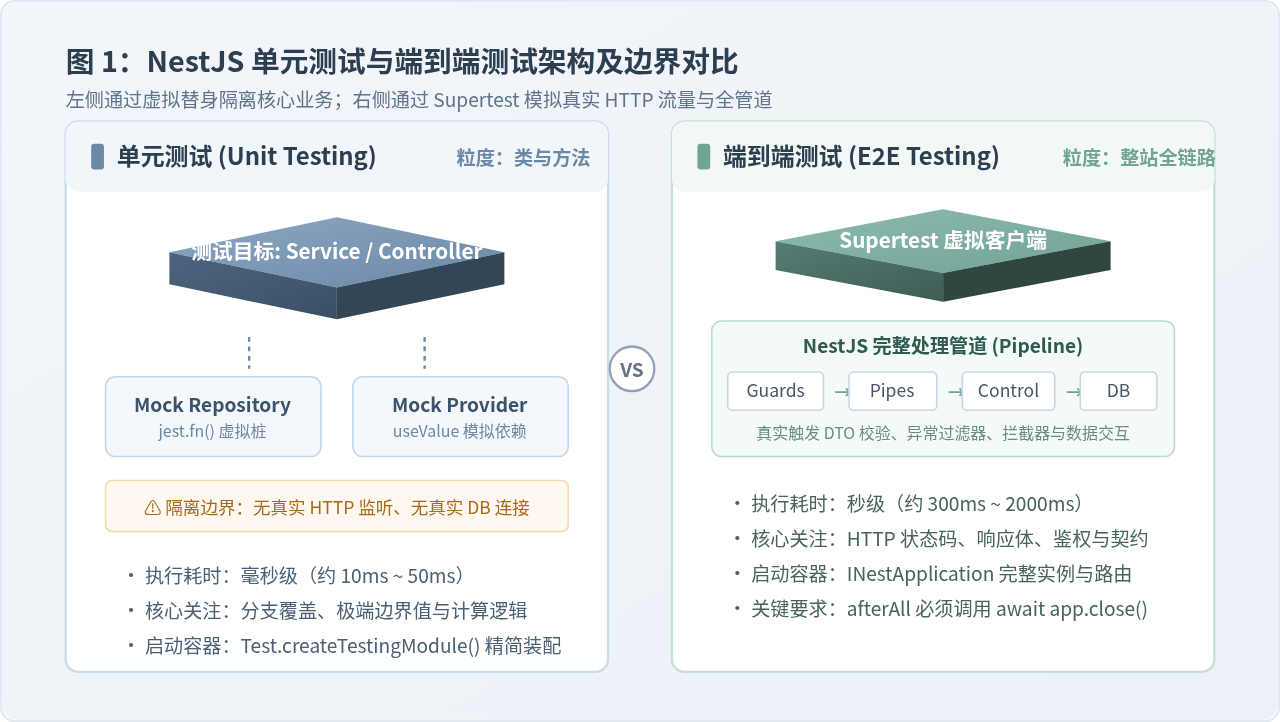
编写测试前,必须清晰界定单元测试与端到端测试的不同定位与执行边界。NestJS 的架构核心在于控制反转(IoC)容器与模块化机制,这为我们提供了极具灵活性的测试切入点:
- 单元测试(Unit Test):聚焦于单一模块内部的类(如 Service、Pipe、Guard 或 Controller)。单元测试必须切断一切真实的外部副作用,如数据库读写、第三方 HTTP 调用及文件系统操作,利用 Jest 的虚拟桩(Mock/Stub)替代真实依赖,从而实现极快的执行速度与精确的问题定位。
- 端到端测试(E2E Test):聚焦于系统的黑盒交互与完整协议链路。借助
Supertest驱动,测试用例直接向底层 HTTP 监听器(如 Express 或 Fastify 实例)派发请求,验证从路由匹配、全局校验管道(ValidationPipe)、身份鉴权(Guards)直至响应序列化的完整流程。
二、使用 Jest 编写单元测试
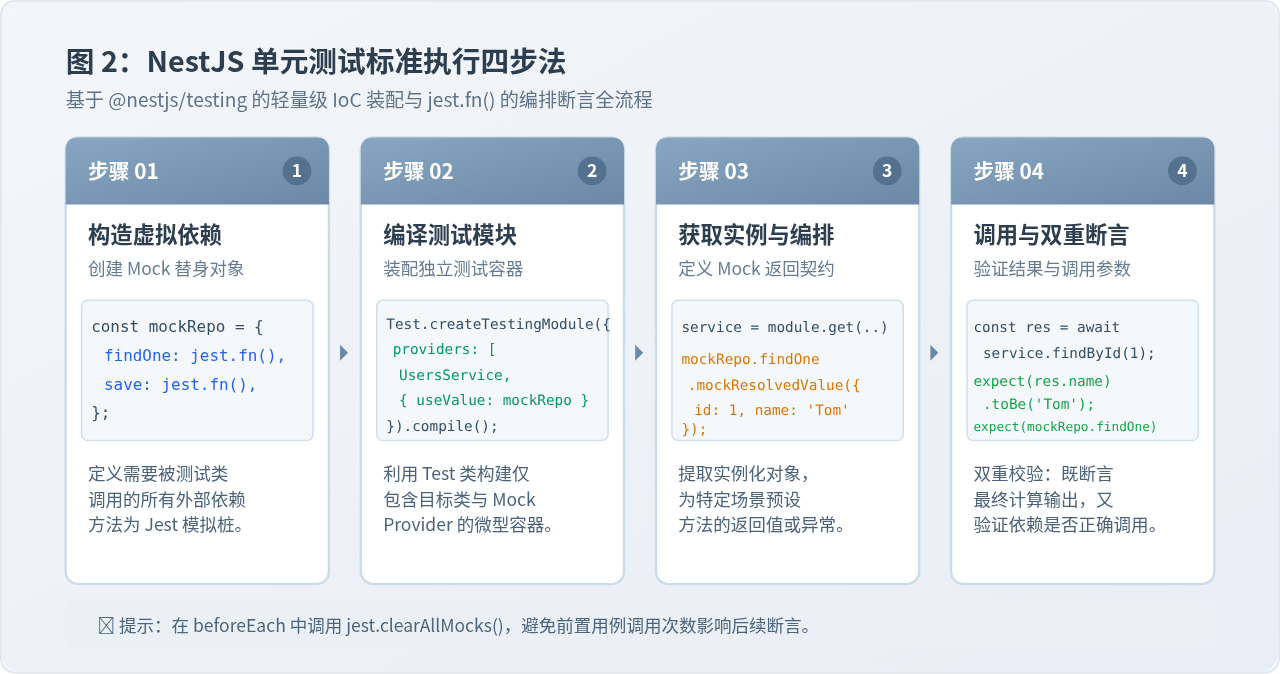
单元测试的编写遵循“准备(Arrange)、执行(Act)、断言(Assert)”原则。在 NestJS 中,我们利用 @nestjs/testing 导出的 Test.createTestingModule 动态构建微型 IoC 容器,把非测试目标依赖全部替换为 Mock 桩。
1. 业务场景定义
假设我们有一个用户模块,包含 UsersService 与 UsersController。Service 依赖 TypeORM 的用户仓储(Repository)查询与创建用户:
import { Injectable, NotFoundException } from '@nestjs/common';
import { InjectRepository } from '@nestjs/typeorm';
import { Repository } from 'typeorm';
import { User } from './entities/user.entity';
import { CreateUserDto } from './dto/create-user.dto';

@Injectable()
export class UsersService {
  constructor(
    @InjectRepository(User)
    private readonly userRepository: Repository<User>,
  ) {}

  async findById(id: number): Promise<User> {
    const user = await this.userRepository.findOne({ where: { id } });
    if (!user) {
      throw new NotFoundException(`User with ID ${id} not found`);
    }
    return user;
  }

  async create(dto: CreateUserDto): Promise<User> {
    const newUser = this.userRepository.create(dto);
    return await this.userRepository.save(newUser);
  }
}
2. 编写 Service 单元测试与依赖 Mock
在测试 UsersService 时,我们不需要真实的数据库连接。利用 getRepositoryToken(User) 作为 Injection Token,将仓储替换为一个具有 findOne、create 和 save 模拟函数的对象:
import { Test, TestingModule } from '@nestjs/testing';
import { getRepositoryToken } from '@nestjs/typeorm';
import { NotFoundException } from '@nestjs/common';
import { UsersService } from './users.service';
import { User } from './entities/user.entity';

describe('UsersService', () => {
  let service: UsersService;

  // 1. 声明 Mock 依赖仓储
  const mockUserRepository = {
    findOne: jest.fn(),
    create: jest.fn(),
    save: jest.fn(),
  };

  beforeEach(async () => {
    // 重置所有 Mock 函数的调用状态与返回值
    jest.clearAllMocks();

    // 2. 编译轻量级测试容器
    const module: TestingModule = await Test.createTestingModule({
      providers: [
        UsersService,
        {
          provide: getRepositoryToken(User),
          useValue: mockUserRepository,
        },
      ],
    }).compile();

    // 3. 提取被测服务实例
    service = module.get<UsersService>(UsersService);
  });

  describe('findById', () => {
    it('当用户存在时,应成功返回用户实体', async () => {
      const expectedUser = { id: 1, name: '张三', email: 'zhangsan@example.com' };
      mockUserRepository.findOne.mockResolvedValue(expectedUser);

      // 4. 执行并断言
      const result = await service.findById(1);

      expect(result).toEqual(expectedUser);
      expect(mockUserRepository.findOne).toHaveBeenCalledWith({ where: { id: 1 } });
      expect(mockUserRepository.findOne).toHaveBeenCalledTimes(1);
    });

    it('当用户不存在时,应抛出 NotFoundException 异常', async () => {
      mockUserRepository.findOne.mockResolvedValue(null);

      // 断言异步异常抛出
      await expect(service.findById(999)).rejects.toThrow(NotFoundException);
      expect(mockUserRepository.findOne).toHaveBeenCalledWith({ where: { id: 999 } });
    });
  });

  describe('create', () => {
    it('应正确调用仓储方法并返回新建用户', async () => {
      const dto = { name: '李四', email: 'lisi@example.com' };
      const createdEntity = { id: 2, ...dto };

      mockUserRepository.create.mockReturnValue(createdEntity);
      mockUserRepository.save.mockResolvedValue(createdEntity);

      const result = await service.create(dto);

      expect(mockUserRepository.create).toHaveBeenCalledWith(dto);
      expect(mockUserRepository.save).toHaveBeenCalledWith(createdEntity);
      expect(result).toEqual(createdEntity);
    });
  });
});
关键点说明:每次执行测试用例前,必须在 beforeEach 中调用 jest.clearAllMocks()。否则前一个测试用例对 Mock 函数的调用记录(如调用次数、调用参数)会污染后续用例的断言结果。
3. 编写 Controller 单元测试
Controller 的单元测试用于检验路由方法是否正确调用了 Service,并如实转发返回值。此时测试目标是 Controller,被 Mock 的则是 Service 接口:
import { Test, TestingModule } from '@nestjs/testing';
import { UsersController } from './users.controller';
import { UsersService } from './users.service';

describe('UsersController', () => {
  let controller: UsersController;
  let service: UsersService;

  const mockUsersService = {
    findById: jest.fn(),
    create: jest.fn(),
  };

  beforeEach(async () => {
    jest.clearAllMocks();

    const module: TestingModule = await Test.createTestingModule({
      controllers: [UsersController],
      providers: [
        {
          provide: UsersService,
          useValue: mockUsersService,
        },
      ],
    }).compile();

    controller = module.get<UsersController>(UsersController);
    service = module.get<UsersService>(UsersService);
  });

  it('GET /users/:id 应当调用 UsersService.findById', async () => {
    const mockUser = { id: 1, name: '王五' };
    mockUsersService.findById.mockResolvedValue(mockUser);

    const result = await controller.findOne('1');

    expect(service.findById).toHaveBeenCalledWith(1);
    expect(result).toEqual(mockUser);
  });
});
三、使用 Supertest 编写端到端(E2E)测试
单元测试只能验证代码逻辑分支,无法验证“HTTP 路径是否拼错”、“DTO 校验是否生效”、“JWT 鉴权中间件是否放行”等系统级集成问题。NestJS 在 test/ 目录下独立配置了端到端测试工程,通过 Supertest 发起仿真网络调用。
1. E2E 测试环境配置与生命周期
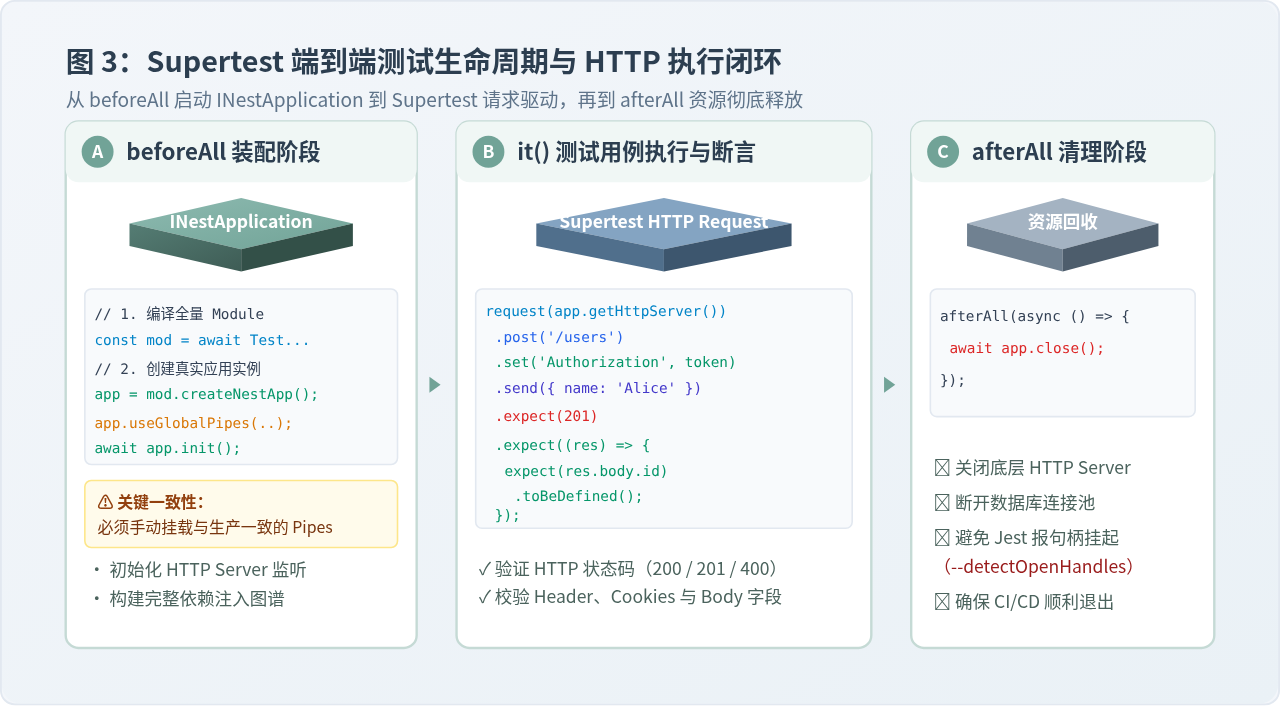
端到端测试的核心在于启动一个完整的 INestApplication 实例。必须注意,在生产环境 main.ts 中配置的全局管道(如 ValidationPipe)、异常过滤器等,在 E2E 测试中不会自动继承,必须显式在测试容器初始化时挂载:
import { Test, TestingModule } from '@nestjs/testing';
import { INestApplication, ValidationPipe } from '@nestjs/common';
import * as request from 'supertest';
import { AppModule } from '../src/app.module';

describe('UsersController (e2e)', () => {
  let app: INestApplication;

  beforeAll(async () => {
    // 1. 加载主应用模块或测试专用模块
    const moduleFixture: TestingModule = await Test.createTestingModule({
      imports: [AppModule],
    }).compile();

    app = moduleFixture.createNestApplication();

    // 2. 关键步骤:显式注入全局校验管道以保持环境一致性
    app.useGlobalPipes(
      new ValidationPipe({
        whitelist: true,
        forbidNonWhitelisted: true,
        transform: true,
      }),
    );

    // 3. 初始化 NestJS 应用及其底层 HTTP 适配器
    await app.init();
  });

  afterAll(async () => {
    // 4. 关键步骤:显式释放底层 HTTP 监听器与数据库连接池
    await app.close();
  });

  describe('/users (POST)', () => {
    it('当入参完整合法时,应成功创建用户并返回 HTTP 201', () => {
      const payload = {
        name: '赵六',
        email: 'zhaoliu@example.com',
      };

      return request(app.getHttpServer())
        .post('/users')
        .send(payload)
        .expect(201)
        .expect((res) => {
          expect(res.body).toHaveProperty('id');
          expect(res.body.name).toBe(payload.name);
          expect(res.body.email).toBe(payload.email);
        });
    });

    it('当邮箱格式非法时,应被 ValidationPipe 拦截并返回 HTTP 400', () => {
      const invalidPayload = {
        name: '赵六',
        email: 'not-an-email',
      };

      return request(app.getHttpServer())
        .post('/users')
        .send(invalidPayload)
        .expect(400)
        .expect((res) => {
          expect(res.body.message).toEqual(
            expect.arrayContaining(['email must be an email']),
          );
        });
    });
  });

  describe('/users/:id (GET)', () => {
    it('查询不存在的 ID 时,应触发 NotFoundException 并返回 HTTP 404', () => {
      return request(app.getHttpServer())
        .get('/users/99999')
        .expect(404)
        .expect((res) => {
          expect(res.body.message).toContain('not found');
        });
    });
  });
});
防坑提醒:在 afterAll 中必须执行 await app.close()。若遗漏此步,NestJS 内部的 HTTP 监听套接字或数据库连接池会持续驻留内存,导致 Jest 在用例全部执行完成后报错:Jest has detected the following 1 open handle potentially keeping Jest from exiting。
四、测试执行命令与输出解析
在项目的 package.json 中,默认定义了针对单元测试与 E2E 测试的执行脚本。两者的 Jest 配置文件与匹配规则各自独立:
"scripts": {
  "test": "jest",
  "test:watch": "jest --watch",
  "test:cov": "jest --coverage",
  "test:e2e": "jest --config ./test/jest-e2e.json --detectOpenHandles"
}
执行单元测试命令:
npm run test示例输出:
 PASS  src/users/users.service.spec.ts
 PASS  src/users/users.controller.spec.ts

Test Suites: 2 passed, 2 total
Tests:       5 passed, 5 total
Snapshots:   0 total
Time:        1.242 s
Ran all test suites.
执行端到端测试命令:
npm run test:e2e示例输出:
 PASS  test/users.e2e-spec.ts
  UsersController (e2e)
    /users (POST)
      ✓ 当入参完整合法时,应成功创建用户并返回 HTTP 201 (182 ms)
      ✓ 当邮箱格式非法时,应被 ValidationPipe 拦截并返回 HTTP 400 (45 ms)
    /users/:id (GET)
      ✓ 查询不存在的 ID 时,应触发 NotFoundException 并返回 HTTP 404 (38 ms)

Test Suites: 1 passed, 1 total
Tests:       3 passed, 3 total
Snapshots:   0 total
Time:        2.854 s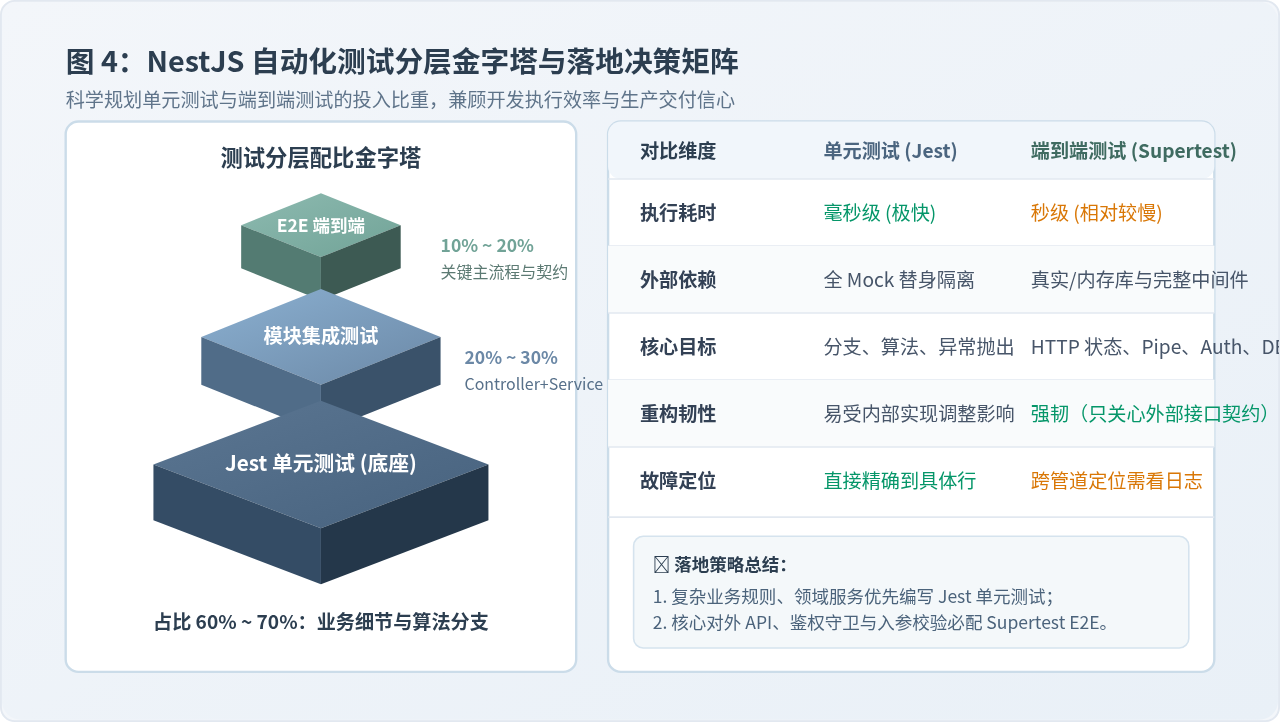
五、工程实践总结与关键注意事项
为了让测试既能有效拦截线上缺陷,又不会因为维护成本过高而成为团队负担,建议遵循以下工程规范:
-
依赖替换颗粒度把握:编写单元测试时,只对被测类的直接协作对象进行 Mock。切勿通过
jest.spyOn侵入私有方法或过度破坏面向对象封装。如果一个 Service 依赖超过 5 个外部类,往往意味着单一职责被打破,应优先考虑代码重构而非堆砌复杂的 Mock 结构。 - E2E 测试数据库隔离:端到端测试中,建议为测试环境配置专用的测试数据库(例如 Docker 容器中的 PostgreSQL 实例,或内存型 SQLite 数据库)。在测试用例集执行完毕后,通过数据库事务回滚或数据表清空钩子,避免持久化脏数据影响后续用例。
-
守卫(Guards)与全局配置对齐:如果生产环境依赖了全局路由前缀(
app.setGlobalPrefix('api'))或身份验证守卫(如 JWT Guard),在 E2E 容器中需通过overrideGuard()或加载对应环境配置,保证测试流量能真实模拟生产通信规范。 -
持续集成(CI)流水线设计:在 CI 流水线中,建议先并行执行轻量的
npm run test(单元测试),在全部通过后再串行触发npm run test:e2e。这样可以在代码存在基础逻辑错误时秒级阻断构建,大幅节省计算资源与等待时间。
Java和JavaScript应用场景对比:企业级后端 vs Web前端与Node.js
2026-11-04 16:42:01
JavaScript模块化开发入门:CommonJS与ES Module的区别
2026-11-03 23:31:34
怎么创建并运行第一个js文件
2026-11-03 21:49:02
JavaScript运行环境怎么搭建?Node.js官方下载与安装教程
2026-11-03 20:03:04
NestJS 集成 TypeORM 或 Prisma 实现数据库持久化操作
2026-11-03 18:56:13