怎么优化JS拖拽排序性能?大数据量下的虚拟滚动结合实践
深入解析万级以上大数据量下前端拖拽排序的性能瓶颈与实战解法。通过结合虚拟滚动机制、坐标投影映射算法、脱离文档流的GPU独立克隆图层与基于requestAnimationFrame的边缘自动滚动,彻底消除DOM重排卡顿,实现稳定60FPS的极致体验。
一、为什么大数据量拖拽排序会严重卡顿?
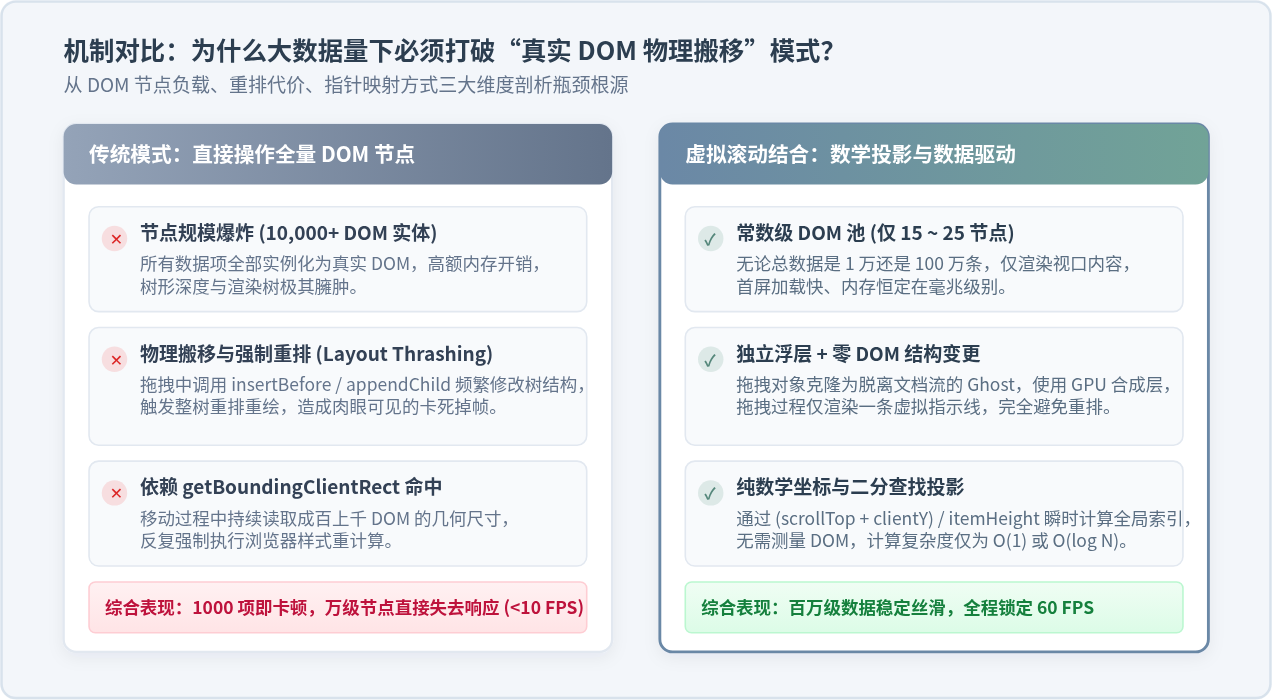
在常规的前端页面中,若列表仅有几十或上百个条目,直接使用 HTML5 原生 Drag and Drop API 或者像 SortableJS 这样的通用库,操作体验通常非常轻快。但当列表数据膨胀至数千、上万条时,页面往往会在指针按下的瞬间冻结,拖拽过程中出现严重的鼠标跟手延迟、视口掉帧甚至浏览器标签页假死。这种性能悬崖的本质原因主要集中在三个技术层面:
| 瓶颈环节 | 传统模式做法 | 浏览器底层开销 | 性能表现 |
|---|---|---|---|
| DOM 节点规模 | 10,000+ 数据项全量渲染为 DOM | 渲染树极其庞大,单个节点变化引发链式标记 | 初始渲染白屏长,基础内存占用高(>100MB) |
| 拖拽命中检测 | 循环调用 getBoundingClientRect() |
在每一帧(16.6ms)内强制触发样式计算与布局重排 | 导致严重的 Layout Thrashing,掉帧至 10~15 FPS |
| 占位与排序反馈 | 实时调用 insertBefore / appendChild |
频繁修改真实 DOM 树拓扑结构,持续触发布局与重绘 | 视口剧烈闪烁,页面完全卡死并丢弃指针事件 |
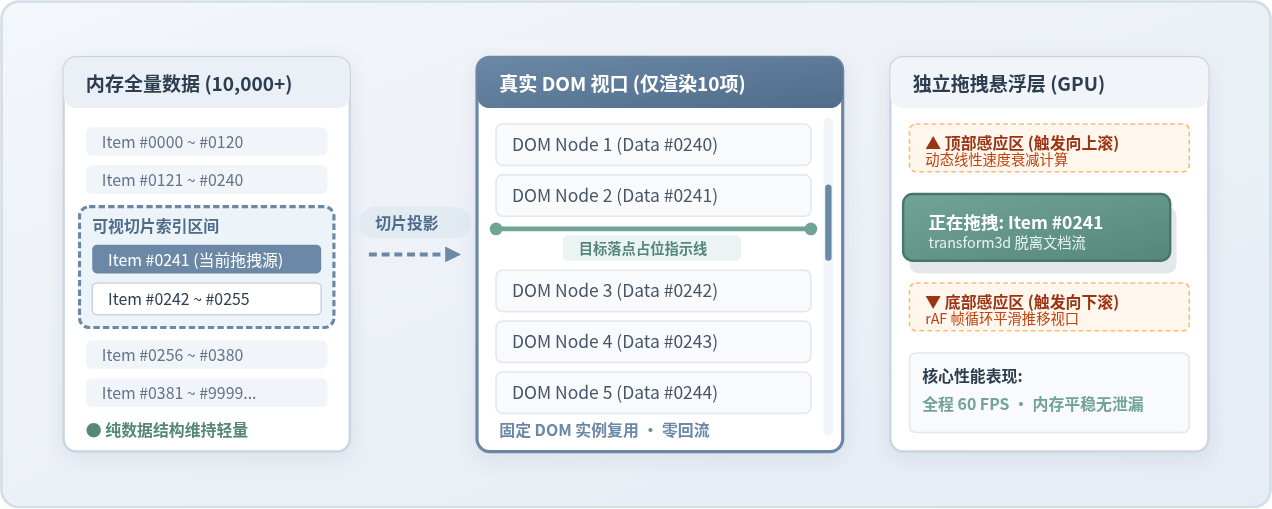
要打破这个死局,核心就在于将“DOM 节点的物理移动”转变为“虚拟视口中的数据数学映射”。
二、虚拟滚动与拖拽结合的四大核心冲突
理解了为什么需要虚拟滚动后,实际工程落地时往往会遇到全新挑战。很多开发者尝试把现有拖拽库套在虚拟列表外部,结果发现完全无法工作。这是因为虚拟滚动与拖拽排序之间存在着根本性的设计冲突:
1. 真实 DOM 缺失与占位定位脱节
传统拖拽依赖 DOM 树中的相邻兄弟节点来确定插入位置(例如通过 target.nextSibling 进行插队)。但在虚拟滚动中,可视区域之外的节点根本没有被渲染到 DOM 中。如果要将第 10 项拖拽到第 500 项,目标位置在当前屏幕上根本不存在对应的 DOM 元素,物理查找必然失效。
2. 视口滚动与拖拽跟踪的动态偏差
当用户拖动元素到容器顶部或底部边缘时,虚拟列表必须向下或向上高速滚动。在普通列表中,容器滚动由浏览器原生机制处理;而在虚拟列表中,滚动意味着数据切片 [startIndex, endIndex] 在持续变更,DOM 节点在不停地被重用和位移。如果缺乏精细的坐标换算,拖拽悬浮层与目标指示线就会瞬间“漂移”甚至错乱。
3. 重渲染闪烁与拖拽对象状态丢失
如果在拖拽过程中直接修改原始数组来驱动视图更新,虚拟滚动会立即触发切片重绘,导致正在被拖动的 DOM 节点被销毁并重新生成,进而导致浏览器的 pointermove 事件丢失、焦点脱落,产生肉眼可见的闪烁甚至直接中断拖拽手势。
4. 从“DOM 驱动”到“数据投影驱动”的范式转变
解决上述所有冲突的唯一正确方法,是进行分层解耦:
- 拖拽本体脱离文档流: 指针按下后,立刻克隆生成一个脱离文档流的 Ghost 悬浮元素(挂载于全局或独立图层),使用 GPU 加速的
transform: translate3d(...)紧跟指针。 - 占位完全虚拟化: 拖拽过程中,不在列表中插入任何真实列表项 DOM,仅在虚拟容器内渲染一条极轻量的绝对定位指示线(Drop Indicator),标示预估落点。
- 落点依靠纯数学运算: 不通过 DOM 几何碰撞,而是利用指针在容器内的绝对坐标
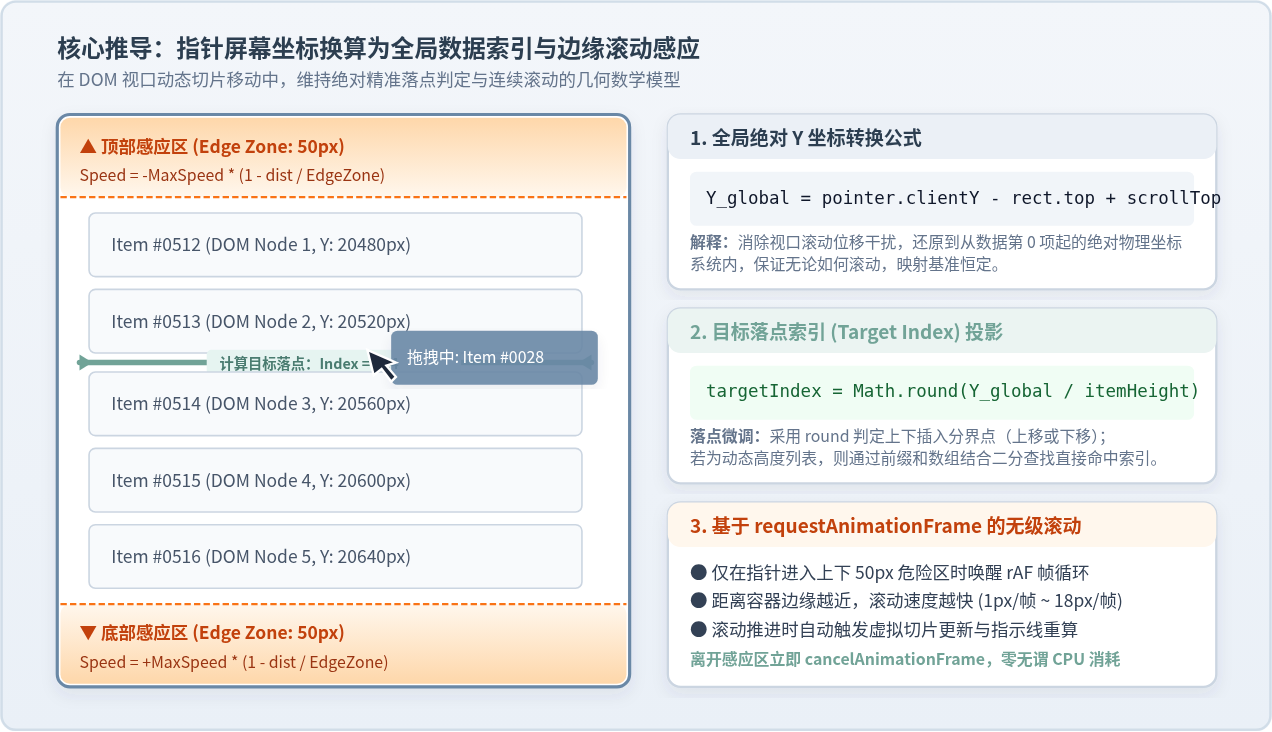
Y_global = pointerY - containerTop + scrollTop,以 O(1) 时间复杂度直接推导出对应的全局数组索引。
三、核心算法推导:从屏幕坐标到全局索引
将屏幕上的物理像素准确换算为数据数组中的下标,是保证万级数据拖拽丝滑命中的数学基础。我们重点分析固定高度场景与动态高度场景下的计算模型。
1. 固定行高场景(Fixed Height)
假设列表每项高度恒为 itemHeight(例如 48px),容器当前滚动距离为 scrollTop,容器在视口中的顶部距离为 containerRect.top,当前指针垂直坐标为 pointerClientY。
指针在全量数据长画布中的绝对 Y 轴投影坐标 yGlobal 为:
const yGlobal = (pointerClientY - containerRect.top) + containerElement.scrollTop;此时目标插入索引 targetIndex 可以通过四舍五入直接求得:
const targetIndex = Math.min(
  totalCount,
  Math.max(0, Math.round(yGlobal / itemHeight))
);
使用 Math.round 而非 Math.floor 的好处在于:当指针位于某项上半部分时,指示线吸附到该项上方;当指针滑过中间线进入下半部分时,指示线自动下移至该项下方,完全符合人类直觉。
2. 动态行高场景(Dynamic Height)
如果每项高度不固定,则不能使用整除法。此时需要维护一个预估或已测量的高度前缀和数组(Prefix Sum Array):
// prefixSums[i] 存储前 i 项的总高度累计值
prefixSums[i] = prefixSums[i - 1] + itemHeights[i - 1];
由于 prefixSums 具有单调递增特性,通过二分查找(Binary Search)算法,可以在 O(log N) 的极短时间内(对于 100,000 条数据仅需约 17 次比较)快速定位到 yGlobal 所落入的索引区间,保证每帧计算时间远小于 0.5 毫秒。
3. 边缘无级自动滚动器(Smooth Edge Scroller)
当用户拖动元素靠近容器顶部或底部边缘时,必须自动匀速或加速滚动视口,以便探索视口外的长列表。许多简陋的实现使用固定步长的 setInterval,导致滚动节奏僵硬且容易与系统刷新率产生撕裂。
最佳实践是基于 requestAnimationFrame 建立自适应无级循环:
- 定义边缘感应危险区宽度(如
EDGE_SIZE = 50px); - 根据指针距离边界的深度 d,按比例线性换算滚动速度:
speed = maxSpeed * (1 - dist / EDGE_SIZE); - 在 rAF 每一帧回调中执行
container.scrollTop += speed,并立即重绘虚拟切片与指示线。当指针离开危险区时,立即注销 rAF,恢复零消耗状态。
四、五步落地实战:从零实现生产级虚拟拖拽列表
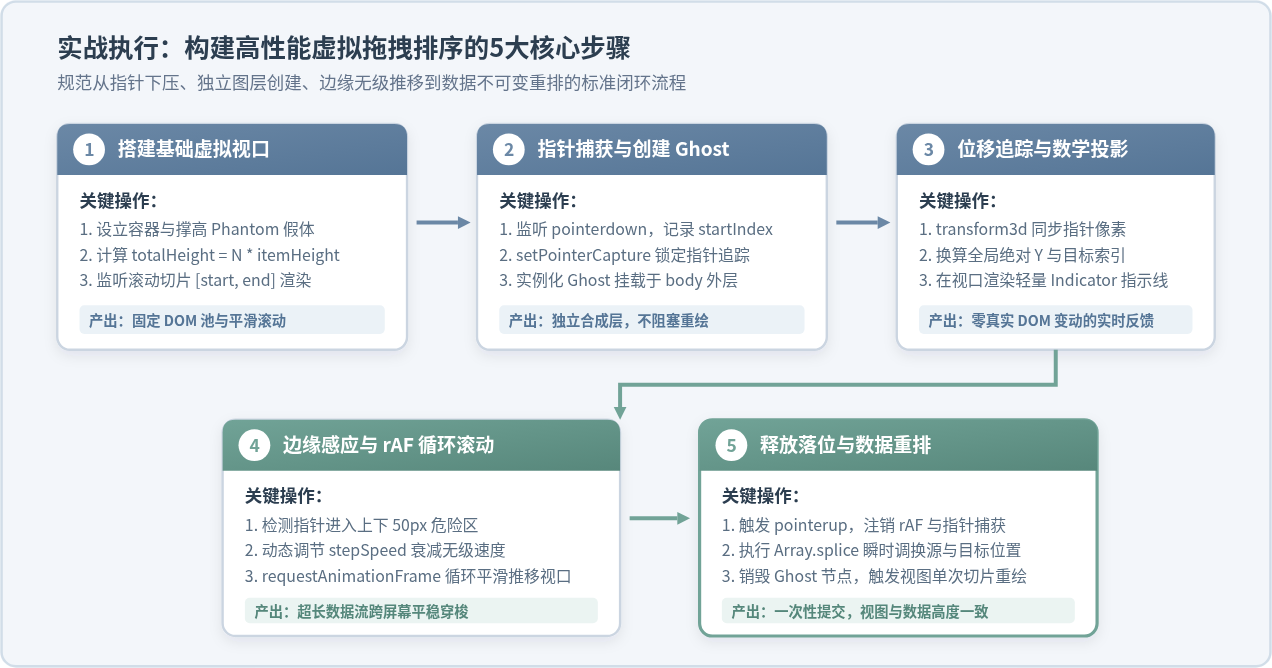
下面我们将通过一套完整、严谨的原生 JavaScript 示例代码,演示如何从零构建一个能够承载 100,000 条数据并支持拖拽重排的高性能组件。所有步骤保持自包含与生产级规范,便于直接集成到任何技术栈中。
步骤一:HTML 骨架与绝对分层样式
虚拟滚动的核心在于设立一个隐藏的占位假体(Phantom)来撑开滚动条,同时保留一个轻量的真实 DOM 容器池:
<div id="virtual-container" class="virtual-container">
  <!-- 撑开真实滚动高度的占位假体 -->
  <div id="virtual-phantom" class="virtual-phantom"></div>
  <!-- 实际挂载 DOM 的列表池 -->
  <div id="virtual-content" class="virtual-content"></div>
  <!-- 目标落点指示线 -->
  <div id="drop-indicator" class="drop-indicator" style="display: none;"></div>
</div>
配套的关键 CSS 样式设计如下:
.virtual-container {
  position: relative;
  height: 500px;
  overflow-y: auto;
  border: 1px solid #CBD5E1;
  background: #FFFFFF;
  border-radius: 8px;
  contain: strict; /* 关键:隔离容器重排,防止影响外部页面 */
  user-select: none;
}

.virtual-phantom {
  position: absolute;
  left: 0;
  top: 0;
  right: 0;
  z-index: -1;
}

.virtual-content {
  position: absolute;
  left: 0;
  top: 0;
  right: 0;
  will-change: transform;
}

.list-item {
  height: 48px;
  box-sizing: border-box;
  padding: 0 16px;
  display: flex;
  align-items: center;
  border-bottom: 1px solid #F1F5F9;
  background: #FFFFFF;
  cursor: grab;
}

.list-item:active {
  cursor: grabbing;
}

/* 目标插入指示线 */
.drop-indicator {
  position: absolute;
  left: 0;
  right: 0;
  height: 3px;
  background: #71A397;
  pointer-events: none;
  z-index: 10;
  transform: translateY(-50%);
}

/* 独立拖拽浮层 (Ghost) */
.drag-ghost {
  position: fixed;
  pointer-events: none;
  z-index: 9999;
  opacity: 0.92;
  box-shadow: 0 8px 24px rgba(44, 62, 80, 0.2);
  border: 1.5px solid #6B88A6;
  border-radius: 6px;
  background: #FFFFFF;
  will-change: transform;
}
步骤二至步骤五:完整逻辑代码实现
以下是具备完整视口计算、指针捕获(Pointer Capture)、坐标投影与 rAF 边缘滚动的核心类实现:
class VirtualDragList {
  constructor(options) {
    this.container = options.container;
    this.phantom = options.phantom;
    this.content = options.content;
    this.indicator = options.indicator;
    this.itemHeight = options.itemHeight || 48;
    this.buffer = options.buffer || 4; // 视口上下预渲染缓冲行数
    this.edgeZone = 50; // 边缘感应触发区(px)
    this.maxScrollSpeed = 16; // 边缘滚动最大速度(px/frame)

    this.items = options.data || [];
    this.totalCount = this.items.length;
    this.visibleCount = Math.ceil(this.container.clientHeight / this.itemHeight);

    // 拖拽运行时状态
    this.isDragging = false;
    this.dragSourceIndex = -1;
    this.targetIndex = -1;
    this.ghostEl = null;
    this.dragPointerOffsetY = 0;
    this.rafId = null;
    this.currentPointerClientY = 0;

    this.init();
  }

  init() {
    // 1. 设置假体全量高度
    this.phantom.style.height = `${this.totalCount * this.itemHeight}px`;

    // 2. 绑定滚动监听 (采用 passive 优化触控性能)
    this.container.addEventListener('scroll', () => this.render(), { passive: true });

    // 3. 绑定指针手势事件
    this.content.addEventListener('pointerdown', (e) => this.onPointerDown(e));

    // 初始首屏渲染
    this.render();
  }

  // 虚拟切片渲染核心
  render() {
    const scrollTop = this.container.scrollTop;

    // 计算切片起止索引
    const startIndex = Math.max(0, Math.floor(scrollTop / this.itemHeight) - this.buffer);
    const endIndex = Math.min(this.totalCount, startIndex + this.visibleCount + this.buffer * 2);
    const offsetY = startIndex * this.itemHeight;

    // 仅移动容器偏移,不触发布局树变动
    this.content.style.transform = `translate3d(0, ${offsetY}px, 0)`;

    // 局部渲染切片数据 (在真实工程中建议复用 DOM 池)
    const visibleData = this.items.slice(startIndex, endIndex);
    this.content.innerHTML = visibleData.map((item, idx) => {
      const realIndex = startIndex + idx;
      const isSource = this.isDragging && realIndex === this.dragSourceIndex;
      return `
        <div class="list-item" data-index="${realIndex}" style="opacity: ${isSource ? '0.3' : '1'}">
          <span style="color: #64748B; width: 60px; font-size: 12px;">#${item.id}</span>
          <span style="font-weight: 500; color: #1E293B;">${item.text}</span>
        </div>
      `;
    }).join('');

    // 若拖拽进行中,重新定位指示线
    if (this.isDragging) {
      this.updateIndicatorPosition();
    }
  }

  onPointerDown(e) {
    const targetItem = e.target.closest('.list-item');
    if (!targetItem || e.button !== 0) return; // 仅响应鼠标左键或触控

    this.isDragging = true;
    this.dragSourceIndex = parseInt(targetItem.getAttribute('data-index'), 10);
    this.targetIndex = this.dragSourceIndex;

    const itemRect = targetItem.getBoundingClientRect();
    this.dragPointerOffsetY = e.clientY - itemRect.top;
    this.currentPointerClientY = e.clientY;

    // 创建独立 GPU 悬浮克隆层
    this.createGhost(targetItem, itemRect);

    // 锁定指针捕获,防止光标滑出视口导致事件丢失
    this.container.setPointerCapture(e.pointerId);

    // 绑定移动与释放事件
    this.onPointerMoveHandler = (ev) => this.onPointerMove(ev);
    this.onPointerUpHandler = (ev) => this.onPointerUp(ev);

    window.addEventListener('pointermove', this.onPointerMoveHandler);
    window.addEventListener('pointerup', this.onPointerUpHandler);

    this.indicator.style.display = 'block';
    this.updateIndicatorPosition();
    this.render(); // 调暗源条目透明度
  }

  createGhost(sourceEl, rect) {
    this.ghostEl = sourceEl.cloneNode(true);
    this.ghostEl.className = 'list-item drag-ghost';
    this.ghostEl.style.width = `${rect.width}px`;
    this.ghostEl.style.height = `${rect.height}px`;
    this.ghostEl.style.transform = `translate3d(${rect.left}px, ${rect.top}px, 0)`;
    document.body.appendChild(this.ghostEl);
  }

  onPointerMove(e) {
    if (!this.isDragging) return;
    this.currentPointerClientY = e.clientY;

    // 1. 同步移动 Ghost 悬浮层 (GPU 加速)
    const ghostY = e.clientY - this.dragPointerOffsetY;
    const containerRect = this.container.getBoundingClientRect();
    this.ghostEl.style.transform = `translate3d(${containerRect.left}px, ${ghostY}px, 0)`;

    // 2. 检查并启动边缘自动滚动循环
    this.checkAutoScroll(containerRect, e.clientY);

    // 3. 计算目标落点索引
    this.calcTargetIndex(containerRect, e.clientY);
  }

  calcTargetIndex(containerRect, clientY) {
    const scrollTop = this.container.scrollTop;
    const relativeY = clientY - containerRect.top + scrollTop;

    // 通过纯数学除法推算全局目标索引
    let calculatedIndex = Math.round(relativeY / this.itemHeight);
    this.targetIndex = Math.max(0, Math.min(this.totalCount, calculatedIndex));

    this.updateIndicatorPosition();
  }

  updateIndicatorPosition() {
    const scrollTop = this.container.scrollTop;
    const indicatorAbsoluteY = this.targetIndex * this.itemHeight;
    // 换算为容器可视区内的相对 Y
    const relativeIndicatorY = indicatorAbsoluteY - scrollTop;

    // 如果指示线在视口范围外部,隐藏或置于边界
    if (relativeIndicatorY < 0 || relativeIndicatorY > this.container.clientHeight) {
      this.indicator.style.display = 'none';
    } else {
      this.indicator.style.display = 'block';
      this.indicator.style.top = `${relativeIndicatorY}px`;
    }
  }

  checkAutoScroll(containerRect, clientY) {
    const topDist = clientY - containerRect.top;
    const bottomDist = containerRect.bottom - clientY;

    let speed = 0;
    if (topDist > 0 && topDist < this.edgeZone) {
      // 距离顶部越近,向上滚动速度越快 (负值)
      speed = -this.maxScrollSpeed * (1 - topDist / this.edgeZone);
    } else if (bottomDist > 0 && bottomDist < this.edgeZone) {
      // 距离底部越近,向下滚动速度越快 (正值)
      speed = this.maxScrollSpeed * (1 - bottomDist / this.edgeZone);
    }

    if (speed !== 0) {
      if (!this.rafId) {
        this.startAutoScrollLoop(speed);
      } else {
        this.currentScrollSpeed = speed; // 动态更新速度
      }
    } else {
      this.stopAutoScrollLoop();
    }
  }

  startAutoScrollLoop(initialSpeed) {
    this.currentScrollSpeed = initialSpeed;
    const step = () => {
      if (!this.isDragging) return;

      this.container.scrollTop += this.currentScrollSpeed;
      // 滚动后容器几何更新,需立即重新推导目标索引
      const containerRect = this.container.getBoundingClientRect();
      this.calcTargetIndex(containerRect, this.currentPointerClientY);

      this.rafId = requestAnimationFrame(step);
    };
    this.rafId = requestAnimationFrame(step);
  }

  stopAutoScrollLoop() {
    if (this.rafId) {
      cancelAnimationFrame(this.rafId);
      this.rafId = null;
    }
  }

  onPointerUp(e) {
    if (!this.isDragging) return;

    // 1. 释放边缘滚动与指针事件
    this.stopAutoScrollLoop();
    window.removeEventListener('pointermove', this.onPointerMoveHandler);
    window.removeEventListener('pointerup', this.onPointerUpHandler);
    try {
      this.container.releasePointerCapture(e.pointerId);
    } catch (err) {}

    // 2. 清理悬浮层与指示线
    if (this.ghostEl) {
      this.ghostEl.remove();
      this.ghostEl = null;
    }
    this.indicator.style.display = 'none';

    // 3. 提交数据重排 (Array.splice 瞬间完成)
    const from = this.dragSourceIndex;
    let to = this.targetIndex;

    if (from !== -1 && to !== -1 && from !== to) {
      // 向上或向下移动时的索引修正
      if (from < to) to--;
      const [movedItem] = this.items.splice(from, 1);
      this.items.splice(to, 0, movedItem);
    }

    // 4. 重置状态并刷新视图
    this.isDragging = false;
    this.dragSourceIndex = -1;
    this.targetIndex = -1;
    this.render();
  }
}

// 验证用例:初始化 100,000 条大数据测试
const mockData = Array.from({ length: 100000 }, (_, i) => ({
  id: i + 1,
  text: `数据项目 ${i + 1} - 高性能拖拽排序验证条目`
}));

new VirtualDragList({
  container: document.getElementById('virtual-container'),
  phantom: document.getElementById('virtual-phantom'),
  content: document.getElementById('virtual-content'),
  indicator: document.getElementById('drop-indicator'),
  itemHeight: 48,
  data: mockData
});
五、进阶工程优化与边界问题防护
在生产环境中投入使用时,为了应对低端设备、高分辨率屏幕或复杂业务交互,还可以引入以下针对性的工程优化措施:
为虚拟滚动容器添加 contain: strict; 或 contain: layout paint;。该属性向浏览器声明当前容器与外部文档流在几何与排版上完全独立。即使容器内部因为滚动发生微小的 DOM 刷新,也不会向上冒泡触发整页重排。
拖拽的 Ghost 元素与内容承载容器设置 will-change: transform;。这会提示浏览器渲染引擎在合成线程中为其分配专用的显存图层(Compositing Layer),所有位移操作直接由 GPU 进行矩阵运算,绕过主线程的 CPU 绘制管道。
避免在 pointermove 回调中反复声明大对象或闭包。Ghost 节点只在 pointerdown 创建一次并在 pointerup 销毁,切勿在每帧移动中重复销毁创建。同时务必保证 scroll 监听器声明为 { passive: true },避免阻塞浏览器的平滑滚动主流程。
六、常见问题排查与调试清单
Q1:快速边缘滚动时,为什么列表有时会出现短暂的空白?
根本原因: 主线程在执行高频计算时被暂时阻塞,或者缓冲区大小设置不足。当视口以 20px/帧高速推移时,若 buffer 仅设为 1~2,新切片尚未完成渲染便已进入视口。
修复对策: 将 buffer 动态扩大至 4~6 项,并在边缘滚动活跃时适当限制最大步进速度;同时确保没有在滚动事件中同步执行耗时较长的业务逻辑。
Q2:如果列表项高度不固定(如含有动态折叠面板或多行文本),如何准确计算落点?
根本原因: 动态高度无法直接通过除法获得索引。若逐个测量真实 DOM,则会导致频繁的样式重计算。
修复对策: 采用“预估高度 + 尺寸缓存池”策略。未渲染条目先使用预估默认高度撑高,当条目首次滑入视口渲染后,通过 ResizeObserver 异步测量真实高度并更新尺寸缓存树。在拖拽判断落点时,通过维护的前缀和数组结合二分查找直接进行投影定位。
Q3:在 Vue 3 或 React 现代响应式框架中如何优雅整合?
根本原因: 频繁更新响应式状态会导致框架反复触发虚拟 DOM 的 Diff 算法,抵消虚拟滚动的性能优势。
最佳实践: 在拖拽过程中,绝对不要将实时的指针坐标与中间目标索引写入 Vue 的 ref/reactive 或 React 的 useState。应当使用原生 DOM 修改指示线样式与 Ghost 位移;仅在用户松开手指的 pointerup 最终时刻,才调用一次 array.splice 并提交到全局响应式状态中。这种“过程走原生,终态走响应式”的模式,能够彻底避免组件无谓的重复渲染。
tween.js 内存泄漏预防:怎么正确停止动画与清理对象
2026-11-05 15:52:56
Vue或React项目中为何不建议直接使用JS刷新页面
2026-11-05 13:57:30
哪里可以找到高质量的免费JS脚本资源?
2026-11-05 13:15:03
JS数组对象怎么根据指定ID字段去重
2026-11-04 21:41:10
JS数组去重方法性能对比:Set、Map与Filter谁更快
2026-11-04 16:14:15