

JS中5个冷门但实用的API:getBoundingClientRect、IntersectionObserver等详解
本文总结了JavaScript中五个相对冷门但极具实用价值的API。详细解析了getBoundingClientRect获取元素视口位置与尺寸、IntersectionObserver异步监听元素交叉状态、createNodeIterator遍历DOM节点、getComputedStyle获取最终CSS样式以及requestAnimationFrame优化动画流畅度的具体用法与场景。
getBoundingClientRect()
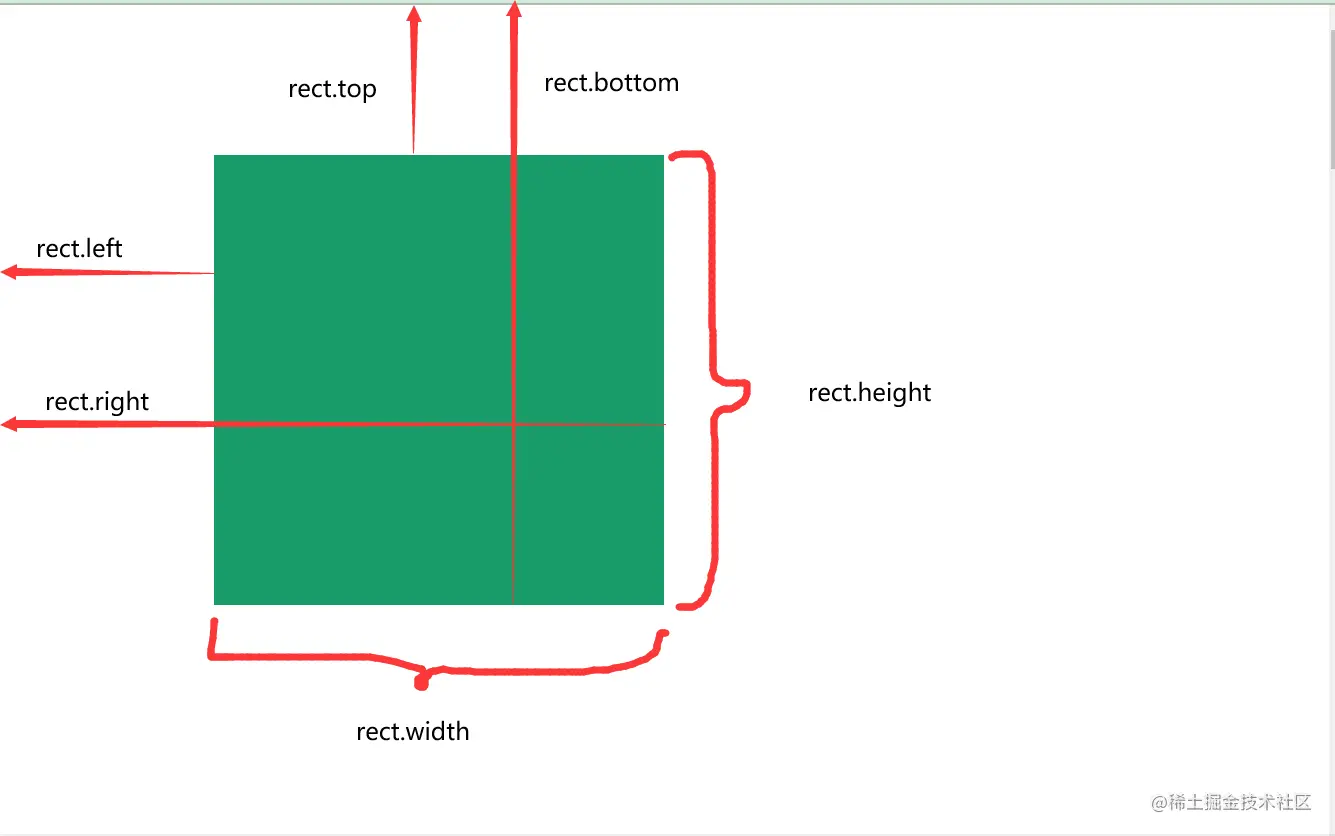
getBoundingClientRect() 用于获取元素在视口中的位置及尺寸信息,返回一个包含详细几何属性的 DOMRect 对象。
x:元素左边缘相对于视口左侧的 X 轴坐标值。y:元素上边缘相对于视口顶部的 Y 轴坐标值。width:元素的实际宽度。height:元素的实际高度。top:元素上边缘距离视口顶部的像素距离。right:元素右边缘距离视口左侧的像素距离。bottom:元素下边缘距离视口顶部的像素距离。left:元素左边缘距离视口左侧的像素距离。
const box = document.getElementById('box');
const rect = box.getBoundingClientRect();
console.log(rect.x);        // 元素左边界相对于视口的 x 坐标
console.log(rect.y);        // 元素上边界相对于视口的 y 坐标
console.log(rect.width);    // 元素的宽度
console.log(rect.height);   // 元素的高度
console.log(rect.top);      // 元素上边界相对于视口顶部的距离
console.log(rect.right);    // 元素右边界相对于视口左侧的距离
console.log(rect.bottom);   // 元素下边界相对于视口顶部的距离
console.log(rect.left);     // 元素左边界相对于视口左侧的距离
为便于理解,页面中设置了一个容器,其各属性对应关系如下图所示:
应用场景
该API常用于需要精确获取元素视口位置与尺寸的场景,如拖拽交互、绝对定位计算或响应式布局适配。其浏览器兼容性良好,常结合滚动事件使用。
在特定场景下尤为有用,例如淘宝网页的懒加载机制:当用户向下滚动时,若当前图片未完全离开可视区域,则提前加载下一张图片,实现平滑的懒加载效果。
以下代码用于判断指定容器是否处于可视窗口范围内:
 const box = document.getElementById('box')
 window.onscroll = function () {//window.addEventListener('scroll',()=>{})
  console.log(checkInView(box));
 }
function checkInView(dom) {
const { top, left, bottom, right } = dom.getBoundingClientRect();
 return top > 0 &&
        left > 0 &&
        bottom <= (window.innerHeight || document.documentElement.clientHeight) &&
       right <= (window.innerWidth ||
       document.documentElement.clientWidth)
}若容器位于可视区域内则返回true,否则返回false。
IntersectionObserver
IntersectionObserver 是一个构造函数,接收回调函数和配置对象两个参数。它用于异步监听目标元素与其祖先元素或视口之间的交叉状态变化,提供了一种高效检测元素可见性或进入视口的方法。
用法
使用 IntersectionObserver 需遵循以下步骤:
- 实例化
IntersectionObserver,传入回调函数及可选的配置对象。
const observer = new IntersectionObserver(callback, options);
const callback = (entries, observer) => {
  // 处理交叉状态变化的回调函数
};
const options = {
  // 可选配置
};- 将需要观察的目标元素注册到观察者实例中。
const target = document.querySelector('#targetElement');
observer.observe(target);- 在回调函数中处理交叉状态变化逻辑。
const callback = (entries, observer) => {
  entries.forEach(entry => {
    if (entry.isIntersecting) {
      // 元素进入视口
    } else {
      // 元素离开视口
    }
  });
};
entries 参数为包含各目标元素交叉状态信息的数组。每个 entry 对象包含以下属性:
target:被观察的目标元素。intersectionRatio:目标元素与视口的交叉比例,取值范围 0 到 1。isIntersecting:布尔值,表示目标元素是否与视口相交。intersectionRect:目标元素与视口交叉区域的位置和尺寸信息。
options 为可选配置对象,常用选项包括:
root:指定观察器的根元素,默认为视口。rootMargin:设置根元素的外边距,用于扩大或缩小交叉检测区域。threshold:指定触发回调的交叉比例阈值,可为单个数值或数组。
应用场景
IntersectionObserver 适用于实现图片懒加载、无限滚动加载、广告曝光统计及可视化数据监控等场景。它同样可用于判断元素是否在特定容器内,且不会引发浏览器回流,性能优于传统监听方式。
createNodeIterator()
createNodeIterator() 是 DOM API 提供的方法,用于创建 NodeIterator 对象,从而遍历文档树中的一组 DOM 节点。
通俗而言,该方法可将 DOM 结构转换为可遍历的形式。
比较偏的面试考点
此方法常作为面试中的冷门考点,询问如何实现 DOM 结构遍历。尽管日常开发中极少直接使用,但它常出现在前端框架的源码实现中。
应用
<body>
    <div id="app">
        <p>hello</p>
        <div class="title">标题</div>
        <div>
            <div class="content">内容</div>
        </div>
    </div>
    <script>
        const body = document.getElementsByTagName('body')[0]
        const item = document.createNodeIterator(body)//让body变成可遍历的
        let root = item.nextNode() // 下一层
        while (root) {
            console.log(root);
            if (root.nodeType !== 3) {
                root.setAttribute('data-index', 123)//给每个节点添加一个属性
            }
            root = item.nextNode()
        }
    </script>
</body>
以下代码成功遍历了各 DOM 节点:
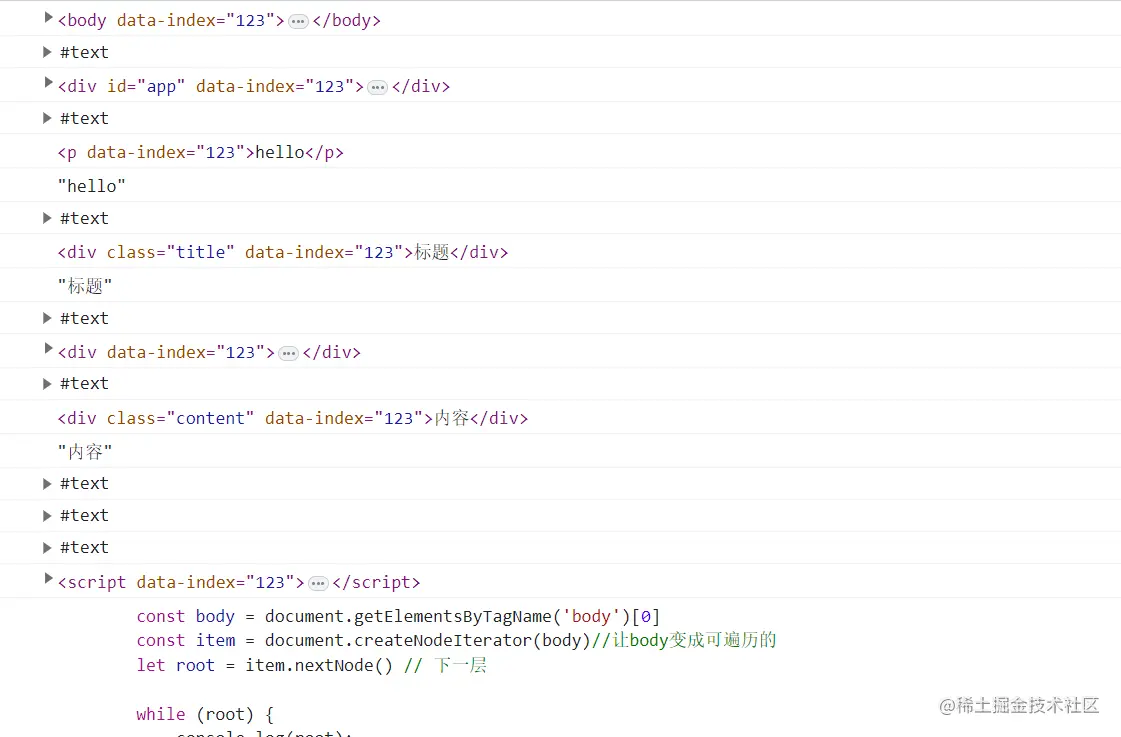
并在每个 DOM 节点上添加了data-index = "123"属性。
getComputedStyle()
getComputedStyle() 用于获取元素当前所有最终生效的 CSS 属性值,返回一个只读的 CSSStyleDeclaration 对象。
该方法接受两个参数:第一个为目标元素,第二个为伪元素选择器(可选)。
用法
<style>
        #box {
            width: 200px;
            height: 200px;
            background-color: cornflowerblue;
            position: relative;
        }
        #box::after {
            content: "";
            width: 50px;
            height: 50px;
            background: #000;
            position: absolute;
            top: 0;
            left: 0;
        }
    </style>
const box = document.getElementById('box')
const style = window.getComputedStyle(box, 'after')
const height = style.getPropertyValue('height')
const width = style.getPropertyValue('width')
console.log(style);
console.log(width, height);上述代码执行结果如下:

获取 id 为 box 的容器的 CSS 样式声明对象,以及伪元素的宽高信息。
requestAnimationFrame()
前述四种方法使用频率较低,但requestAnimationFrame相对常用。requestAnimationFrame() 是 HTML5 提供的 API,用于在浏览器下一次重绘之前执行指定回调函数。
与setInterval和setTimeout
requestAnimationFrame 的调用频率通常与屏幕刷新率同步,约为每秒 60 次。这允许在每次重绘前更新动画状态,确保动画流畅且不占用过多浏览器性能。
setInterval 与setTimeout 按指定时间间隔重复执行操作,不理会浏览器重绘周期,可能导致回调延迟执行,从而影响动画流畅度。
效果对比
设置两个容器,分别使用requestAnimationFrame()和setTimeout实现平移效果,JavaScript 代码如下:
   let distance = 0
        let box = document.getElementById('box')
        let box2 = document.getElementById('box2')
        window.addEventListener('click', function () {
         requestAnimationFrame(function move() {
         box.style.transform = `translateX(${distance++}px)`
         requestAnimationFrame(move)//递归
          })
        setTimeout(function change() {
         box2.style.transform = `translateX(${distance++}px)`
         setTimeout(change, 17)
            }, 17)
        })
运行效果图如下:
肉眼可能难以察觉细微差异,但下方图形使用setTimeout时确实存在卡顿现象,不如上方图形流畅。
小结
本文介绍了 JavaScript 中五个不常用但功能强大的 API。希望本文对您的学习有所帮助,祝大家周末愉快,下篇文章再见。
以上就是JS中比较冷门但非常好用的方法总结的详细内容,更多关于JS方法总结的资料请关注本站其它相关文章!
为什么JS调用reload后页面没有立即更新
2026-11-05 13:38:29
crypto-js 加密结果与 Java/Python 后端不一致怎么解决
2026-11-05 12:09:48
js文件缓存导致代码不更新怎么强制刷新
2026-11-04 22:30:24
JS逆向调试技巧:编写Hook脚本监控加密函数输入输出
2026-11-04 10:42:46
Babylon.js 性能优化技巧:实例化网格与遮挡剔除
2026-11-03 23:43:22