
原生JavaScript怎么封装可复用组件
本文系统讲解如何使用原生JavaScript(Vanilla JS)封装高质量、高可复用、防内存泄漏的UI组件,深入剖析解耦架构、事件委托、CustomEvent通信与生命周期管理机制。
rootElement 事件委托与 CustomEvent 实现业务彻底解耦,并建立包含 init() 与 destroy() 的严格生命周期闭环,从根源上杜绝内存泄漏与多实例冲突。
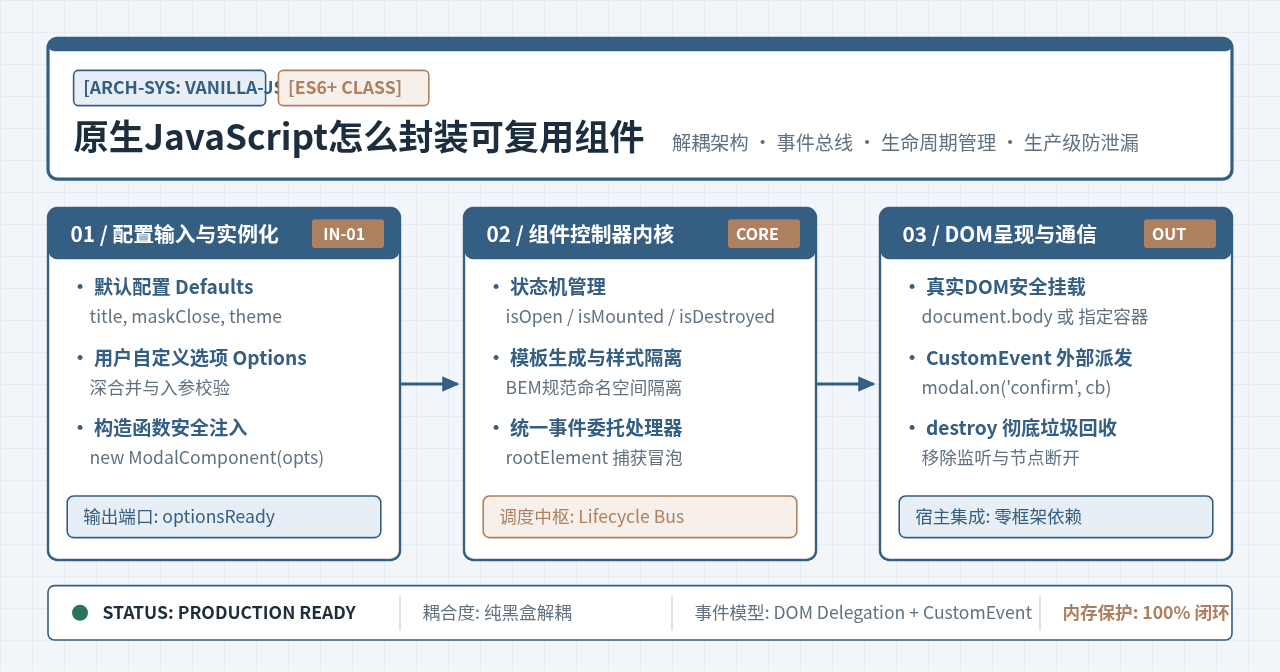
一、为什么需要原生封装及核心解耦原则
很多开发者在脱离现代前端框架后,编写的 JavaScript 往往容易演变成“散落的 DOM 操作与匿名监听器”。这种写法不仅难以在不同页面或项目中复用,还极易引发全局变量污染、CSS 样式冲突以及无法释放的内存泄漏。
封装一个真正可复用的原生组件,必须在设计层面遵循三个不可妥协的解耦原则:
- DOM 归属性原则:组件绝不在全局范围内直接通过
document.getElementById()操作元素,其内部的所有节点查找必须局限在当前实例的根容器this.rootElement之内,确保同一页面无论实例化多少次均互不干扰。 - 通信黑盒原则:组件内部不需要了解外部的业务逻辑,外部业务也无需刺探组件内部的具体 DOM 节点。两者之间仅通过输入配置(Options)、公共 API(如
open()、close())以及原生自定义事件(CustomEvent)进行契约交互。 - 生命周期对等原则:任何形式的资源申请(创建 DOM 节点、绑定全局快捷键、启动定时器)都必须在
destroy()中存在对应的释放逻辑,保证组件在被宿主销毁时能够完全被 JavaScript 引擎垃圾回收(GC)。
二、原生组件的五层解耦架构模型
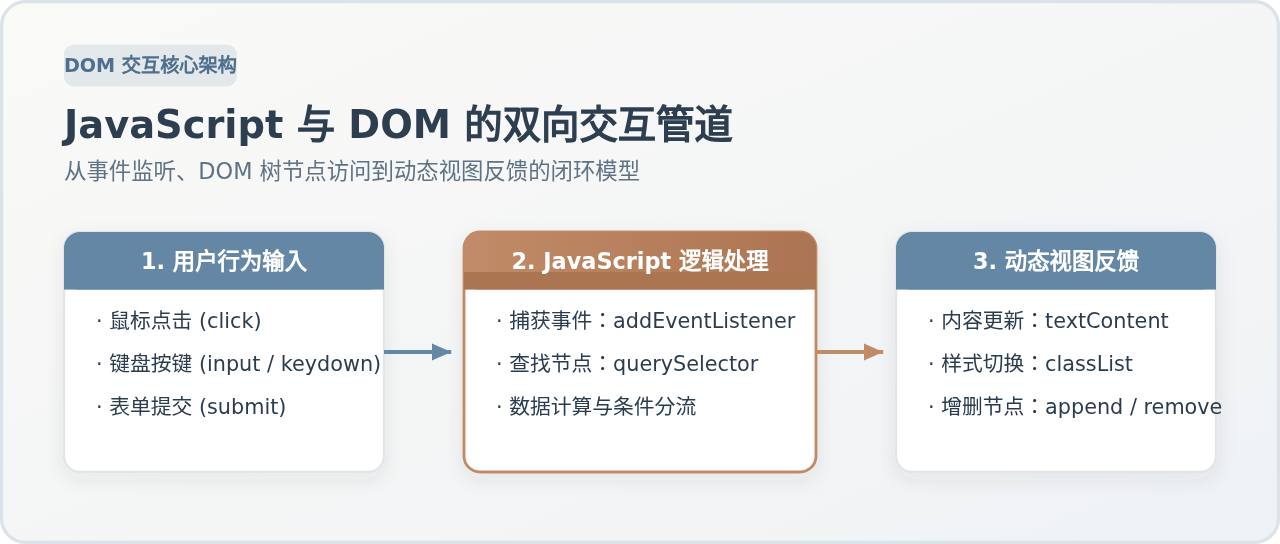
为了保证组件具备清晰的扩展性和可维护性,我们可以将一个原生组件划分为职责分明的五个层次:配置层、状态层、渲染层、通信层和销毁层。各层之间单向流转,职责明确。
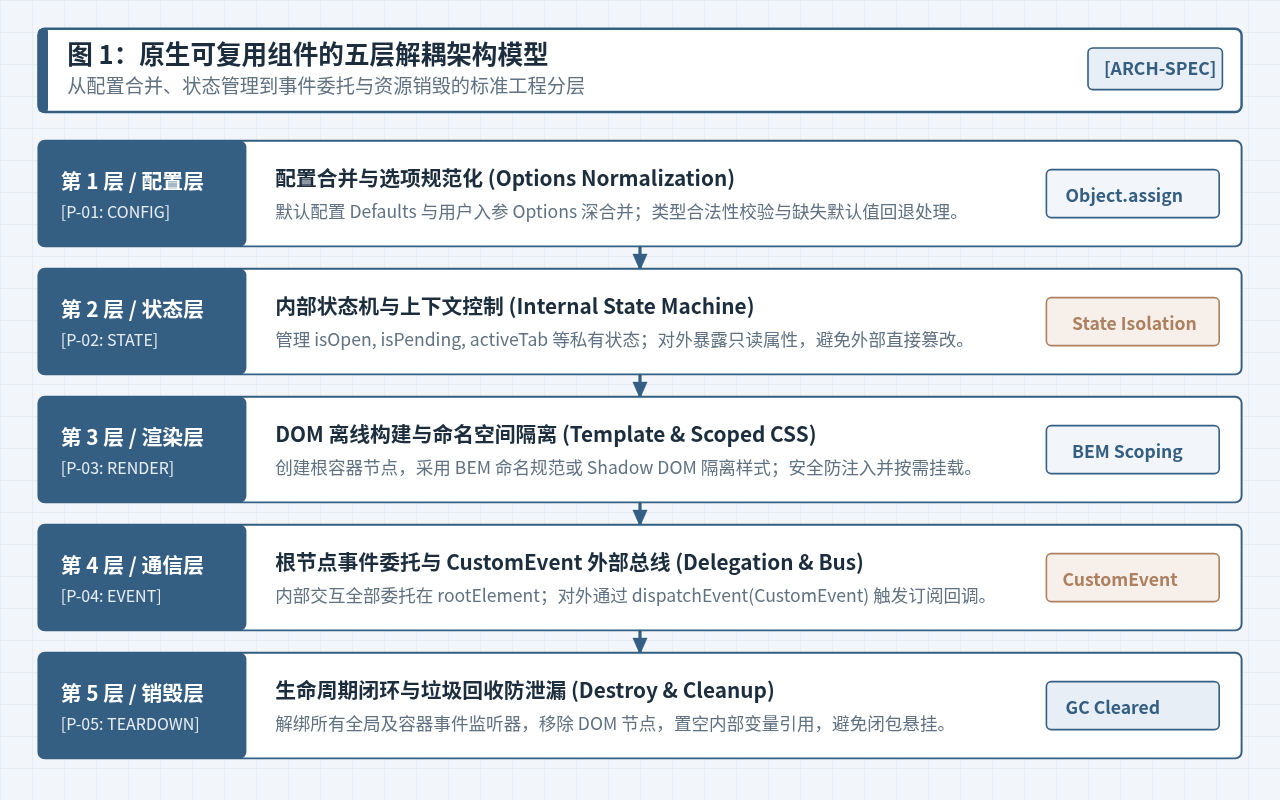
在图 1 所示的架构中:
- 配置层(Configuration Layer):负责接收宿主环境传入的自定义参数,并与内部预设的默认配置进行安全合并,对非法类型提供防御性回退。
- 状态层(State Layer):维护组件内部的运行标志位(如打开状态、加载状态),这些状态作为私有属性存在,通过类方法统一调度,防止外部随意赋值导致状态紊乱。
- 渲染层(Render Layer):负责模板的动态拼装或基于
createElement的离线构建。采用 BEM(Block Element Modifier)命名规范限定 CSS 类名,避免样式泄露或被宿主全局规则覆盖。 - 通信层(Communication Layer):内部交互全部收归于根节点的单一事件代理(Event Delegation),对外交互则派发标准
CustomEvent。 - 销毁层(Teardown Layer):提供标准的
destroy()接口,解除所有事件委托与全局订阅,清除 DOM 并切断引用。
三、实战开发:从零构建一个通用模态框(Modal)组件
以 Web 页面中最经典的“模态弹窗(Modal)”为例,我们通过六个明确的工程步骤来完成这一组件的完整封装。
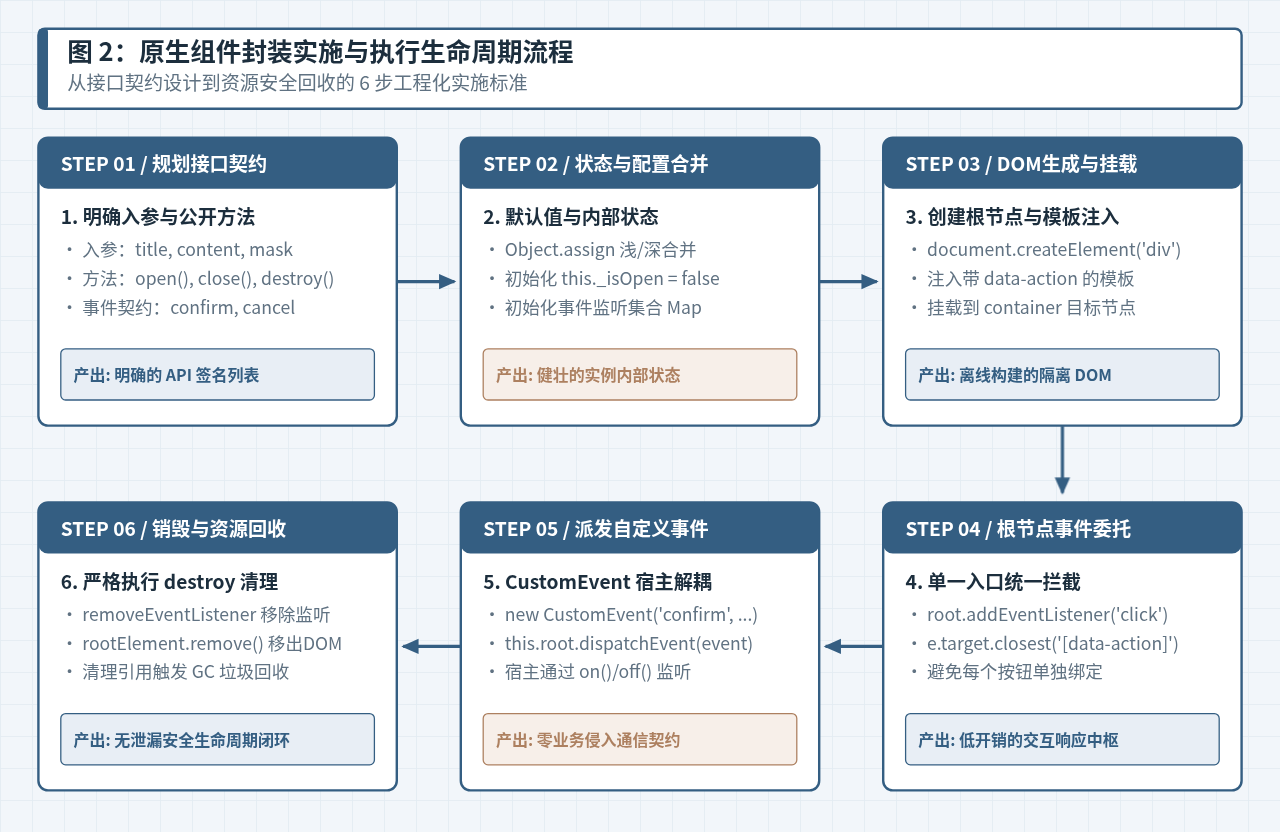
第 1 步:规划接口契约与配置默认值
在动笔写代码前,先定义好组件接收的入参以及向外暴露的方法。我们希望用户这样调用:
// 宿主调用期望
const modal = new ModalComponent({
  title: '系统通知',
  content: '您的配置已保存成功!',
  maskClosable: true,
  confirmText: '知道了'
});

modal.open();
modal.on('confirm', () => {
  console.log('用户点击了确认按钮');
});
第 2 步:编写构造函数与配置合并
使用 ES6 Class 结构,在构造函数内部通过 Object.assign 实现参数合并,并初始化私有变量:
class ModalComponent {
  // 静态默认配置
  static DEFAULTS = {
    title: '提示',
    content: '',
    maskClosable: true,
    confirmText: '确定',
    cancelText: '取消',
    showCancel: true,
    container: document.body
  };

  constructor(options = {}) {
    // 1. 配置合并
    this.options = Object.assign({}, ModalComponent.DEFAULTS, options);

    // 2. 内部私有状态
    this._isOpen = false;
    this._root = null;
    this._eventsMap = new Map();

    // 3. 绑定事件处理器的 this 指向,确保移除监听时引用一致
    this._handleRootClick = this._handleRootClick.bind(this);
    this._handleKeydown = this._handleKeydown.bind(this);

    // 4. 初始化初始化 DOM 与事件
    this._init();
  }
}
第 3 步:构建隔离的 DOM 结构与注入样式
为了保证多实例共存且不污染全局,所有 CSS 均使用独立的命名空间(如 .vanilla-modal),并在根元素内部通过 data-action 属性标记各可交互控件:
  _init() {
    this._ensureStyles();
    this._buildDOM();
    this._bindEvents();
  }

  _buildDOM() {
    const root = document.createElement('div');
    root.className = 'vanilla-modal';
    root.setAttribute('role', 'dialog');
    root.setAttribute('aria-modal', 'true');
    root.style.display = 'none';

    root.innerHTML = `
      <div class="vanilla-modal__mask" data-action="mask"></div>
      <div class="vanilla-modal__wrapper">
        <div class="vanilla-modal__header">
          <h3 class="vanilla-modal__title">${this.options.title}</h3>
          <button class="vanilla-modal__close" data-action="close" aria-label="关闭">×</button>
        </div>
        <div class="vanilla-modal__body">${this.options.content}</div>
        <div class="vanilla-modal__footer">
          ${this.options.showCancel ? `<button class="vanilla-modal__btn vanilla-modal__btn--cancel" data-action="cancel">${this.options.cancelText}</button>` : ''}
          <button class="vanilla-modal__btn vanilla-modal__btn--confirm" data-action="confirm">${this.options.confirmText}</button>
        </div>
      </div>
    `;

    this._root = root;
    this.options.container.appendChild(this._root);
  }
四、内部交互与外部通信解耦
很多初学者在封装组件时,喜欢在 _buildDOM 完成后使用 querySelector 给每一个关闭按钮、取消按钮、遮罩层单独调用 addEventListener。这种方式不仅代码冗长,而且一旦后续通过动态脚本更新了内部 HTML 片段,重新生成的按钮就会丢失监听。
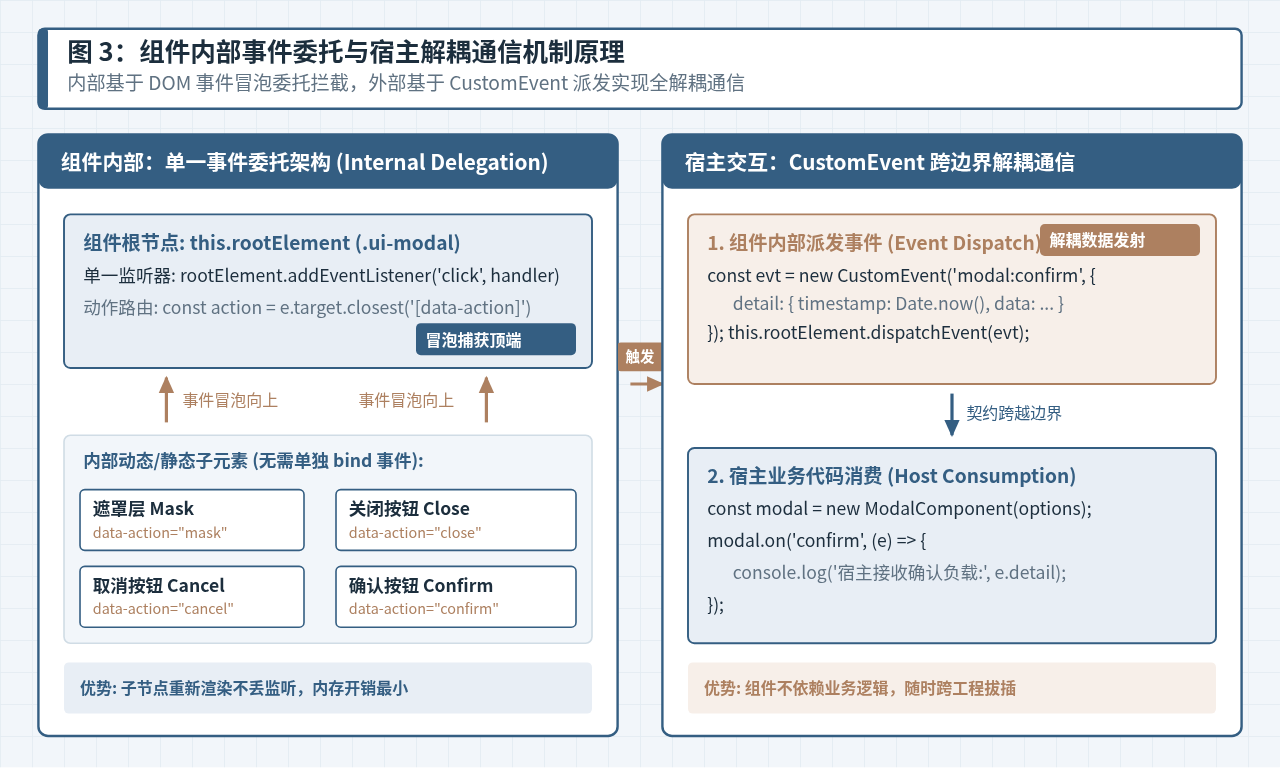
高品质的做法是:在组件根容器使用事件委托,对外派发 CustomEvent。
4.1 单一根节点事件委托机制
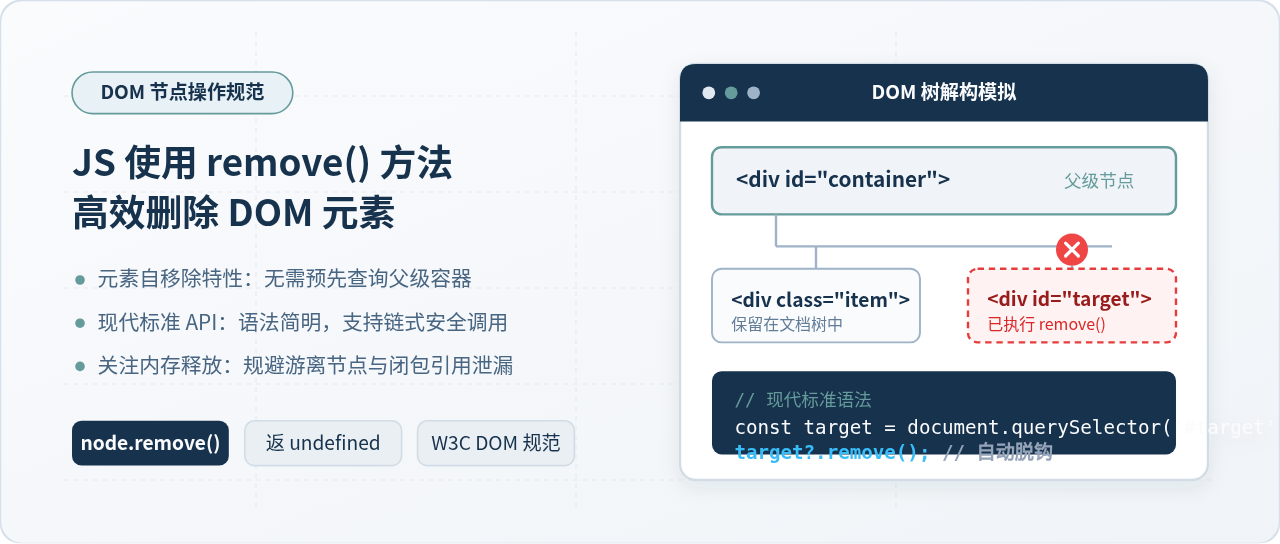
如图 3 所示,所有按钮点击后都会通过浏览器 DOM 树自然冒泡到 this._root。我们只需在根容器监听一次 click,并通过 e.target.closest('[data-action]') 读取目标元素的动作类型:
  _bindEvents() {
    // 根节点单一事件委托
    this._root.addEventListener('click', this._handleRootClick);
    // 全局快捷键监听(如按 ESC 退出)
    window.addEventListener('keydown', this._handleKeydown);
  }

  _handleRootClick(e) {
    const target = e.target.closest('[data-action]');
    if (!target) return;

    const action = target.getAttribute('data-action');
    if (action === 'mask') {
      if (this.options.maskClosable) this.close('mask');
    } else if (action === 'close' || action === 'cancel') {
      this.close(action);
      this._emit('cancel', { action });
    } else if (action === 'confirm') {
      this._emit('confirm', { timestamp: Date.now() });
      this.close('confirm');
    }
  }

  _handleKeydown(e) {
    if (this._isOpen && e.key === 'Escape' && this.options.maskClosable) {
      this.close('escape');
    }
  }
4.2 CustomEvent 对外广播事件
为了让宿主页面能够像监听原生 DOM 事件一样监听组件回调,组件内部提供 on() 和 off() 方法作为语法糖,本质上是调用根节点的 dispatchEvent 与 addEventListener:
  _emit(eventName, detailData = {}) {
    // 创建原生 CustomEvent
    const customEvent = new CustomEvent(`modal:${eventName}`, {
      bubbles: true,
      cancelable: true,
      detail: detailData
    });
    this._root.dispatchEvent(customEvent);
  }

  // 供外部订阅事件
  on(eventName, handler) {
    const actualEventName = `modal:${eventName}`;
    this._root.addEventListener(actualEventName, handler);
    // 存储引用以支持统一销毁
    if (!this._eventsMap.has(actualEventName)) {
      this._eventsMap.set(actualEventName, new Set());
    }
    this._eventsMap.get(actualEventName).add(handler);
    return this; // 支持链式调用
  }

  // 供外部解除订阅
  off(eventName, handler) {
    const actualEventName = `modal:${eventName}`;
    this._root.removeEventListener(actualEventName, handler);
    if (this._eventsMap.has(actualEventName)) {
      this._eventsMap.get(actualEventName).delete(handler);
    }
    return this;
  }
五、彻底防范内存泄漏:编写可靠的 destroy() 生命周期
在单页应用(SPA)或长期运行的前端页面中,组件频繁创建与销毁如果处理不当,会产生严重的内存泄漏。内存泄漏通常来源于两个隐蔽点:
- 全局事件悬挂:绑定在
window或document上的监听器(例如keydown、resize、scroll),若未显式解绑,即使组件 DOM 节点已被从页面删除,由于全局对象持有组件方法的引用,导致整个组件实例及相关闭包永远无法被垃圾回收。 - 游离 DOM 树(Detached DOM):仅仅将父容器的
innerHTML清空,但 JavaScript 中仍有变量引用了子节点,导致 DOM 树驻留在内存中无法释放。
因此,每个可复用组件必须提供健全的 destroy() 清理方法:
  destroy() {
    // 1. 若处于打开状态,先执行关闭收尾
    if (this._isOpen) {
      this.close('destroy');
    }

    // 2. 解除根节点与全局事件监听
    if (this._root) {
      this._root.removeEventListener('click', this._handleRootClick);
    }
    window.removeEventListener('keydown', this._handleKeydown);

    // 3. 移除宿主订阅的外部 CustomEvent
    for (const [eventName, handlers] of this._eventsMap.entries()) {
      for (const handler of handlers) {
        this._root.removeEventListener(eventName, handler);
      }
    }
    this._eventsMap.clear();

    // 4. 将 DOM 节点从文档树中彻底移除
    if (this._root && this._root.parentNode) {
      this._root.parentNode.removeChild(this._root);
    }

    // 5. 切断内部对象引用,协助 V8 引擎垃圾回收
    this._root = null;
    this.options = null;
    this._eventsMap = null;
  }
removeEventListener 时,第二个参数传入的必须是与 addEventListener 完全相同的函数引用。若在构造函数中使用了 addEventListener('click', () => this.handleClick()) 传入匿名函数,removeEventListener 将无法命中,导致监听器永久残留。这就是为什么我们在构造函数中显式执行 this._handleKeydown = this._handleKeydown.bind(this)。
六、技术选型与生产落地自检
在企业级开发中,除了纯 ES6 Class 封装之外,浏览器原生还提供了基于 CustomElementRegistry 和 Shadow DOM 的 Web Components 标准。两者各有适用场景。
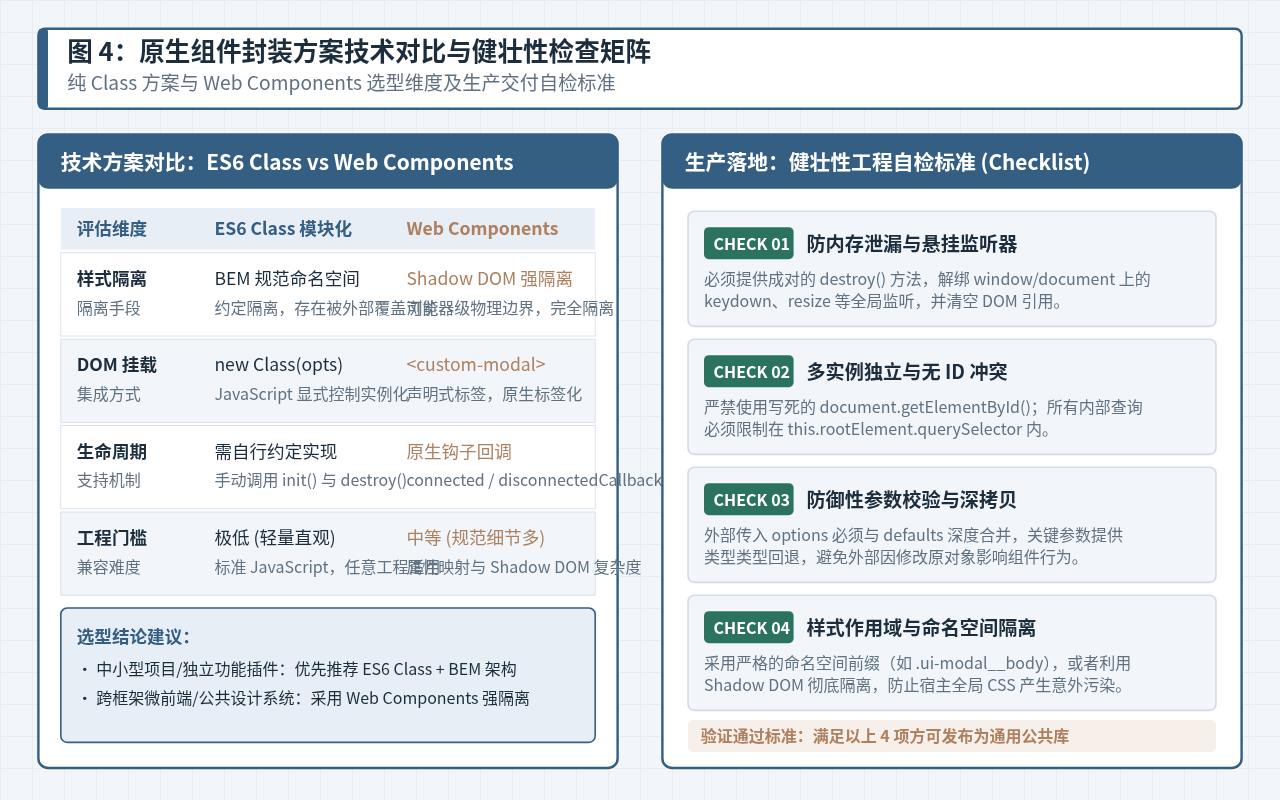
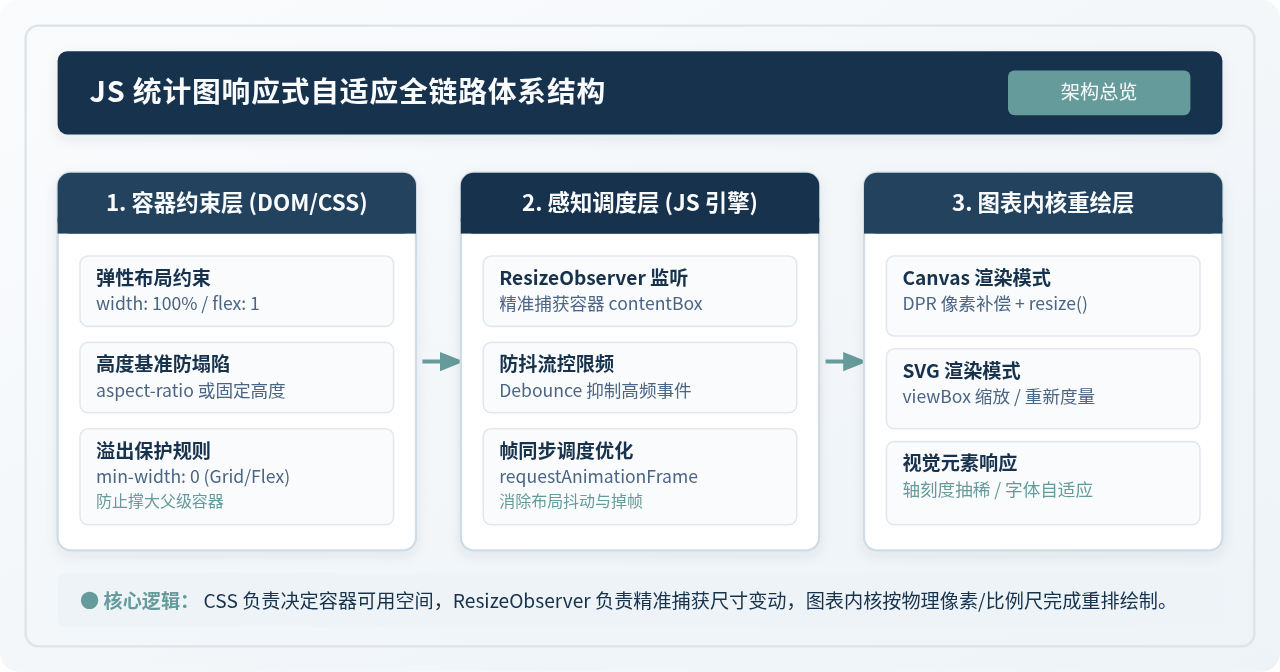
通过图 4 可以清晰看出两者的取舍边界:
- ES6 Class 模块化方案:学习门槛最低,调试直观,与各大第三方库(Lodash, Dayjs等)集成零阻碍,非常适合在不需要极端强样式隔离的中小型项目、独立业务插件以及轻量微前端挂载层中使用。
- Web Components(Custom Elements + Shadow DOM)方案:提供了真正的浏览器级别物理样式隔离(宿主 CSS 完全无法渗透进 Shadow Root),能够以
<custom-modal>自定义标签的形式直接嵌入 HTML。它非常适合跨团队、跨技术栈(同时供给 React、Vue、Angular 使用)的通用设计系统(Design System)。
生产就绪检查清单(Checklist)
| 检查项 | 标准要求 | 验证与自测方法 |
|---|---|---|
| 多实例隔离 | 组件内禁止出现固定的 DOM id;所有元素查询严格基于 this._root 作用域。 |
在同一个页面连续 new 出 3 个实例,检查操作其中一个是否会引发其他实例的状态异动。 |
| 样式无污染 | 使用严格的命名空间前缀(如 .vanilla-modal__*),禁止向标签选择器(如 p、button)定义全局样式。 |
将组件直接挂载入已有旧项目中,检查旧页面的原有按钮与排版样式是否受到干扰。 |
| GC 垃圾回收 | 调用 destroy() 后,DOM 节点完全移除,window 上无多余事件监听残留。 |
打开 Chrome DevTools -> Memory 面板,录制堆快照(Heap Snapshot),检查是否存在 Detached HTMLElement。 |
| 防御性传参 | 外部不传参或传入空对象 {} 时,组件能以合理默认值静默回退,绝不抛出 Uncaught TypeError。 |
执行 new ModalComponent(),确认组件能够正常初始化并具备基础视觉表现。 |
七、完整可运行示例代码
以下是具备生产完整度的 VanillaModal 组件完整代码。将此段代码保存后即可在任意原生 HTML 环境中直接运行与复用:
/**
 * VanillaModal - 高复用原生JavaScript模态弹窗组件
 */
class VanillaModal {
  static DEFAULTS = {
    title: '提示',
    content: '默认内容',
    maskClosable: true,
    confirmText: '确定',
    cancelText: '取消',
    showCancel: true,
    container: document.body
  };

  constructor(options = {}) {
    this.options = Object.assign({}, VanillaModal.DEFAULTS, options);
    this._isOpen = false;
    this._root = null;
    this._eventsMap = new Map();

    this._handleRootClick = this._handleRootClick.bind(this);
    this._handleKeydown = this._handleKeydown.bind(this);

    this._init();
  }

  _init() {
    this._injectStyles();
    this._buildDOM();
    this._bindEvents();
  }

  _injectStyles() {
    const styleId = 'vanilla-modal-styles';
    if (document.getElementById(styleId)) return;

    const style = document.createElement('style');
    style.id = styleId;
    style.textContent = `
      .vanilla-modal {
        position: fixed;
        top: 0; left: 0;
        width: 100vw; height: 100vh;
        z-index: 9999;
        display: flex;
        align-items: center;
        justify-content: center;
      }
      .vanilla-modal__mask {
        position: absolute;
        top: 0; left: 0;
        width: 100%; height: 100%;
        background-color: rgba(28, 46, 61, 0.45);
        backdrop-filter: blur(2px);
      }
      .vanilla-modal__wrapper {
        position: relative;
        width: 90%;
        max-width: 480px;
        background: #FFFFFF;
        border-radius: 8px;
        box-shadow: 0 10px 30px rgba(0, 0, 0, 0.15);
        overflow: hidden;
        animation: vanilla-modal-enter 0.2s cubic-bezier(0.16, 1, 0.3, 1);
      }
      .vanilla-modal__header {
        padding: 16px 20px;
        display: flex;
        justify-content: space-between;
        align-items: center;
        border-bottom: 1px solid #E2EBF2;
      }
      .vanilla-modal__title {
        margin: 0; font-size: 16px; font-weight: 600; color: #1C2E3D;
      }
      .vanilla-modal__close {
        background: none; border: none; font-size: 20px;
        cursor: pointer; color: #607282; line-height: 1;
      }
      .vanilla-modal__body {
        padding: 20px; font-size: 14px; line-height: 1.6; color: #344857;
      }
      .vanilla-modal__footer {
        padding: 14px 20px;
        background-color: #F8FAFC;
        display: flex;
        justify-content: flex-end;
        gap: 12px;
        border-top: 1px solid #E2EBF2;
      }
      .vanilla-modal__btn {
        padding: 8px 16px;
        border-radius: 4px;
        font-size: 13px;
        font-weight: 500;
        cursor: pointer;
        border: 1px solid transparent;
      }
      .vanilla-modal__btn--cancel {
        background: #FFFFFF; border-color: #D0DCE5; color: #607282;
      }
      .vanilla-modal__btn--confirm {
        background: #345E82; color: #FFFFFF;
      }
      @keyframes vanilla-modal-enter {
        from { opacity: 0; transform: scale(0.96) translateY(-8px); }
        to { opacity: 1; transform: scale(1) translateY(0); }
      }
    `;
    document.head.appendChild(style);
  }

  _buildDOM() {
    const root = document.createElement('div');
    root.className = 'vanilla-modal';
    root.style.display = 'none';

    root.innerHTML = `
      <div class="vanilla-modal__mask" data-action="mask"></div>
      <div class="vanilla-modal__wrapper">
        <div class="vanilla-modal__header">
          <h3 class="vanilla-modal__title">${this.options.title}</h3>
          <button class="vanilla-modal__close" data-action="close">×</button>
        </div>
        <div class="vanilla-modal__body">${this.options.content}</div>
        <div class="vanilla-modal__footer">
          ${this.options.showCancel ? `<button class="vanilla-modal__btn vanilla-modal__btn--cancel" data-action="cancel">${this.options.cancelText}</button>` : ''}
          <button class="vanilla-modal__btn vanilla-modal__btn--confirm" data-action="confirm">${this.options.confirmText}</button>
        </div>
      </div>
    `;
    this._root = root;
    this.options.container.appendChild(this._root);
  }

  _bindEvents() {
    this._root.addEventListener('click', this._handleRootClick);
    window.addEventListener('keydown', this._handleKeydown);
  }

  _handleRootClick(e) {
    const target = e.target.closest('[data-action]');
    if (!target) return;

    const action = target.getAttribute('data-action');
    if (action === 'mask' && !this.options.maskClosable) return;

    if (action === 'confirm') {
      this._emit('confirm', { timestamp: Date.now() });
    } else {
      this._emit('cancel', { reason: action });
    }
    this.close(action);
  }

  _handleKeydown(e) {
    if (this._isOpen && e.key === 'Escape' && this.options.maskClosable) {
      this.close('escape');
    }
  }

  _emit(eventName, detail = {}) {
    const evt = new CustomEvent(`modal:${eventName}`, {
      bubbles: true,
      cancelable: true,
      detail
    });
    this._root.dispatchEvent(evt);
  }

  open() {
    if (this._isOpen) return;
    this._root.style.display = 'flex';
    this._isOpen = true;
    this._emit('open');
  }

  close(trigger = 'program') {
    if (!this._isOpen) return;
    this._root.style.display = 'none';
    this._isOpen = false;
    this._emit('close', { trigger });
  }

  on(eventName, handler) {
    const fullEventName = `modal:${eventName}`;
    this._root.addEventListener(fullEventName, handler);
    if (!this._eventsMap.has(fullEventName)) {
      this._eventsMap.set(fullEventName, new Set());
    }
    this._eventsMap.get(fullEventName).add(handler);
    return this;
  }

  off(eventName, handler) {
    const fullEventName = `modal:${eventName}`;
    this._root.removeEventListener(fullEventName, handler);
    if (this._eventsMap.has(fullEventName)) {
      this._eventsMap.get(fullEventName).delete(handler);
    }
    return this;
  }

  destroy() {
    if (this._isOpen) this.close('destroy');
    if (this._root) {
      this._root.removeEventListener('click', this._handleRootClick);
      for (const [evtName, handlers] of this._eventsMap.entries()) {
        for (const h of handlers) {
          this._root.removeEventListener(evtName, h);
        }
      }
      if (this._root.parentNode) {
        this._root.parentNode.removeChild(this._root);
      }
    }
    window.removeEventListener('keydown', this._handleKeydown);
    this._eventsMap.clear();
    this._root = null;
    this.options = null;
  }
}
通过遵循以上五层架构、事件委托模型与严格的资源释放机制,开发者无需引入任何重型框架,就能写出结构清晰、健壮可靠、随处可引用的原生 JavaScript 组件。
原生JS与jQuery获取窗口高度的方法对比及选择建议
2026-11-21 10:44:28
JS获取定位后怎么在地图上标记显示位置
2026-11-20 23:22:47
JS全选后怎么批量获取选中值并提交表单
2026-11-20 18:48:41
JavaScript alert() 基础语法与调用示例
2026-11-20 16:39:38
前端入门路径:为什么建议先学HTML和CSS再学JavaScript
2026-11-20 15:56:40