
Vue/React项目中怎么封装通用的JS图片验证码组件
讲解如何在Vue和React项目中封装跨技术栈通用的前端图片验证码组件。通过解耦纯JS Canvas绘制引擎与框架适配层,实现高清晰度、低耦合且可灵活复用的验证码方案。
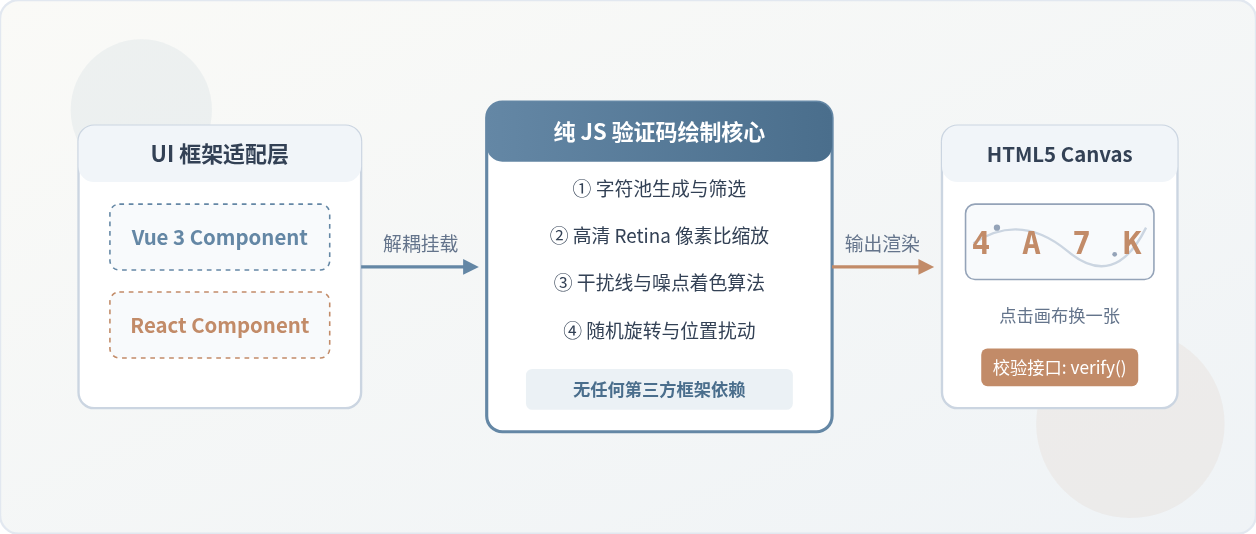
在前端表单、轻量后台系统或无外网依赖的内网应用中,图片验证码常用于阻断低成本的自动化机器刷单与重复提交。许多开发者在面对 Vue 或 React 项目时,往往直接寻找各自技术栈的专用三方库,或者在组件生命周期里拼凑零散的 Canvas 绘图代码,这极易引发逻辑重复与跨端维护困难。最稳妥、可维护的解决方案是将底层的图形生成、干扰渲染与字符校验抽象为框架无关的纯 JavaScript 引擎,再分别针对 Vue 3 与 React 编写轻薄的适配层。这样既能保证绘图核心代码 100% 共享,又能自然融入各自框架的数据流与组件生命周期。
一、为什么采用“核心引擎 + 框架适配器”的架构
很多前端验证码组件难以维护的核心原因,是将“画布绘制算法”与“框架生命周期”强行杂糅在了一起。例如在 Vue 的 watch 或 React 的 useEffect 内部堆砌百余行 Canvas 上下文操作代码,一旦需要调整字符集、干扰线透明度或高分辨率缩放逻辑,往往需要修改两份完全不一样的组件文件。
合理的架构应当遵循单一职责原则,划分为清晰的两个层次:
- 纯 JS 核心层(
CaptchaEngine):不依赖任何 DOM 框架,仅接收一个HTMLCanvasElement实例或画布配置。负责字符随机生成、高分屏分辨率矫正、背景噪点/干扰贝塞尔曲线绘制、随机旋转倾斜以及提供refresh()和verify()接口。 - 框架包装层(Vue/React Component):仅负责挂载与销毁对应的
<canvas>DOM 节点、将框架外部属性(如宽度、高度、字符长度)同步至核心引擎,并将最新验证码文本或事件通过emit或onChange传出。
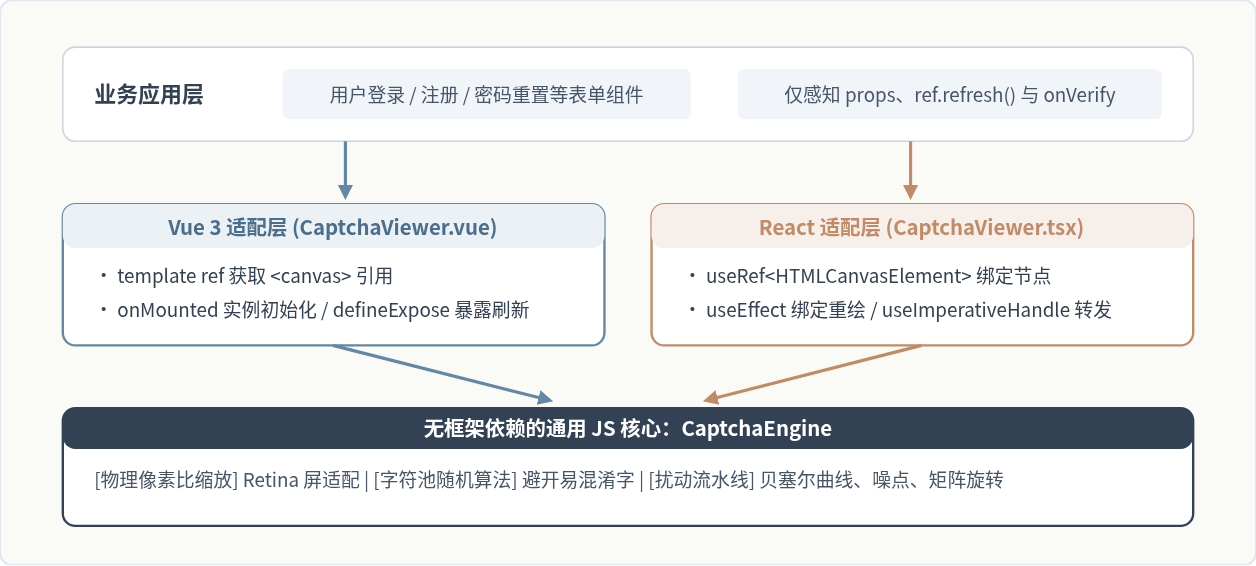
二、编写通用 JS 验证码引擎(CaptchaEngine)
核心类 CaptchaEngine 需要直接操作原生 Canvas 上下文。为了确保绘制质量与交互友好,在编码时有三个不可忽略的关键技术细节:
- 设备像素比(DevicePixelRatio)矫正:在 Retina 高分辨率屏幕上,普通的 Canvas 会发虚模糊。必须将 Canvas 的实际物理像素(
canvas.width/height)放大为css_width * window.devicePixelRatio,再通过 CSS 样式限制显示宽高,并在上下文中执行ctx.scale(dpr, dpr)。 - 过滤高混淆度字符:常见的数字和字母如
0与O、1与I或l极难肉眼辨识,输入错误会导致用户受挫。字符池中应预先剔除这些歧义字符。 - 独立的变换矩阵隔离:绘制每一个字符时,必须使用
ctx.save()与ctx.restore()隔离平移、旋转与缩放,避免上一个字符的旋转矩阵污染后续字符和干扰线。
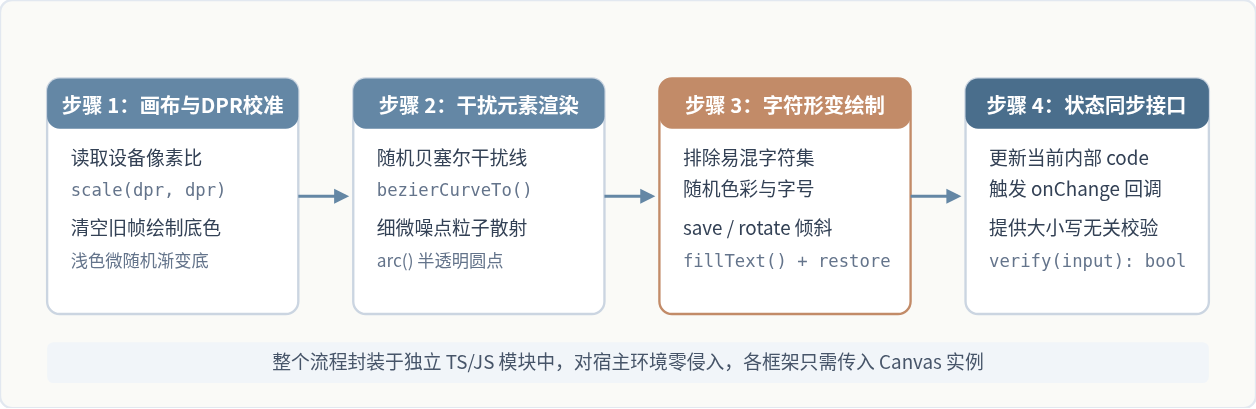
下面给出完整的纯 JavaScript/TypeScript 核心实现,代码可存放在项目公共目录 src/utils/captchaEngine.ts 中:
/**
 * captchaEngine.ts
 * 框架无关的纯 JavaScript Canvas 图片验证码生成引擎
 */
export interface CaptchaOptions {
  width?: number;              // 容器显示宽度(CSS 像素)
  height?: number;             // 容器显示高度(CSS 像素)
  length?: number;             // 验证码字符长度
  lineCount?: number;          // 干扰线条数
  dotCount?: number;           // 干扰点数量
  characters?: string;         // 自定义字符池
  onChange?: (code: string) => void; // 刷新时的回调
}

export class CaptchaEngine {
  private canvas: HTMLCanvasElement;
  private ctx: CanvasRenderingContext2D;
  private options: Required<CaptchaOptions>;
  private currentCode: string = '';

  // 默认剔除了易混淆字符 0, O, o, 1, I, l, v, u 等
  private static DEFAULT_CHARS = '23456789ABCDEFGHJKLMNPQRSTUVWXYZabcdefghjkmnpqrstuvwxyz';

  constructor(canvas: HTMLCanvasElement, options: CaptchaOptions = {}) {
    this.canvas = canvas;
    const ctx = canvas.getContext('2d');
    if (!ctx) {
      throw new Error('当前环境不支持 Canvas 2D 上下文');
    }
    this.ctx = ctx;

    this.options = {
      width: options.width ?? 120,
      height: options.height ?? 40,
      length: options.length ?? 4,
      lineCount: options.lineCount ?? 4,
      dotCount: options.dotCount ?? 30,
      characters: options.characters ?? CaptchaEngine.DEFAULT_CHARS,
      onChange: options.onChange ?? (() => {}),
    };

    this.initCanvasSize();
    this.refresh();
  }

  /**
   * 处理 Retina 高分辨率屏幕模糊问题
   */
  private initCanvasSize(): void {
    const dpr = window.devicePixelRatio || 1;
    const { width, height } = this.options;

    // 设置 CSS 显示尺寸
    this.canvas.style.width = `${width}px`;
    this.canvas.style.height = `${height}px`;

    // 设置画布底层物理像素
    this.canvas.width = Math.floor(width * dpr);
    this.canvas.height = Math.floor(height * dpr);

    // 缩放画布坐标系,后续所有绘制均按 CSS 逻辑像素计算
    this.ctx.scale(dpr, dpr);
  }

  /**
   * 生成指定范围内的随机整数
   */
  private getRandomInt(min: number, max: number): number {
    return Math.floor(Math.random() * (max - min) + min);
  }

  /**
   * 生成随机 RGB 颜色,可指定明度区间
   */
  private getRandomColor(min: number = 0, max: number = 255, alpha: number = 1): string {
    const r = this.getRandomInt(min, max);
    const g = this.getRandomInt(min, max);
    const b = this.getRandomInt(min, max);
    return `rgba(${r}, ${g}, ${b}, ${alpha})`;
  }

  /**
   * 绘制底色与浅色背景块
   */
  private drawBackground(): void {
    const { width, height } = this.options;
    this.ctx.fillStyle = this.getRandomColor(235, 250);
    this.ctx.fillRect(0, 0, width, height);
  }

  /**
   * 绘制平滑贝塞尔干扰线
   */
  private drawLines(): void {
    const { width, height, lineCount } = this.options;
    for (let i = 0; i < lineCount; i++) {
      this.ctx.beginPath();
      this.ctx.moveTo(this.getRandomInt(0, width), this.getRandomInt(0, height));
      this.ctx.bezierCurveTo(
        this.getRandomInt(0, width), this.getRandomInt(0, height),
        this.getRandomInt(0, width), this.getRandomInt(0, height),
        this.getRandomInt(0, width), this.getRandomInt(0, height)
      );
      this.ctx.strokeStyle = this.getRandomColor(120, 200, 0.45);
      this.ctx.lineWidth = 1.2;
      this.ctx.stroke();
    }
  }

  /**
   * 绘制杂色干扰噪点
   */
  private drawDots(): void {
    const { width, height, dotCount } = this.options;
    for (let i = 0; i < dotCount; i++) {
      this.ctx.beginPath();
      this.ctx.arc(
        this.getRandomInt(0, width),
        this.getRandomInt(0, height),
        1,
        0,
        2 * Math.PI
      );
      this.ctx.fillStyle = this.getRandomColor(100, 220, 0.5);
      this.ctx.fill();
    }
  }

  /**
   * 绘制文字:随机旋转、字号与色彩
   */
  private drawCharacters(): string {
    const { width, height, length, characters } = this.options;
    let code = '';
    const sliceWidth = width / (length + 1);

    for (let i = 0; i < length; i++) {
      const char = characters.charAt(this.getRandomInt(0, characters.length));
      code += char;

      // 字符样式配置
      const fontSize = this.getRandomInt(Math.floor(height * 0.55), Math.floor(height * 0.75));
      this.ctx.font = `bold ${fontSize}px sans-serif`;
      this.ctx.fillStyle = this.getRandomColor(40, 140);
      this.ctx.textBaseline = 'middle';

      // 随机旋转角度 (-25度 到 25度)
      const deg = (this.getRandomInt(-25, 25) * Math.PI) / 180;
      const x = (i + 1) * sliceWidth;
      const y = height / 2 + this.getRandomInt(-3, 3);

      this.ctx.save();
      this.ctx.translate(x, y);
      this.ctx.rotate(deg);
      this.ctx.fillText(char, -fontSize / 3, 0);
      this.ctx.restore();
    }
    return code;
  }

  /**
   * 重新生成并绘制验证码
   */
  public refresh(): string {
    const { width, height } = this.options;
    this.ctx.clearRect(0, 0, width, height);

    this.drawBackground();
    this.drawLines();
    this.drawDots();
    this.currentCode = this.drawCharacters();

    this.options.onChange(this.currentCode);
    return this.currentCode;
  }

  /**
   * 获取当前验证码字符串
   */
  public getCode(): string {
    return this.currentCode;
  }

  /**
   * 校验用户输入
   * @param input 用户输入的字符串
   * @param caseSensitive 是否区分大小写(默认 false)
   */
  public verify(input: string, caseSensitive: boolean = false): boolean {
    if (!input || !this.currentCode) return false;
    const a = caseSensitive ? input : input.toLowerCase();
    const b = caseSensitive ? this.currentCode : this.currentCode.toLowerCase();
    return a.trim() === b.trim();
  }
}
三、在 Vue 3 项目中封装适配组件
在 Vue 3 中,推荐同时提供一个单文件组件(SFC)和一个 Composable 函数。这样既可以直接在模版里使用 <CaptchaViewer />,也可以在自定义表单中用 useCaptcha() 获取更底层的控制权。
1. 编写 Vue 3 组件(CaptchaViewer.vue)
<template>
  <div class="captcha-box" :style="{ width: `${width}px`, height: `${height}px` }">
    <canvas
      ref="canvasRef"
      class="captcha-canvas"
      title="点击更换验证码"
      @click="handleRefresh"
    />
  </div>
</template>

<script setup lang="ts">
import { ref, onMounted, watch } from 'vue';
import { CaptchaEngine } from '@/utils/captchaEngine';

interface Props {
  width?: number;
  height?: number;
  length?: number;
  lineCount?: number;
  dotCount?: number;
}

const props = withDefaults(defineProps<Props>(), {
  width: 120,
  height: 40,
  length: 4,
  lineCount: 4,
  dotCount: 30,
});

const emit = defineEmits<{
  (e: 'change', code: string): void;
}>();

const canvasRef = ref<HTMLCanvasElement | null>(null);
let engine: CaptchaEngine | null = null;

const handleRefresh = () => {
  engine?.refresh();
};

const verify = (input: string, caseSensitive: boolean = false) => {
  return engine?.verify(input, caseSensitive) ?? false;
};

const getCode = () => {
  return engine?.getCode() ?? '';
};

onMounted(() => {
  if (canvasRef.value) {
    engine = new CaptchaEngine(canvasRef.value, {
      width: props.width,
      height: props.height,
      length: props.length,
      lineCount: props.lineCount,
      dotCount: props.dotCount,
      onChange: (code) => emit('change', code),
    });
  }
});

// 当长宽等关键尺寸改变时重新初始化
watch(
  () => [props.width, props.height, props.length],
  () => {
    if (canvasRef.value) {
      engine = new CaptchaEngine(canvasRef.value, {
        width: props.width,
        height: props.height,
        length: props.length,
        onChange: (code) => emit('change', code),
      });
    }
  }
);

// 暴露操作方法给父组件 ref
defineExpose({
  refresh: handleRefresh,
  verify,
  getCode,
});
</script>

<style scoped>
.captcha-box {
  display: inline-block;
  cursor: pointer;
  user-select: none;
  vertical-align: middle;
}
.captcha-canvas {
  display: block;
  border-radius: 4px;
}
</style>
2. Vue 3 业务表单调用示例
<template>
  <form @submit.prevent="handleSubmit">
    <div class="form-row">
      <input v-model="userInput" placeholder="请输入验证码" />
      <CaptchaViewer ref="captchaRef" @change="onCaptchaChange" />
    </div>
    <button type="submit">登录</button>
  </form>
</template>

<script setup lang="ts">
import { ref } from 'vue';
import CaptchaViewer from '@/components/CaptchaViewer.vue';

const userInput = ref('');
const captchaRef = ref<InstanceType<typeof CaptchaViewer> | null>(null);

const onCaptchaChange = (newCode: string) => {
  console.log('新生成的验证码已同步:', newCode);
};

const handleSubmit = () => {
  // 通过 ref 调用组件封装的校验方法
  const isValid = captchaRef.value?.verify(userInput.value);
  if (!isValid) {
    alert('验证码输入有误,请重新输入');
    captchaRef.value?.refresh(); // 校验失败自动刷新
    userInput.value = '';
    return;
  }
  alert('验证码正确,提交表单');
};
</script>
四、在 React 项目中封装适配组件
在 React 中,使用 forwardRef 和 useImperativeHandle 组合是暴露命令式方法(如 refresh() 与 verify())的标准模式,能保证与 React 18+ 的严格模式良好兼容。
1. 编写 React 组件(CaptchaViewer.tsx)
import React, {
  useRef,
  useEffect,
  useImperativeHandle,
  forwardRef,
  useCallback,
} from 'react';
import { CaptchaEngine, CaptchaOptions } from '../utils/captchaEngine';

export interface CaptchaViewerHandle {
  refresh: () => string;
  verify: (input: string, caseSensitive?: boolean) => boolean;
  getCode: () => string;
}

export interface CaptchaViewerProps {
  width?: number;
  height?: number;
  length?: number;
  lineCount?: number;
  dotCount?: number;
  onChange?: (code: string) => void;
  className?: string;
  style?: React.CSSProperties;
}

export const CaptchaViewer = forwardRef<CaptchaViewerHandle, CaptchaViewerProps>(
  (
    {
      width = 120,
      height = 40,
      length = 4,
      lineCount = 4,
      dotCount = 30,
      onChange,
      className,
      style,
    },
    ref
  ) => {
    const canvasRef = useRef<HTMLCanvasElement | null>(null);
    const engineRef = useRef<CaptchaEngine | null>(null);

    // 暴露给父组件 ref 的句柄
    useImperativeHandle(ref, () => ({
      refresh: () => engineRef.current?.refresh() ?? '',
      verify: (input: string, caseSensitive = false) =>
        engineRef.current?.verify(input, caseSensitive) ?? false,
      getCode: () => engineRef.current?.getCode() ?? '',
    }));

    // 初始化引擎实例
    useEffect(() => {
      if (!canvasRef.current) return;

      const engine = new CaptchaEngine(canvasRef.current, {
        width,
        height,
        length,
        lineCount,
        dotCount,
        onChange,
      });

      engineRef.current = engine;
    }, [width, height, length, lineCount, dotCount, onChange]);

    const handleClick = useCallback(() => {
      engineRef.current?.refresh();
    }, []);

    return (
      <div
        className={className}
        style={{
          display: 'inline-block',
          width,
          height,
          cursor: 'pointer',
          userSelect: 'none',
          verticalAlign: 'middle',
          ...style,
        }}
        onClick={handleClick}
        title="点击更换验证码"
      >
        <canvas ref={canvasRef} style={{ display: 'block', borderRadius: 4 }} />
      </div>
    );
  }
);

CaptchaViewer.displayName = 'CaptchaViewer';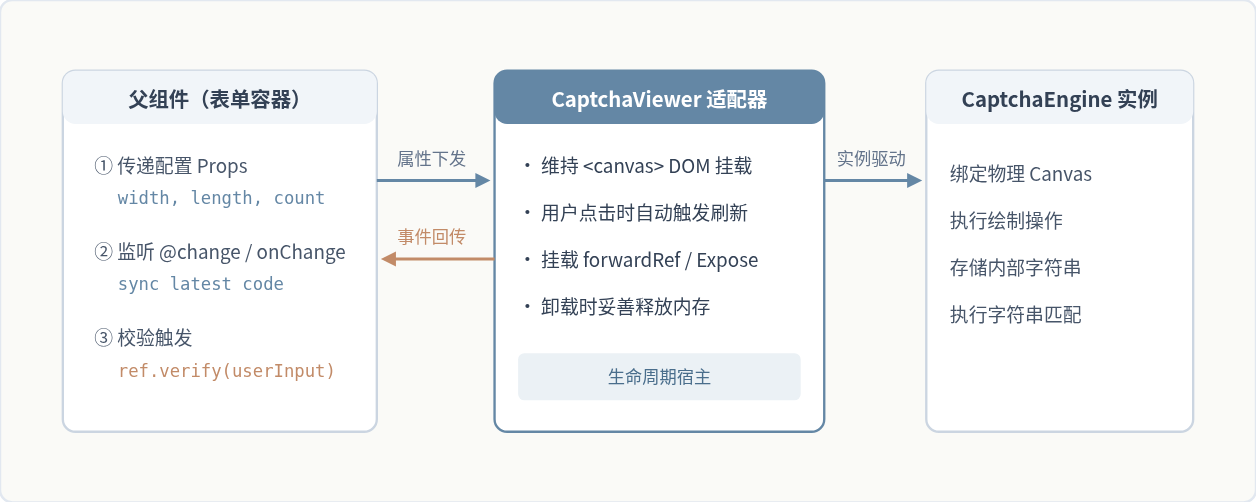
2. React 业务表单调用示例
import React, { useRef, useState } from 'react';
import { CaptchaViewer, CaptchaViewerHandle } from './components/CaptchaViewer';

export const LoginForm: React.FC = () => {
  const [inputVal, setInputVal] = useState('');
  const captchaRef = useRef<CaptchaViewerHandle | null>(null);

  const handleSubmit = (e: React.FormEvent) => {
    e.preventDefault();

    const isMatch = captchaRef.current?.verify(inputVal);
    if (!isMatch) {
      alert('验证码错误,已重置');
      captchaRef.current?.refresh();
      setInputVal('');
      return;
    }

    alert('验证码正确,继续提交');
  };

  return (
    <form onSubmit={handleSubmit}>
      <div style={{ display: 'flex', gap: 8, alignItems: 'center' }}>
        <input
          type="text"
          value={inputVal}
          onChange={(e) => setInputVal(e.target.value)}
          placeholder="输入图形验证码"
          maxLength={4}
        />
        <CaptchaViewer ref={captchaRef} width={120} height={40} />
      </div>
      <button type="submit" style={{ marginTop: 12 }}>
        确认提交
      </button>
    </form>
  );
};
五、工程化落地细节与避坑指南
在实际生产部署中,如果不注意浏览器渲染差异与用户体验,前端图片验证码常常会遇到用户投诉。以下是必须重点核查的技术细节:
| 潜在问题 | 根本原因 | 标准解决方案 |
|---|---|---|
| Retina / 移动端模糊 | Canvas 画布逻辑像素未按 devicePixelRatio 缩放,文字被拉伸失真。 |
物理像素 width * dpr,CSS 尺寸保持原样,配合 ctx.scale(dpr, dpr)。 |
| 用户抱怨“怎么输都错” | 字符池包含 0/O、1/I/l、v/u 等近形字符;或者强制区分了大小写。 |
排除易混淆字符集;默认采用 toLowerCase() 进行大小写无关校验。 |
| 频繁重绘导致闪烁 | 父组件因输入框打字导致 re-render,重复创建新引擎实例。 | React 中使用 useCallback 固化回调,或仅以固定尺寸属性为 useEffect 依赖项。 |
| 移动端触摸点击失效 | 仅绑定了 click 事件,在某些移动 WebView 中存在 300ms 延迟或点击穿透。 |
确保绑定在包裹层容器上,设置 user-select: none 与 cursor: pointer。 |
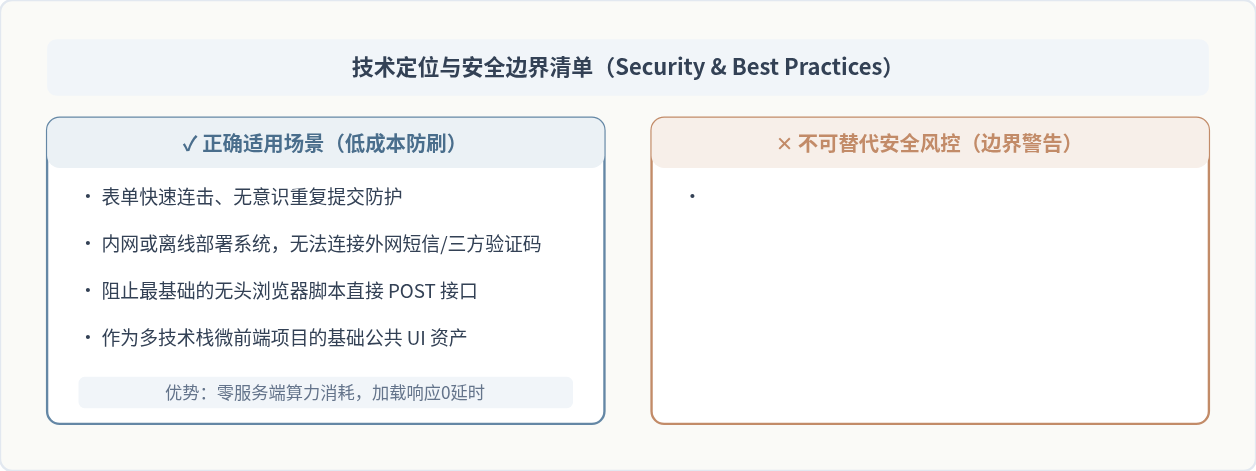
安全提示:纯前端生成的图片验证码,其正确答案在客户端内存中必定有迹可循(无论是通过 getCode() 还是拦截 JS 变量)。如果业务涉及资金流转、核心账户鉴权等高安全等级场景,必须由服务端生成带有时效签名的验证码图片(或 Session/Redis 绑定的 Key)并在后端校验,切勿单凭前端组件作为唯一防线。
六、总结
封装一个能够在 Vue 3 与 React 技术栈中通用的图片验证码组件,关键并不在于为每个框架各自发明一套复杂的组件逻辑,而在于将易变的“框架视图桥接”与稳定的“Canvas 图形算法”彻底解耦:
- 底层
CaptchaEngine负责处理纯净的数学随机、像素比矫正、噪点贝塞尔曲线与字符旋转; - 上层 Vue 3 的
CaptchaViewer.vue与 React 的CaptchaViewer.tsx仅负责生命周期绑定与响应式状态转发; - 两者共享一份字符集逻辑、高清渲染机制与校验接口,当视觉规则或字符算法升级时,只需在
CaptchaEngine中改动一处,即可全量生效。
这种分层封装思想不仅适用于图片验证码,在处理前端手写签名板、水印生成器、音频波形图等 Canvas / DOM 深度操作的业务场景中,同样是保持组件库跨技术栈健壮性的最佳实践。
不依赖第三方库,怎么用 JS 原生代码导出 Excel 数据
2026-11-20 08:06:52
兼容旧浏览器的JS URL参数截取方案
2026-11-19 21:37:39
JS中location.reload、history.go与window.location.href的区别
2026-11-19 20:05:44
JS怎么获取鼠标滚轮的滚动方向与距离
2026-11-19 14:49:25
原生JavaScript实现滑动验证码:Canvas绘图与拖拽逻辑详解
2026-11-19 13:35:44