

JavaScript 实现简单图片放大镜效果教程
作者:青柠时间:2026-10-23 16:21:45浏览:438
本文详细介绍如何使用原生 JavaScript 实现一个简单的图片放大镜效果。通过监听鼠标在缩略图区域的事件,控制半透明遮罩层的移动,并同步计算比例以移动右侧的大图显示区域。文章提供了完整的 HTML 结构、CSS 样式以及核心 JS 类代码,适合前端初学者学习 DOM 操作与事件处理。
JavaScript 实现简单图片放大镜效果教程
本文介绍如何使用 JavaScript 实现一个基础的图片放大镜功能,供读者参考学习。
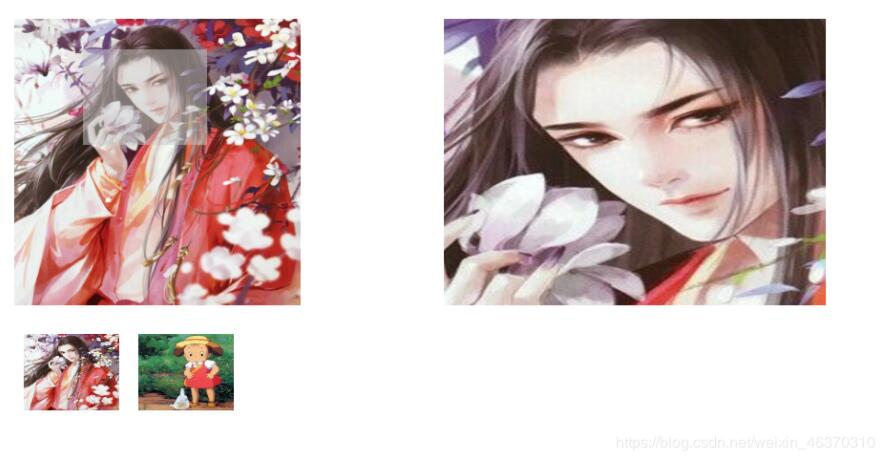
该放大镜效果的核心逻辑是:当鼠标移入指定图片区域时,显示一个半透明的遮罩层,并截取图片的一部分进行放大展示;当鼠标在区域内移动时,右侧的大图区域会同步进行局部滚动显示。需要注意的是,这里的“放大”并非改变图片分辨率,而是通过等比例移动大图来模拟放大视觉效果。以下是具体的实现代码。
CSS 样式定义
首先定义 CSS 样式,代码如下:
<style>
 .s_box{width:400px;height: 300px;position: absolute;left: 50px;top:100px;}
 .s_box img{width: 400px;height: 300px;}
 .s_box span{width: 130px;height: 100px;background: rgba(200,200,200,0.5);position: absolute;left:0;top:0;display: none;cursor:move;}

 .b_box{width: 400px;height: 300px;overflow: hidden;position: absolute;left:500px;top:100px;display: none;}
 .b_box img{width: 1200px;height: 900px;position: absolute;left:0;top:0;}

 .list{margin: 0;padding: 0;list-style: none;position: absolute;left:50px;top:430px;}
 .list li{float: left;margin: 0 10px;}
 .list li img{width: 100px;height: 80px;}
</style>
HTML 结构构建
接下来是 HTML 结构部分,代码如下:
<body>
 <div class="s_box">
 <img src="../img/large1.jpg" alt="">
 <span></span>
 </div>
 <div class="b_box">
 <img src="../img/large1.jpg" alt="">
 </div>
 <ul class="list">
 <li><img src="../img/large1.jpg" alt=""></li>
 <li><img src="../img/large2.jpg" alt=""></li>
 </ul>
</body>
JavaScript 核心逻辑
核心 JavaScript 逻辑如下,代码如下:
// 分析:
// 1.选择元素
// 2.绑定事件
// 3.进入的时候显示元素
// 4.移动:遮罩层跟随鼠标移动的同时计算遮罩层的移动比例 、右侧大图,等比例移动
// 5.离开的时候隐藏元素
<script>
 class Large{
 constructor(){
 this.sBox = document.querySelector(".s_box");
 this.sImg = document.querySelector(".s_box img");
 this.sSpan = document.querySelector(".s_box span");
 this.bBox = document.querySelector(".b_box");
 this.bImg = document.querySelector(".b_box img");
 // 点击小图切换大图的按钮
 this.li = document.querySelectorAll(".list li");
 }
 addEvent(){
 var that = this;
 this.sBox.onmouseover = function(){
 that.over();
 }
 this.sBox.onmousemove = function(eve){
 var e = eve || window.event;
 that.move(e);
 }
 this.sBox.onmouseout = function(){
 that.out();
 }
 // 切换图片按钮的点击事件:根据布局做出调整
 for(var i=0;i<this.li.length;i++){
 this.li[i].onclick = function(){
  that.sImg.src = this.children[0].src;
  that.bImg.src = this.children[0].src;
 }
 }
 }
 over(){
 this.sSpan.style.display = "block";
 this.bBox.style.display = "block";
 }
 move(e){
 // 计算遮罩层跟随鼠标移动时的left和top
 var l = e.pageX - this.sBox.offsetLeft - this.sSpan.offsetWidth/2;
 var t = e.pageY - this.sBox.offsetTop - this.sSpan.offsetHeight/2;
 // 边界限定
 if(l<0) l=0;
 if(t<0) t=0;
 if(l > this.sBox.offsetWidth - this.sSpan.offsetWidth){
 l = this.sBox.offsetWidth - this.sSpan.offsetWidth;
 }
 if(t > this.sBox.offsetHeight - this.sSpan.offsetHeight){
 t = this.sBox.offsetHeight - this.sSpan.offsetHeight;
 }
 // 设置遮罩层的位置
 this.sSpan.style.left = l + "px";
 this.sSpan.style.top = t + "px";
 // 根据遮罩层移动的距离计算比例
 var x = l / (this.sBox.offsetWidth - this.sSpan.offsetWidth);
 var y = t / (this.sBox.offsetHeight - this.sSpan.offsetHeight);
 // 根据上一步得到的比例,计算右侧大图要移动的当前值
 this.bImg.style.left = (this.bBox.offsetWidth - this.bImg.offsetWidth) * x + "px";
 this.bImg.style.top = (this.bBox.offsetHeight - this.bImg.offsetHeight) * y + "px";
 }
 out(){
 this.sSpan.style.display = "none";
 this.bBox.style.display = "none";
 }
 }

 // 启动
 var l = new Large();
 l.addEvent();

</script>
最终实现的视觉效果如图所示:
如需了解更多关于放大镜效果的精彩文章,请点击链接查看:《放大镜效果》
以上就是本文的全部内容,希望对大家的学习有所帮助,也希望大家多多支持本站。
作者最新文章
ES6模块化中js文件怎么用import和export交互
2026-11-05 17:00:48
JS读取本地文件时报错或无响应的常见原因
2026-11-05 16:32:31
let、const与var的区别:JavaScript变量声明最佳实践
2026-11-05 14:16:38
JS中直接定义静态二维数组的字面量写法
2026-11-05 14:16:08
JS 怎么查找字符串中所有匹配项的位置
2026-11-05 14:15:53