

基于cropper.js实现头像裁剪的前后端完整示例
本文介绍如何利用cropper.js库实现头像裁剪功能。前端采用独立JSP页面作为弹出层,集成cropper相关资源;后端基于SSM框架,通过Spring MVC接收MultipartFile图片数据,完成保存与转码处理。文中提供了完整的前后端代码片段及GitHub资源地址,供开发者参考集成。
cropper.js头像裁剪功能实现概述
近期项目中遇到了头像裁剪的需求,经过网络检索,发现GitHub上的cropper项目表现良好,遂进行借鉴开发。整体使用过程较为简便,以下为一个具体的应用实例。
首先展示最终实现的效果图:
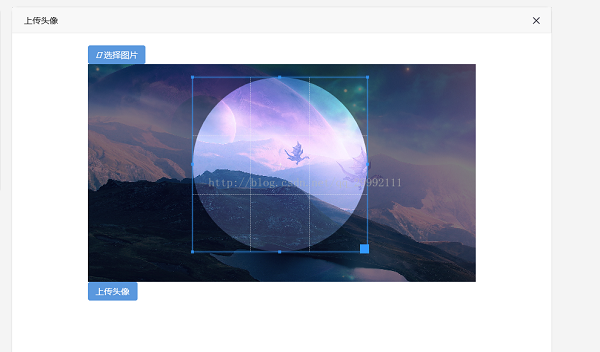
接下来分别提供前端与后端的实现代码。
前端采用独立的JSP页面构建,这种结构非常适合用于实现图片裁剪的弹出层交互。
关于JSP页面中引用的cropper相关JS与CSS文件,此处不再赘述。如需获取,可前往官方GitHub仓库下载。
官方仓库地址:https://github.com/fengyuanchen/cropper
前端JSP页面实现
<%@ page language="java" contentType="text/html; charset=UTF-8"
pageEncoding="UTF-8"%>
<%@ include file="../common_front.jsp" %>
<!DOCTYPE html PUBLIC "-//W3C//DTD HTML 4.01 Transitional//EN" "http://www.w3.org/TR/html4/loose.dtd">
<html>
<head>
<meta http-equiv="Content-Type" content="text/html; charset=UTF-8">
<title>Insert title here</title>
<link rel="stylesheet" href="${path }/front/plugins/cropper/cropper.css" rel="external nofollow" >
<script src="${path }/front/plugins/cropper/cropper.js"></script>
<style>
.container {
max-width: 640px;
margin: 20px auto;
}
img {
max-width: 100%;
}
#result img{
max-width: 200px;
max-height: 200px;
}
.cropper-view-box,
.cropper-face {
border-radius: 50%;
}
</style>
<script type="text/javascript">
function getSize(size){
var num=parseInt(size);
if(num<=300){//先要求图片的大小小于300之间
return num;
}
return getSize(num/2);
}
function getRoundedCanvas(sourceCanvas) {
var canvas = document.createElement('canvas');
var context = canvas.getContext('2d');
var width = sourceCanvas.width;
var height = sourceCanvas.height;
width=getSize(width);
height=width;
canvas.width = width;
canvas.height = height;
context.beginPath();
//这里是控制裁剪区域的大小(这里也决定你所要生成的图片的大小和形状 我这边用的是圆形的头像 大家有别的需要可以修改)
context.arc(width/2, height/2, Math.min(width, height)/2, 0, 2 * Math.PI);
context.strokeStyle = 'rgba(0,0,0,0)';
context.stroke();
context.clip();
context.drawImage(sourceCanvas, 0, 0, width, height);
return canvas;
}
$(function(){
var $image = $('#image');
var $button = $('#button');
var $result = $('#result');
var croppable = false;
$image.cropper({
aspectRatio: 1,
viewMode: 1,
ready: function () {
croppable = true;
}
});
$button.on('click', function () {
var croppedCanvas;
var roundedCanvas;
if (!croppable) {
return;
}
// 裁剪
croppedCanvas = $image.cropper('getCroppedCanvas');
//判断图片大小,如果超过1080 则返回
if(croppedCanvas.width>1080){
alert("图片过大,请重新选择!");
return false;
}
// 生成圆形
roundedCanvas = getRoundedCanvas(croppedCanvas);
//将裁剪区域的图片转出图片的base64编码,放到表单里提交到后台。后台再对其进行解码,保存。
$("#icon").val(roundedCanvas.toDataURL());
$.ajax({
url:'${path }/front/saveUserIcon',
data:$("#submitForm").serialize(),
type:'POST',
success:function(data){
if(data.code==200){
parent.location.reload(); // 父页面刷新
var index = parent.layer.getFrameIndex(window.name); //获取窗口索引
parent.layer.close(index);
}else{
warningAlert(data.msg);
}
}
});
return false;
});
//当选择完图片后,直接提交表单到后台,图片保存后再回到此页面。这样此页面的图片裁剪画布就改变成你所选择的图片了
$("#file").change(function(){
var fileName=$("#file").val();
fileName=fileName.toLowerCase();
if((fileName.indexOf(".jpg")!=-1)||(fileName.indexOf(".png")!=-1)||(fileName.indexOf(".jpeg")!=-1)||(fileName.indexOf(".bmp")!=-1)||(fileName.indexOf(".gif")!=-1)){
$("#imageUploadForm").submit();
}else{
alert("所选图片格式错误或者不支持此类图片格式!");
}
return false;
});
});
</script>
</head>
<body>
<div class="container">
<form enctype="multipart/form-data" method="post" id="imageUploadForm" action="${path}/front/imageUpload" >
<span class="btn-upload">
<a href="javascript:void();" rel="external nofollow" class="btn btn-primary radius"><i class="iconfont">󰀠</i> 选择图片</a>
<input type="file" name="file" id="file" class="input-file">
<input type="hidden" name="originalImage" value="${imageRelativePath}"/>
</span>
</form>
<div>
<c:if test="${!empty imageRelativePath }">
<img id="image" src="${path }/${imageRelativePath}" alt="Picture">
</c:if>
<c:if test="${!empty userico }">
<img id="image" src="${path }/${userico}" alt="Picture">
</c:if>
<c:if test="${!empty teachericon }">
<img id="image" src="${path }/${teachericon}" alt="Picture">
</c:if>
</div>
<form id="submitForm" action="" method="post">
<input type="hidden" name="originalImage" value="${imageRelativePath}"/>
<input type="hidden" name="icon" id="icon"/>
</form>
<input class="btn btn-primary size-M radius" type="button" id="button" value="上传头像">
<div id="result"></div>
</div>
</body>
</html>snippet_file_0.txt
以下是后台处理逻辑,供参考。后端基于SSM框架开发,核心功能包括图片保存及图片数据的转码处理。
后端SSM框架处理逻辑
//用户上传头像
 /**
 *
 * @param image 选择的图片
 * @param model
 * @param userId 用户id
 * @param userType 用户类型
 * @param request
 * @param originalImage 上一张临时图片
 * @return
 */
 @RequestMapping(value="/imageUpload",method=RequestMethod.POST)
 public String iconImageUpload(@RequestParam(value="file",required=false)MultipartFile image,Model model,@CookieValue("userId")String userId,HttpServletRequest request,String originalImage){
 String basePath="image/";
 //web.xml里面配置的用户图片存储路径
 String userImagePath=request.getSession().getServletContext().getInitParameter("userImageSavePath");
 //图片相对路径
 String imageRelativePath=FileUtils.fileUpload(image, request,basePath+userImagePath);
 System.out.println("图片保存路径------"+imageRelativePath);
 System.out.println("上一张临时图片------"+originalImage);
 //删除上一张临时图片
 if(originalImage!=null){
 String basePathTemp=request.getSession().getServletContext().getRealPath("/");
 FileUtils.deleteFile(basePathTemp+originalImage);
 }
 model.addAttribute("imageRelativePath", imageRelativePath);
 model.addAttribute("userId", userId);
 return "/crop_image";
 }
 //将裁剪好的头像由base64还原成图片
 @ResponseBody
 @RequestMapping(value="/saveUserIcon",method=RequestMethod.POST)
 public Msg saveUserIcon(String icon,@CookieValue("userType")String userType,@CookieValue("userId")String userId,String originalImage,HttpServletRequest request){
 System.out.println("icon-----"+icon);
 //先生成图片地址
 String realpath=request.getSession().getServletContext().getRealPath("/");
 String basePath="image/";
 String userImagePath=request.getSession().getServletContext().getInitParameter("userImageSavePath");
 Calendar now=Calendar.getInstance();
 String relativePath=basePath+userImagePath+"/"+now.get(Calendar.YEAR)+"/"+(now.get(Calendar.MONTH)+1)+"/"+now.get(Calendar.DAY_OF_MONTH)+"/"+FileUtils.getUUID()+".png";
 String imagePath=realpath+relativePath;
 //将base64 转换成图片
 FileUtils.base64ToImage(icon, imagePath);
 //删除原图
 if(originalImage!=null){
 FileUtils.deleteFile(realpath+originalImage);
 }
 return Msg.success();
 }
 //下面是解码的方法
 public static boolean base64ToImage(String base64, String path) {// 对字节数组字符串进行Base64解码并生成图片
  if (base64 == null){ // 图像数据为空
   return false;
  }
  System.out.println(base64);
  // base64 的格式为 “data:image/png;base64,****”,逗号之前都是一些说明性的文字,我们只需要逗号之后的就行了
  base64=base64.split(",")[1];
  BASE64Decoder decoder = new BASE64Decoder();
  try {
   // Base64解码
   byte[] bytes = decoder.decodeBuffer(base64);
   for (int i = 0; i < bytes.length; ++i) {
    if (bytes[i] < 0) {// 调整异常数据
     bytes[i] += 256;
    }
   }
   // 生成图片
   OutputStream out = new FileOutputStream(path);
   out.write(bytes);
   out.flush();
   out.close();
   return true;
  } catch (Exception e) {
   return false;
  }
 }
总结
以上即为使用cropper.js进行头像裁剪的完整实例代码,希望能为读者提供帮助。如有任何疑问,欢迎留言,作者将及时回复。同时感谢对本站的支持!
macOS卸载Node.js指南:区分Homebrew与pkg安装包的处理方式
2026-11-05 11:28:12
JS逆向入门:浏览器Console调试与Node.js环境搭建指南
2026-11-05 10:57:15
Node.js 大版本升级需要注意哪些破坏性变更
2026-11-03 20:35:44
Node.js官网LTS版与Current版有什么区别
2026-11-03 19:33:49
Windows彻底卸载Node.js:清理AppData残留与PATH环境变量
2026-11-03 19:15:35