

详解JavaScript如何创建一个非自动播放的GIF网络组件
本文详细介绍如何使用JavaScript创建一个自定义Web组件,实现GIF图片的非自动播放功能。通过结合HTML5 Canvas、Shadow DOM及属性监听机制,开发者可以构建一个轻量级、可复用的GIF播放器,允许用户手动控制动画的启动与停止,从而优化页面性能并提升用户体验。
本文将演示如何开发一个Web组件,让用户能够自主决定是否播放GIF动画。我们将逐步构建这一功能。
准备测试数据
示例中使用的GIF素材为小骆驼与猫咪的互动画面:

画面十分可爱,令人百看不厌。
构建Web组件
开发该Web组件需要以下要素:
- 画布元素(用于显示缩略图)
- 图片元素(实际的GIF源)
- 带有“GIF”字样的标签
- 必要的样式定义
具体实现步骤如下:
const noAutoplayGifTemplate = document.createElement('template')
noAutoplayGifTemplate.innerHTML = `
<style>
.no-autoplay-gif {
  --size: 30px;
  cursor: pointer;
  position: relative;
}

.no-autoplay-gif .gif-label {
  border: 2px solid #000;
  background-color: #fff;
  border-radius: 100%;
  width: var(--size);
  height: var(--size);
  text-align: center;
  font: bold calc(var(--size) * 0.4)/var(--size) sans-serif;
  position: absolute;
  top: calc(50% - var(--size) / 2);
  left: calc(50% - var(--size) / 2);
}

.no-autoplay-gif .hidden {
  display: none;
}
</style>
<div class="no-autoplay-gif">
  <canvas />
  <span class="gif-label" aria-hidden="true">GIF</span>
  <img class="hidden">
</div>
首先,我们创建一个继承自HTMLElement的类。该类将包含控制播放与停止的逻辑。
class NoAutoplayGif extends HTMLElement {
  constructor() {
    super()

    // 在此处添加设置
  }

  loadImage() {
    // 在此处添加渲染
  }

  static get observedAttributes() {
    return ['src', 'alt'];
  }

  attributeChangedCallback(name, oldVal, newVal) {
    if (oldVal !== newVal || oldVal === null) {
      this.loadImage()
    }
  }
}
接下来是基础代码结构:包含一个空的渲染函数,用于加载图像并显示缩略图,以及构造函数和一些Web组件特有的生命周期方法。
代码量看似不少,下面进行详细解释。
该loadImage方法并非由浏览器自动调用,我们需要手动触发。attributeChangedCallback方法用于定义当observedAttributes中指定的属性发生变化时的响应行为。在此场景中,它负责加载图像并展示。浏览器的大致执行流程如下:
- 解析到Web组件节点
- 执行构造函数(此时调用
constructor()) - 依次将DOM中设置的属性赋值给组件实例(因此,
src="llama.gif"会触发.setAttribute('src', 'llama.gif')) - 针对每个发生变化的属性执行
attributeChangedCallback
在构造函数执行时,属性初始值为空,后续才会被填充。如果渲染依赖于特定属性,而在属性尚未存在时调用loadImage并无意义。因此,我们不在构造函数中直接调用它,而是确保在属性可能存在的时机再行调用。**
完成基础结构后,将该类注册为自定义Web组件:
class NoAutoplayGif extends HTMLElement {
  // ...
}

window.customElements.define('no-autoplay-gif', NoAutoplayGif)
现在,我们可以像这样使用此组件:
<no-autoplay-gif
  src="..."
  alt="Llama and cat"
/>
核心逻辑实现
关键部分来了。我们需要将noAutoplayGifTemplate注入组件的Shadow DOM中。src属性已具备渲染DOM的能力,但若缺少alt等属性,功能仍不完整。因此,我们从Shadow DOM中提取后续所需的元素,并绑定点击事件以切换播放/停止状态。
class NoAutoplayGif extends HTMLElement {
  constructor() {
    super()

    // 添加 shadow DOM
    this._shadowRoot = this.attachShadow({ mode: 'open' })

    // 从上面添加模板
    this._shadowRoot.appendChild(
      noAutoplayGifTemplate.content.cloneNode(true)
    )

    // 我们稍后会需要这些
    this.canvas = this._shadowRoot.querySelector('canvas')
    this.img = this._shadowRoot.querySelector('img')
    this.label = this._shadowRoot.querySelector('.gif-label')
    this.container = this._shadowRoot.querySelector('.no-autoplay-gif')

    // 使整个东西可点击
    this._shadowRoot.querySelector('.no-autoplay-gif').addEventListener('click', () => {
      this.toggleImage()
    })
  }

  // ...
}
为避免未定义方法的错误,我们补充了以下三个方法:
class NoAutoplayGif extends HTMLElement {
  // ...
  toggleImage(force = undefined) {
    this.img.classList.toggle('hidden', force)

    // We need to check for undefined values, as JS does a distinction here.
    // We cannot simply negate a given force value (i.e. hiding one thing and unhiding another)
    // as an undefined value would actually toggle the img, but
    // always hide the other two, because !undefined == true
    this.canvas.classList.toggle('hidden', force !== undefined ? !force : undefined)
    this.label.classList.toggle('hidden', force !== undefined ? !force : undefined)
  }

  start() {
    this.toggleImage(false)
  }

  stop() {
    this.toggleImage(true)
  }
  // ...
}
start和stop方法用于强制启动或停止GIF。理论上,调用方式如下:
const gif = document.querySelector('no-autoplay-gif')
gif.start()
gif.stop()
gif.toggleImage()
最后一步,处理图片加载逻辑。首先进行参数验证:
class NoAutoplayGif extends HTMLElement {
  // ...
  loadImage() {
    const src = this.getAttribute('src')
    const alt = this.getAttribute('alt')

    if (!src) {
      console.warn('A source gif must be given')
      return
    }

    if (!src.endsWith('.gif')) {
      console.warn('Provided src is not a .gif')
      return
    }

    // More stuff
  }
  // ...
}
完成加载后,设置宽高并利用Canvas进行绘制:
class NoAutoplayGif extends HTMLElement {
  // ...
  loadImage() {
    // Validation

    this.img.onload = event => {
      const width = event.currentTarget.width
      const height = event.currentTarget.height

      // Set width and height of the entire thing
      this.canvas.setAttribute('width', width)
      this.canvas.setAttribute('height', height)
      this.container.setAttribute('style', `
        width: ${width}px;
        height: ${height}px;
      `)

      // "Draws" the gif onto a canvas, i.e. the first
      // frame, making it look like a thumbnail.
      this.canvas.getContext('2d').drawImage(this.img, 0, 0)
    }

    // Trigger the loading
    this.img.src = src
    this.img.alt = alt
  }
  // ...
}
至此,组件开发完成。
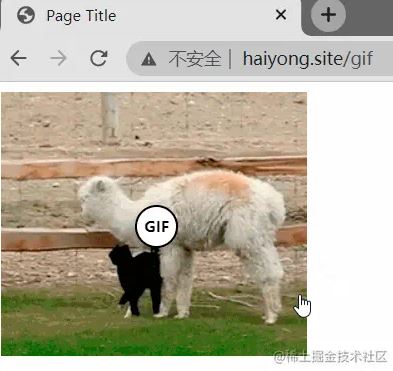
最终效果
演示地址:haiyong.site/gif
以上即为详解JavaScript如何创建一个非自动播放的GIF网络组件的详细内容,更多关于JavaScript播放GIF的资料请关注本站其它相关文章!
JS读取本地文件时报错或无响应的常见原因
2026-11-05 16:32:31
let、const与var的区别:JavaScript变量声明最佳实践
2026-11-05 14:16:38
JS中直接定义静态二维数组的字面量写法
2026-11-05 14:16:08
JS 怎么查找字符串中所有匹配项的位置
2026-11-05 14:15:53
JavaScript新手常犯的编码错误与最佳实践指南
2026-11-04 22:12:38