
JS怎么修改伪元素::before的颜色
详解JavaScript为什么无法直接操作::before伪元素,以及通过CSS自定义属性、切换类名或data属性、动态插入style规则三种实用方式修改::before颜色的步骤与排查方法。
JavaScript 不能像修改普通元素那样直接用 element.style.color 去改 ::before 的颜色,因为伪元素并不存在于 DOM 树中。实际开发中有三种通用做法:用 CSS 变量(自定义属性)传递颜色、通过切换类名或 data-* 属性触发预设样式,以及用 JS 动态写入 <style> 标签或样式表规则。下面从原因讲起,依次给出可直接运行的完整步骤与排查方法。
为什么 JS 不能直接选中或修改 ::before
很多人在刚遇到这个问题时,会尝试用选择器直接获取伪元素,或者把 getComputedStyle 的返回值拿来赋值,结果都会失败。原因在于 ::before 是浏览器根据 CSS 的 content 属性在渲染阶段生成的虚拟节点,它附着在宿主元素上,但并不属于 DOM 树的一部分。
在现代浏览器的控制台里执行下面两类常见写法,就能看到具体的限制:
// 1. 尝试直接选中伪元素
const pseudo = document.querySelector('.tag::before');
console.log(pseudo);

// 2. 尝试修改计算样式对象
const host = document.querySelector('.tag');
const styles = window.getComputedStyle(host, '::before');
console.log(styles.color);
styles.color = '#71A397'; // 在严格模式下会直接抛出异常既然 JS 触达不到 ::before 本身,修改它的思路就需要转个弯:让 JS 去修改“DOM 宿主元素”或“CSS 样式表”,再由浏览器的 CSS 引擎把变化传导给 ::before。
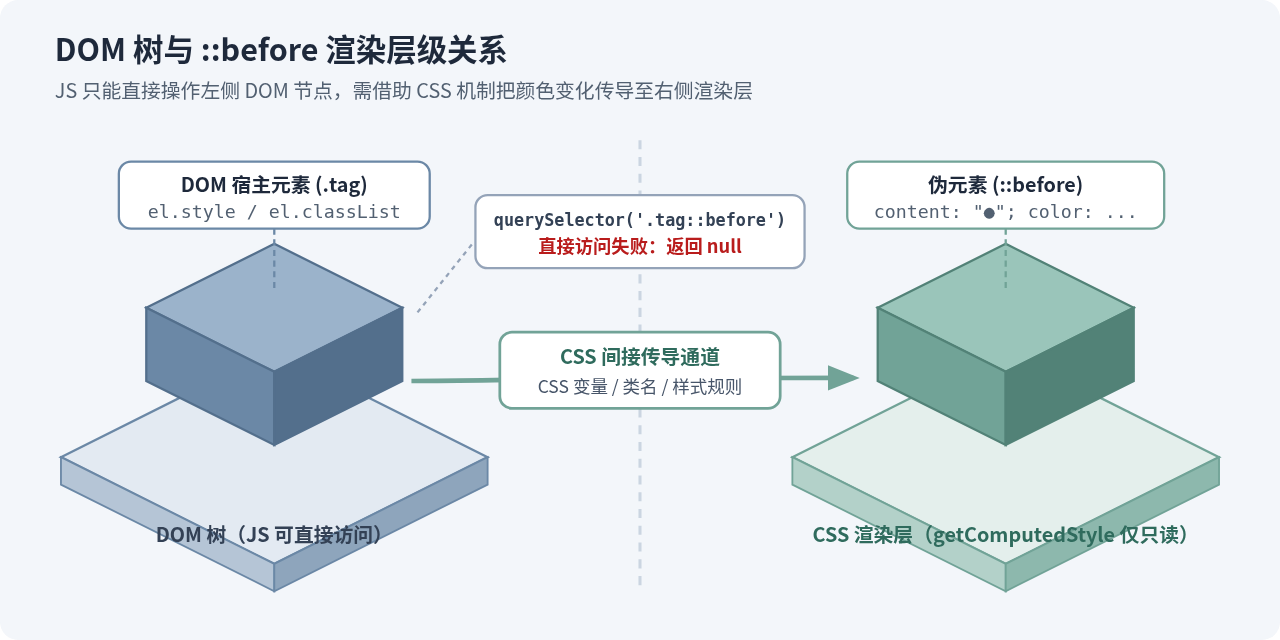
方法一:使用 CSS 变量动态修改(推荐)
如果颜色需要由用户输入、取色器或后端数据实时决定,或者页面上有多个同类名元素但只想改其中某一个的颜色,使用 CSS 自定义属性(CSS 变量)是最直接、副作用最小的方案。
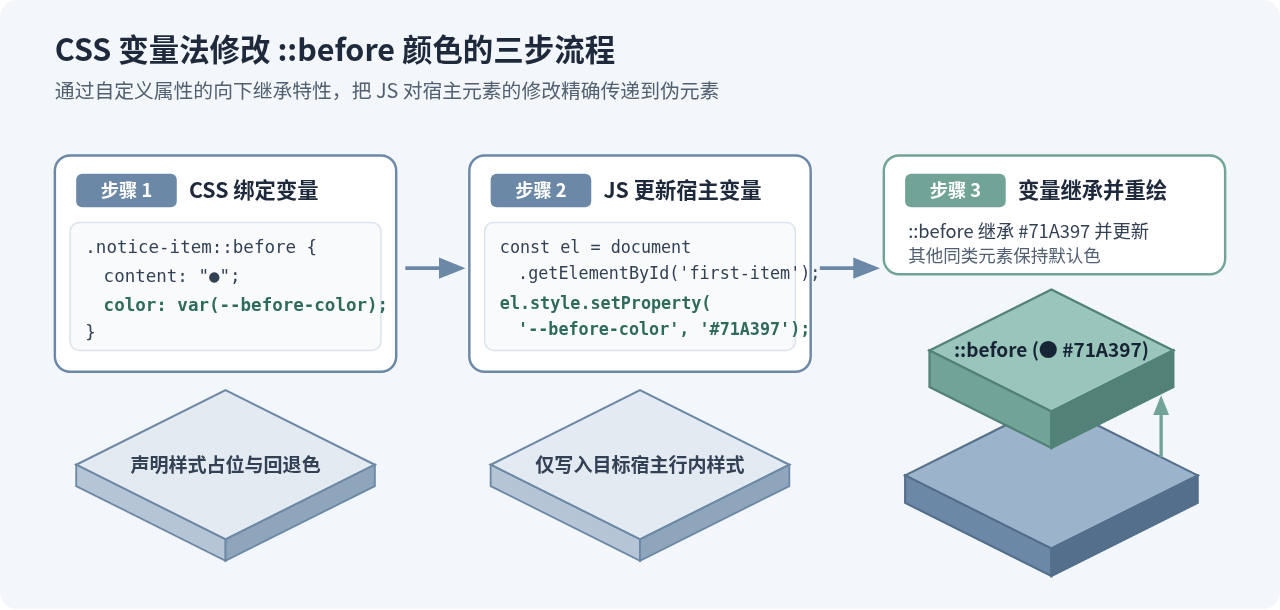
原理是 CSS 自定义属性会自动从宿主元素向下继承给它的 ::before 和 ::after 伪元素。只要在 CSS 中让伪元素读取变量,JS 在宿主元素上更新这个变量即可。
操作步骤
- 在 CSS 中声明变量引用:给目标元素的
::before设置content,并把color(如果是色块或边框,则对应background-color或border-color)写成var(--before-color, 默认色)。 - 在 JS 中获取宿主元素并更新变量:通过
element.style.setProperty('--before-color', 新颜色值)写入新颜色。 - 需要恢复默认颜色时移除属性:调用
element.style.removeProperty('--before-color'),样式会自动回退到 CSS 中设置的默认值。
<!-- 完整可运行 HTML 示例(保存为 .html 文件并在浏览器打开) -->
<style>
  .notice-item {
    position: relative;
    padding-left: 22px;
    margin-bottom: 10px;
    font-size: 16px;
  }

  .notice-item::before {
    content: "●";
    position: absolute;
    left: 0;
    /* 第二个参数为回退默认色 */
    color: var(--before-color, #6b88a6);
    transition: color 0.2s ease;
  }
</style>

<p id="first-item" class="notice-item">第一条提示:将单独变为灰绿色</p>
<p class="notice-item">第二条提示:保持默认雾蓝色</p>

<button id="change-btn" type="button">修改第一条 ::before 颜色</button>
<button id="reset-btn" type="button">恢复默认颜色</button>

<script>
  const firstItem = document.getElementById('first-item');
  const changeBtn = document.getElementById('change-btn');
  const resetBtn = document.getElementById('reset-btn');

  changeBtn.addEventListener('click', () => {
    // 仅作用于 firstItem 及其伪元素,不影响第二条
    firstItem.style.setProperty('--before-color', '#71A397');
  });

  resetBtn.addEventListener('click', () => {
    firstItem.style.removeProperty('--before-color');
  });
</script>firstItem.style.--before-color = '#71A397',带双连字符的自定义属性在 JS 中不是合法标识符,必须使用 style.setProperty('--变量名', '值')。
方法二:切换类名或 data-* 属性
很多界面交互并不需要随意传任意颜色,而是在“正常、高亮、警告、错误”等几种固定状态间切换。这时把颜色写死在 CSS 状态规则里,让 JS 只负责切换状态标记,代码结构会更清晰。
下面演示用 data-status 属性控制状态标记颜色的做法(用 classList.add / classList.toggle 切换类名也是同样原理):
<style>
  .status-label::before {
    content: "●";
    margin-right: 6px;
    color: #6b88a6; /* 默认状态 */
  }

  .status-label[data-status="success"]::before {
    color: #71a397;
  }

  .status-label[data-status="error"]::before {
    color: #c95656;
  }
</style>

<span id="task-badge" class="status-label" data-status="default">当前任务状态</span>
<button id="mark-success" type="button">设为成功</button>
<button id="mark-error" type="button">设为异常</button>

<script>
  const badge = document.getElementById('task-badge');

  document.getElementById('mark-success').addEventListener('click', () => {
    badge.dataset.status = 'success';
  });

  document.getElementById('mark-error').addEventListener('click', () => {
    badge.dataset.status = 'error';
  });
</script>
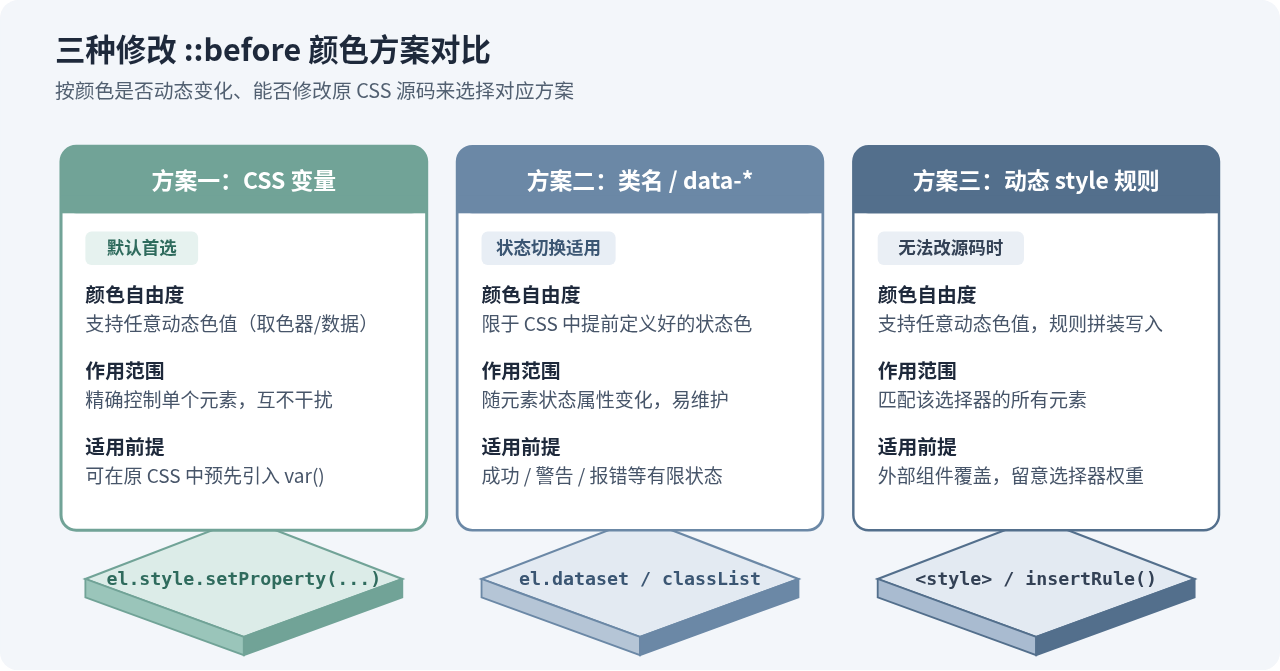
这种方式的好处是颜色规则集中留在 CSS 文件中,JS 只管语义状态,不和具体色值耦合;局限在于只能切换事先写好的几种颜色。
方法三:通过 <style> 标签或 CSSStyleSheet 动态写入规则
有时你接手的是第三方组件或无法修改原 CSS 源码的页面,原样式表里既没有预留 CSS 变量,也没有预留状态类名,这时就需要用 JS 直接向页面注入或修改一条包含 ::before 的 CSS 规则。
做法 A:复用一个专用 <style> 标签(最稳妥)
在 <head> 中创建一个带固定 id 的 <style> 元素,需要改色时更新它的 textContent。为了不误伤页面上其他同类元素,建议同时给目标元素加上专属类名或属性选择器。
<style>
  .legacy-card::before {
    content: "★";
    margin-right: 6px;
    color: #6b88a6;
  }
</style>

<div id="target-card" class="legacy-card">无法改原 CSS 的旧组件</div>
<button id="inject-btn" type="button">注入样式修改颜色</button>

<script>
  function setBeforeColorByStyleTag(selector, color) {
    let styleEl = document.getElementById('dynamic-before-style');
    if (!styleEl) {
      styleEl = document.createElement('style');
      styleEl.id = 'dynamic-before-style';
      document.head.appendChild(styleEl);
    }
    styleEl.textContent = `${selector}::before { color: ${color}; }`;
  }

  document.getElementById('inject-btn').addEventListener('click', () => {
    // 使用 id 选择器限定只改目标元素,且权重高于原类选择器
    setBeforeColorByStyleTag('#target-card.legacy-card', '#71A397');
  });
</script>
做法 B:调用 CSSStyleSheet.insertRule()
如果不想每次拼接整段文本,也可以给新建的 <style> 元素拿到它的 sheet 对象,通过 insertRule() 和 deleteRule() 精准增删规则:
const dynamicStyle = document.createElement('style');
document.head.appendChild(dynamicStyle);
const sheet = dynamicStyle.sheet;

// 插入新规则到末尾
const ruleIndex = sheet.insertRule(
  '#target-card.legacy-card::before { color: #71A397; }',
  sheet.cssRules.length
);

// 若需再次替换,可先删除旧规则再插入
// sheet.deleteRule(ruleIndex);document.styleSheets[0].cssRules。如果页面中引入了跨域的外部 CDN 样式表(<link>),浏览器出于安全策略会阻止脚本读取其 cssRules,并抛出 SecurityError。自己新建一个内联 <style> 元素再操作它的 sheet,可以完全避开这个问题。
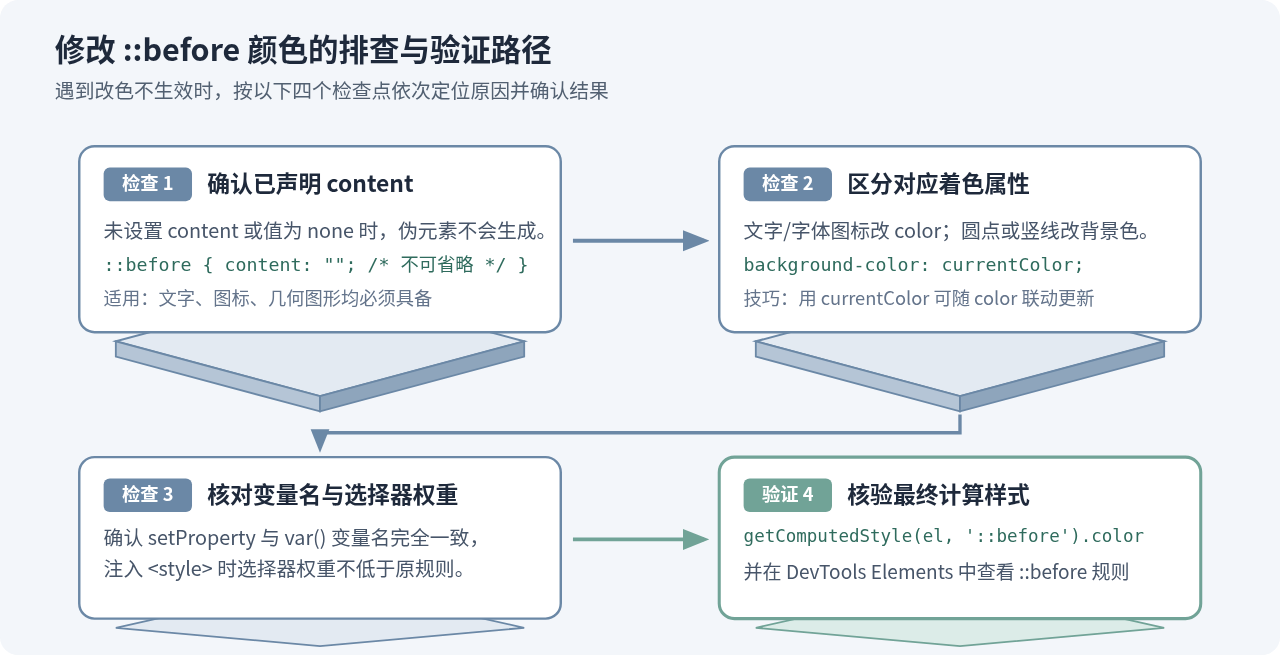
如何验证颜色是否生效,以及常见排查问题
代码写完后,除了肉眼看页面显示,还可以用下面两种方式确认最终计算颜色是否已经应用到 ::before 上:
- 用 JS 读取计算样式:虽然
getComputedStyle(el, '::before')不能赋值,但它可以读取最终生效的颜色值(浏览器通常返回rgb(...)格式)。 - 在开发者工具里查看节点:打开浏览器开发者工具的 Elements(元素)面板,展开宿主元素,在子级可以看到独立的
::before项,点击它就能在右侧 Styles 面板核对当前生效的样式规则和被划掉的覆盖规则。
// 在浏览器控制台或脚本中验证最终颜色
const el = document.getElementById('first-item');
const computedColor = window.getComputedStyle(el, '::before').color;
console.log(computedColor);如果执行了 JS 代码,但页面上的伪元素颜色依然没有变化,通常出在下面几个地方:
| 常见现象 | 根本原因 | 对应解决方法 |
|---|---|---|
| 伪元素根本没显示出来 | CSS 中未定义 content,或值为 none,浏览器不会生成伪元素。 |
在 ::before 规则中补上 content: ""; 或需要的符号字符。 |
改了 color,但圆点、竖线或三角形颜色没变 |
color 只控制文字和字体图标颜色;纯几何形状依赖背景或边框色。 |
改用 background-color 或 border-color,或者在 CSS 里写成 background-color: currentColor;,这样修改 color 时就会联动变色。 |
注入的 <style> 规则不生效 |
原 CSS 选择器权重更高(例如原本写了 #app .item::before),把新规则覆盖掉了。 |
提高注入规则的选择器权重,或在测试定位时确认样式顺序位于原规则之后。 |
| 方法一修改了变量,但子伪元素还是旧颜色 | 宿主元素上写了 --color,而伪元素样式里写成了固定色值或拼错了变量名。 |
核对 setProperty 和 var() 里的变量名是否完全一致(区分大小写)。 |
整体来看,只要能够改动项目里的 CSS,首选 CSS 变量 + setProperty;如果只是几种固定状态切换,使用 classList 或 data-* 属性更简洁;只有在不方便改原样式表的情况下,再考虑用独立 <style> 标签注入规则。
页面切换后JS倒计时暂停与恢复的实现方法
2026-11-17 18:04:44
JS代码在Safari或IE中报错?常用不兼容API清单及替代方案
2026-11-17 16:20:35
display:none隐藏与JS删除HTML元素有什么区别
2026-11-17 15:50:00
JavaScript Canvas绘制雷达扫描动画及车辆标记实现
2026-11-17 08:42:21
JS实现简易计算器:HTML布局、CSS样式与事件监听完整教程
2026-11-16 13:42:00