

React Native 指纹登录实现:从组件集成到状态管理
本文详解 React Native 应用中指纹登录功能的实现。通过集成 react-native-fingerprint-scanner 库,结合 ActionSheet 组件控制界面显示,重点解决 Android API 低于 23 版本的兼容性问题。文章提供了基于函数式组件的重写方案,涵盖设备检测、API 适配、组件生命周期管理及状态控制等核心步骤,确保指纹识别流程在真机环境下的稳定运行。
本文介绍 React Native 应用中的指纹登录功能实现细节。
React Native 指纹登录功能概述
近期开发的 React Native 应用程序集成了五种登录方式:普通账号密码、短信验证码、手势密码、指纹识别及人脸识别。为便于查阅,特此整理登录功能合集,本节重点讲解指纹登录模块。该模块通过调用手机硬件指纹传感器采集用户指纹数据,经后端或本地校验成功后,自动完成登录流程。
首先展示最终实现效果,以真实设备录制的 GIF 动图为例,直观呈现交互过程。
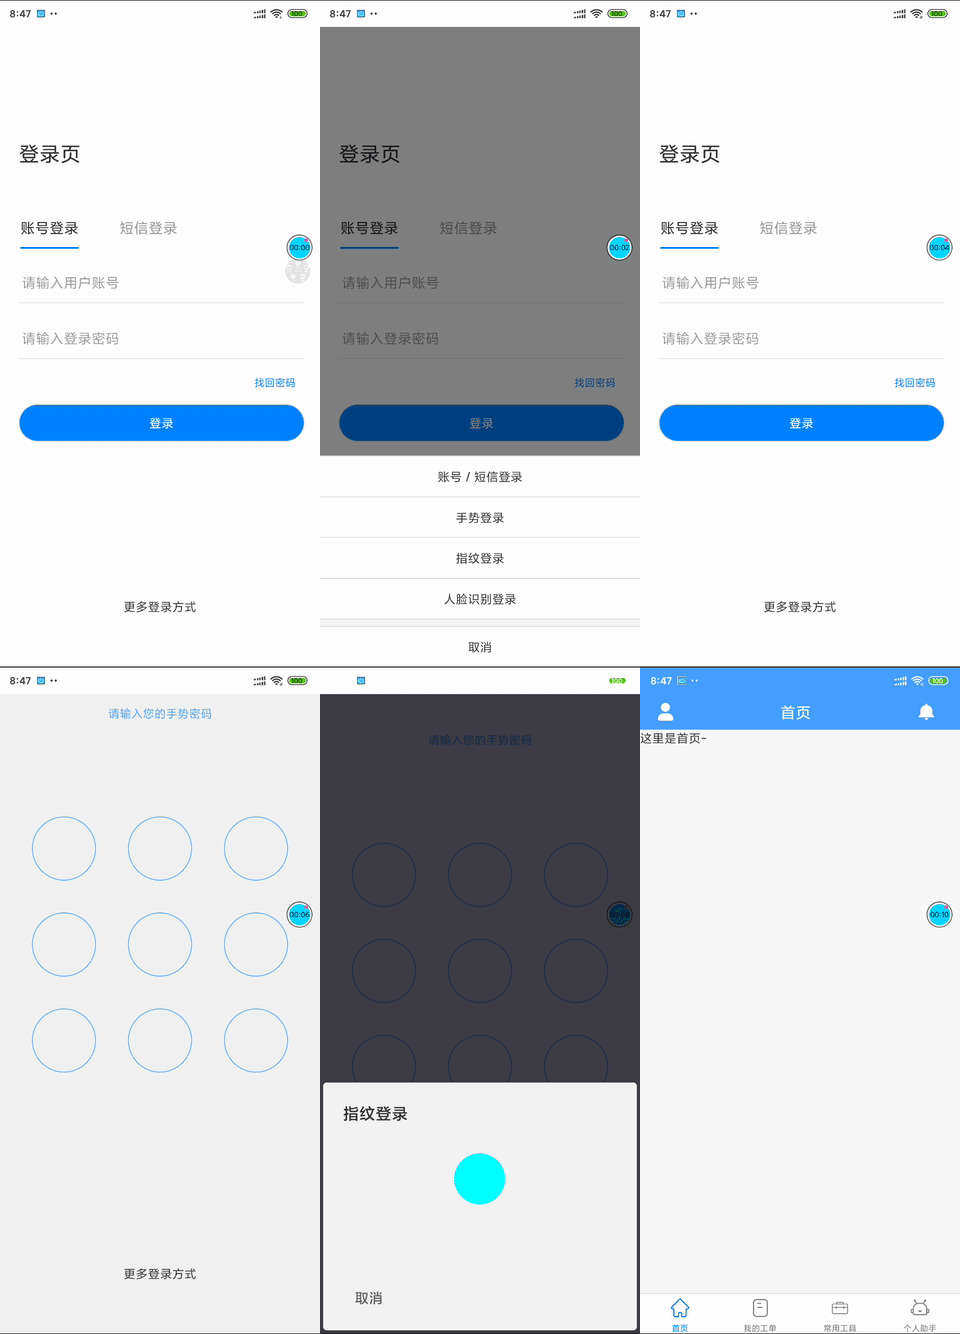
解析上述 GIF 中展示的核心功能点:
1. 用户点击特定操作选项时,弹出指纹识别界面;点击取消按钮或界面空白区域可关闭该识别窗口。
2. 即使切换至其他登录方式界面,仍可通过“更多操作方式”入口重新唤起指纹识别功能。
组件选型与真机调试要求
基于上述功能分析,系统需构建一个独立的指纹识别组件,并通过操作项组件控制其弹出与切换。操作项部分选用 antd-mobile-rn 库中的 ActionSheet 组件;指纹识别核心组件则采用 react-native-fingerprint-scanner。该组件在 GitHub 上拥有 642 个 Star,具备较高的可信度,官方仓库地址为 https://github.com/hieuvp/react-native-fingerprint-scanner。需特别注意,模拟器不支持指纹识别功能,调试时必须使用真机设备。
参照官方文档进行下载与 Demo 运行后,发现存在兼容性问题,需进一步调整。
官方 Demo 采用 React 16 之前的 Class 组件写法,且对指纹识别组件的唤起与隐藏逻辑描述较为简略。因此,需重新梳理逻辑,并使用现代函数式组件语法进行重构。
指纹识别执行流程与 Android 适配
指纹识别的标准执行流程如下:
1. 检测设备硬件是否支持指纹识别功能。
2. 检查 Android API 版本是否低于 23。由于 Android 6.0(API 23)之后官方才提供指纹识别 API,若设备 API 版本低于 23,需进行特殊适配处理。
3. 从 react-native-fingerprint-scanner 库中引入 FingerprintScanner,并调用 FingerprintScanner.authenticate 方法以启动指纹识别组件。
4. 当用户点击取消按钮或屏幕空白区域时,隐藏指纹识别组件。
5. 在指纹识别成功时触发对应事件(如执行登录逻辑)。
指纹组件实现与状态控制逻辑
依据上述流程,在 FingerPrint/index.tsx 文件中编写指纹组件,关键代码已添加详细注释。
import React, {Component, useState, useCallback} from 'react';
import {
 Alert,
 Image,
 Text,
 TouchableOpacity,
 View,
 ViewPropTypes,
 Platform,
 StyleSheet,
} from 'react-native';
import FingerprintScanner from 'react-native-fingerprint-scanner';
import ShakingText from './ShakingText.component';
import {connector, ModelState} from '@/models/connect';
import {useFocusEffect} from "@react-navigation/native";


interface Props extends ModelState{
 fingerPrint,
 setFingerPrint,
}

const FingerPrintPopup: React.FC<Props> = React.memo(props => {
 let {fingerPrint, setFingerPrint,dispatch} = props;
 const description = null;

 const [LegacyInfo, setLegacyInfo] = useState({
  errorMessageLegacy: undefined,
  biometricLegacy: undefined
 })
 useFocusEffect(
  React.useCallback(() => {
   console.log("进入指纹组件");
   //判断设备是否支持指纹识别
   detectFingerprintAvailable();
   //判断Android API是不是<23,高于此版本使用标准指纹解锁api;低于此版本使用兼容适配版本
   if (requiresLegacyAuthentication()) {
    authLegacy();
   } else {
    authCurrent();
   }

   return () => {
    console.log("离开指纹组件");
    //组件卸载,停止指纹监听指纹扫描器并释放内部缓存
    FingerprintScanner.release();
   }
  }, [])
 )

 //判断安卓版本
 function requiresLegacyAuthentication() {
  return Platform.Version < 23;
 }

 //控制指纹组件消失
 const handleFingerprintDismissed = () => {
  setFingerPrint({
   ...fingerPrint,
   popupShowed: false
  });
 };
 //检测手机是否支持指纹识别
 const detectFingerprintAvailable = () => {
  FingerprintScanner
   .isSensorAvailable()
   .catch(error => {
    Alert.alert("您的设备不支持指纹识别,请选择其他方式登录")
    setFingerPrint({
     ...fingerPrint,
     errorMessage: error.message,
     biometric: error.biometric,
     popupShowed: false,
    })
   });
 }
 //android API>23时,调用authCurrent
 const authCurrent = () => {
  FingerprintScanner
   .authenticate({title: '指纹登录', cancelButton: '取消'})
   .then(() => {
    //离开页面时将popupShowed置为false
    handleFingerprintDismissed();
    //指纹验证成功后的事件,比如登录
    successVerify();
   })
   .catch(() => {
    //点击取消或上方空白区隐藏组件后,将popupShowed置为false
    //这里是控制指纹组件切换显示/隐藏的关键!
    handleFingerprintDismissed();
   })
 }

 //指纹验证成功后的事件,比如登录
 const successVerify = () => {
  dispatch({
   type: 'user/login',
   payload: {
    username: "张三",
    password: '123456',
   }
  });

 }
 //android API<23时调用指纹组件的兼容写法
 const authLegacy = () => {
  FingerprintScanner
   .authenticate({onAttempt: handleAuthenticationAttemptedLegacy})
   .then(() => {
    //指纹验证成功
    handleFingerprintDismissed();
    Alert.alert('指纹身份验证', '身份验证成功');
    successVerify();
   })
   .catch((error) => {
    //指纹验证失败
    setLegacyInfo({errorMessageLegacy: error.message, biometricLegacy: error.biometric});
    description.shake();
    handleFingerprintDismissed();
   });
 }

 //当用户尝试扫描指纹但失败时的回调函数
 const handleAuthenticationAttemptedLegacy = (error) => {
  setLegacyInfo({
   ...LegacyInfo,
   errorMessageLegacy: error.message
  });
  description.shake();
 };

 //手动写一个指纹验证的组件
 const renderLegacy = (
  <View style={styles.container}>
   <View style={styles.contentContainer}>

    <Image
     style={styles.logo}
     source={require('../../../assets/login/finger_print.png')}
    />

    <Text style={styles.heading}>
     生物识别{'\n'}身份验证
    </Text>
    <ShakingText
     ref={(instance) => {
      description = instance;
     }}
     style={styles.description(!!LegacyInfo.errorMessageLegacy)}>
     {LegacyInfo.errorMessageLegacy || `Scan your ${LegacyInfo.biometricLegacy} on the\ndevice scanner to continue`}
    </ShakingText>

    <TouchableOpacity
     style={styles.buttonContainer}
     onPress={handleFingerprintDismissed}
    >
     <Text style={styles.buttonText}>
      返回
     </Text>
    </TouchableOpacity>

   </View>
  </View>
 );

 return () => {
  //android API>23时,不需要渲染;否则渲染renderLegacy的组件
  if (requiresLegacyAuthentication()) {
   return renderLegacy
  }

  return null;

 }

})


export default connector(FingerPrintPopup);
const styles = StyleSheet.create({
 container: {
  position: 'absolute',
  top: 0,
  bottom: 0,
  left: 0,
  right: 0,
  backgroundColor: 'rgba(0, 164, 222, 0.9)',
  flexDirection: 'column',
  justifyContent: 'center',
  alignItems: 'center',
 },
 contentContainer: {
  flexDirection: 'column',
  justifyContent: 'center',
  alignItems: 'center',
  backgroundColor: '#ffffff',
 },
 logo: {
  marginVertical: 45,
 },
 heading: {
  textAlign: 'center',
  color: '#00a4de',
  fontSize: 21,
 },
 description: (error) => {
  return {
   textAlign: 'center',
   color: error ? '#ea3d13' : '#a5a5a5',
   height: 65,
   fontSize: 18,
   marginVertical: 10,
   marginHorizontal: 20,
  }
 },
 buttonContainer: {
  padding: 20,
 },
 buttonText: {
  color: '#8fbc5a',
  fontSize: 15,
  fontWeight: 'bold',
 },
});
代码逻辑显示,当 Android API 版本大于等于 23 时,无需渲染自定义指纹识别组件;而对于 API 低于 23 的旧版本设备,需手动渲染一个兼容组件。此处引用了 ShakingText 组件,该组件由官方提供,直接复制代码至 ShakingText.component.js 即可使用。
import PropTypes from 'prop-types';
import React, { Component } from 'react';
import {
 Animated,
 Text,
} from 'react-native';

class ShakingText extends Component {

 componentWillMount() {
  this.shakedValue = new Animated.Value(0);
 }

 get animatedStyle() {
  return {
   transform: [
    {
     translateY: this.shakedValue.interpolate({
      inputRange: [0, 0.1, 0.2, 0.3, 0.4, 0.5, 0.6, 0.7, 0.8, 0.9, 1],
      outputRange: [0, 10, -15, 12, -9, 18, -7, 10, -11, 5, 0],
     }),
    },
    {
     translateX: this.shakedValue.interpolate({
      inputRange: [0, 0.1, 0.2, 0.3, 0.4, 0.5, 0.6, 0.7, 0.8, 0.9, 1],
      outputRange: [0, 2, -3, 4, -4, 3, -3, 4, -5, 2, 0],
     }),
    },
   ],
  };
 }

 shake = () => {
  this.shakedValue.setValue(0);
  Animated.spring(this.shakedValue, {
   toValue: 1,
   friction: 3,
   tension: 10,
  }).start(() => this.shakedValue.setValue(0));
 };

 render() {
  return (
   <Animated.Text
    {...this.props}
    style={[this.animatedStyle, this.props.style]}
   />
  );
 }
}

ShakingText.propTypes = {
 children: PropTypes.oneOfType([
  PropTypes.arrayOf(PropTypes.node),
  PropTypes.node
 ]),
 style:Text.propTypes.style,
};

export default ShakingText;
指纹组件编写完成后,需利用 ActionSheet 组件来切换和控制指纹组件的显示与隐藏。通过 state 中的 popupShowed 变量控制组件状态,具体实现代码位于 LoginSheet/index.tsx 处。
import React,{useState} from 'react';
import {View, Text, StyleSheet} from 'react-native';
import {px2rem} from "@/utils/px2rem";
import {ActionSheet} from "@ant-design/react-native";
import {navigateReplace} from "@/utils/navigation";
import FingerprintPopup from "@/pages/Account/FingerPrint";
import {connector,ModelState} from '@/models/connect';


interface Props {

}
const LoginSheet: React.FC<Props> = React.memo(props => {
 const {dispatch} = props;

 const [fingerPrint,setFingerPrint] = useState({
  errorMessage: undefined,
  biometric: undefined,
  popupShowed: false,
 })

 //点击指纹登录选项时,将popupShowed置为true
 const handleFingerprintShowed = () => {
  setFingerPrint({
   ...fingerPrint,
   popupShowed: true
  });
 }

 const showActionSheet = () =>{
  const BUTTONS = [
   '账号 / 短信登录',
   '手势登录',
   '指纹登录',
   '人脸识别登录',
   '取消',
  ];
  ActionSheet.showActionSheetWithOptions(
   {
    options: BUTTONS,
    cancelButtonIndex: 4,
   },
   buttonIndex => {
    const clickOption = BUTTONS[buttonIndex];
    console.log('clicked: ',clickOption);
    switch (clickOption){
     case '账号 / 短信登录':
      navigateReplace("Login");
      return;
     case '手势登录':
      navigateReplace("GestureUnlock");
      return;
     case '指纹登录':
      //显示指纹登录
      handleFingerprintShowed();
      return;
     case '人脸识别登录':
      navigateReplace("Login");
      return;
    }
   }
  );
 }

 return (
  <View style={styles.container}>
   <View style={styles.more}>
    <Text style={styles.moreText} onPress={showActionSheet}>更多登录方式</Text>
   </View>
   {fingerPrint.popupShowed ? (
    <FingerprintPopup
     fingerPrint={fingerPrint}
     setFingerPrint={setFingerPrint}
    />
   ) : null}
  </View>
 );

})

export default connector(LoginSheet);
const styles = StyleSheet.create({
 container:{

 },
 more:{
  width:'100%',
  alignItems:'center',
  height:px2rem(50),
  marginBottom:px2rem(30),
 },
 moreText:{
  // color:'#a1a1a1'
 }
});
至此,React Native 指纹登录功能开发完毕。核心要点总结如下:
控制指纹组件显示与隐藏的关键在于管理 popupShowed 的 true/false 状态,以此决定 FingerprintPopup 组件的渲染与否。每次唤醒组件时,需先显示 FingerprintPopup 组件,在初始化阶段判断设备可用性及系统版本,随后调用组件展示逻辑。每次隐藏组件时,需通过隐藏 FingerprintPopup 组件,并在组件卸载阶段释放指纹监听器 FingerprintScanner.release();。无论指纹识别成功、失败还是用户点击取消,均需将 popupShowed 置为 false;仅当指纹识别失败时,保持当前状态不做额外操作。
总结
本文介绍了 React Native 指纹登录的实现方法,更多相关 React Native 指纹登录内容可搜索本站往期文章或浏览后续相关教程。感谢支持。
Next.js 数据获取:getServerSideProps 与新 fetch 缓存策略详解
2026-11-04 09:11:32
原生JavaScript与Vue/React对比:网站制作技术栈怎么选择
2026-11-03 19:56:26
Webpack实现条件组件按需加载的多种方案与实战
2026-10-31 21:16:54
Vue3定义组件的四种方式:SFC、渲染函数、JSX与函数式组件对比
2026-10-31 19:22:29
前端实现全局主题切换功能实例代码
2026-10-31 19:19:33