

Angular指令实现按钮点击与悬停切换效果
本文介绍如何利用Angular指令实现按钮的点击与悬停切换效果。通过@HostListener装饰器监听鼠标事件,结合CSS伪类与!important提升优先级,解决事件冲突问题,实现简洁高效的按钮交互体验。
Angular指令实现按钮点击与悬停切换效果
此前在AngularJS2中曾探讨过一种较为基础的按钮切换实现方式,本文将介绍一种更优方案,即通过Angular指令来完成这一功能。
利用指令实现悬停效果
import { Directive, ElementRef, HostListener, Input } from '@angular/core';
@Directive({
 selector: '[myHighlight]'
})
export class HighlightDirective {
 constructor(private el: ElementRef) { }
 @HostListener('mouseenter') onMouseEnter() {
 this.highlight('red');
 }
 @HostListener('mouseleave') onMouseLeave() {
 this.highlight(null);
 }
 private highlight(color: string) {
 this.el.nativeElement.style.backgroundColor = color;
 }
}
<button myHighlight class="btn">按钮一</button>
<button myHighlight class="btn">按钮二</button>
<button myHighlight class="btn">按钮三</button>
.btn{
 height: 50px;
 width: 100px;
 background-color: #3399ff;
 color: white;
 border: 0;
 outline: 0;
 cursor: hand;
}
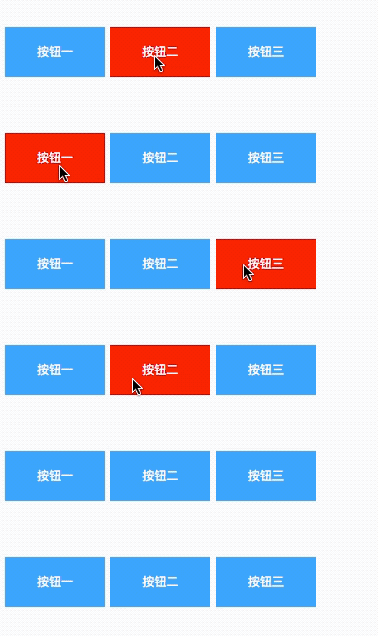
关于悬停效果的实现,可直接参考Angular官方文档提供的代码示例。
利用指令实现点击效果
import { Directive, ElementRef, HostListener, Input } from '@angular/core';
@Directive({
 selector: '[myHighlight]'
})
export class HighlightDirective {
 constructor(private el: ElementRef) { }
 @HostListener('click') onMouseClick() {
 this.clickhighlight("black");
 }
 private clickhighlight(color: string) {
 let obj = this.el.nativeElement;
 let btns = obj.parentNode.children;
 //背景色全部重置
 for(let i=0; i<btns.length; i++){
 btns[i].style.backgroundColor = "#3399ff";
 }
 //设置当前点击对象的背景色
 obj.style.backgroundColor = color;
 }
}
<div>
<button myHighlight class="btn">按钮一</button>
<button myHighlight class="btn">按钮二</button>
<button myHighlight class="btn">按钮三</button>
</div>
.btn{
 height: 50px;
 width: 100px;
 background-color: #3399ff;
 color: white;
 border: 0;
 outline: 0;
 cursor: hand;
}
点击效果的实现依然依赖@HostListener装饰器来引用属性型指令的宿主元素。具体做法是先将所有按钮的背景色重置,随后设置当前被点击按钮的背景色,从而达成点击后背景色变化的视觉效果。

结合指令实现点击与悬停复合效果
import { Directive, ElementRef, HostListener, Input } from '@angular/core';
@Directive({
 selector: '[myHighlight]'
})
export class HighlightDirective {
 constructor(private el: ElementRef) { }
 @HostListener('click') onMouseClick() {
 this.clickhighlight("black");
 }
 private clickhighlight(color: string) {
 let obj = this.el.nativeElement;
 let btns = obj.parentNode.children;
 //背景色全部重置
 for(let i=0; i<btns.length; i++){
 btns[i].style.backgroundColor = "#3399ff";
 }
 //设置当前点击对象的背景色
 obj.style.backgroundColor = color;
 }
}
<div>
<button myHighlight class="btn">按钮一</button>
<button myHighlight class="btn">按钮二</button>
<button myHighlight class="btn">按钮三</button>
</div>
.btn{
 height: 50px;
 width: 100px;
 background-color: #3399ff;
 color: white;
 border: 0;
 outline: 0;
 cursor: hand;
}
.btn:hover{
 background: black !important;
}
在实现点击效果的基础上,只需添加一行CSS代码即可同时支持点击与悬停效果。此处必须使用hover伪类,并通过!important提升样式优先级。若同时使用@HostListener监听mouseenter、mouseleave及click事件,三者之间会产生冲突。

以上所述是小编给大家介绍的使用AngularJS2中的指令实现按钮的切换效果,希望对大家有所帮助,如果大家有任何疑问请给我留言,小编会及时回复大家的。在此也非常感谢大家对本站网站的支持!
JS中使用位运算(~~)和一元加号(+)快速转换字符串为整数
2026-11-03 22:41:12
怎么使用命令行批量格式化项目中的JS文件
2026-11-03 19:04:42
JS代码美化后报错怎么办?常见格式化冲突解决方法
2026-11-03 18:47:01
不用moment.js,怎么用原生JS Intl API格式化时间戳
2026-11-03 18:10:30
原生JS与dayjs获取当前日期的代码对比
2026-11-03 17:57:26