

uniapp微信小程序集成xr-frame加载3D模型完整指南
作者:小算子时间:2026-10-31 14:27:13浏览:558
本文详解在uniapp微信小程序中通过xr-frame组件加载3D模型的全流程。涵盖目录结构创建、pages.json与manifest.json关键配置,以及preview.vue页面实现。重点解析xr-scene、xr-gltf等核心组件用法,帮助开发者快速实现小程序内3D内容展示。
首先在根目录与pages同级目录下,建立所需的目录结构及文件。
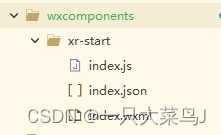
// index.js
Component({
	properties: {
		modelPath: { // vue页面传过来的模型
			type: String,
			value: ''
		}
	},
	data: {},
	methods: {}
})
{ // index.json
"component": true,
"renderer": "xr-frame",
"usingComponents": {}
}<!-- index.wxml -->
<!-- 加载静态模型 -->
<xr-scene render-system="alpha:true" bind:ready="handleReady">
<xr-node>
<xr-light type="ambient" color="1 1 1" intensity="2" />
<xr-light type="spot" position="3 3 3" color="1 1 1" range="3" intensity="5" />
<xr-assets>
<!-- options="ignoreError:-1" -->
<xr-asset-load type="gltf" asset-id="gltf-model" src="{{modelPath}}"/>
</xr-assets>
<xr-gltf scale="0.7 0.7 0.7" node-id="gltf-model" bind:gltf-loaded="handleGLTFLoaded" model="gltf-model"></xr-gltf>
</xr-node>
<xr-camera id="camera" clear-color="0 0 0 0" position="1 1 2" target="gltf-model" camera-orbit-control/>
</xr-scene>接着在pages.json中进行相关配置。
{
				"path": "pages/resource/preview/preview",
				"style": {
					"navigationBarTitleText": "效果预览",
					"enablePullDownRefresh": false,
					"navigationBarBackgroundColor": "#73ceda",
					"usingComponents": {
						"xr-start": "/wxcomponents/xr-start"
					},
					"disableScroll": true
				}
			}
随后对manifest.json文件进行必要设置。
"mp-weixin": {
		"appid": "自己的appid",
		"setting": {
			"urlCheck": false,
			"postcss": true,
			"es6": true,
			"minified": true,
			"ignoreDevUnusedFiles": false,
			"ignoreUploadUnusedFiles": false
		},
		"usingComponents": true,
		"lazyCodeLoading": "requiredComponents"
	},
最后使用preview.vue文件进行具体实现。
<template>
	<view style="display: flex;flex-direction: column;">
		<xr-start :modelPath="modelPath" id="main-frame" disable-scroll :width="renderWidth" :height="renderHeight"
			:style="'width:'+width+'px;height:'+height+'px;'">
		</xr-start>
	</view>
</template>
<script>
	export default {
		onLoad(option) {
			this.modelPath = option.modelPath;
			this.width = uni.getWindowInfo().windowWidth
			this.height = uni.getWindowInfo().windowHeight
			const dpi = uni.getWindowInfo().pixelRatio
			this.renderWidth = this.width * dpi
			this.renderHeight = this.height * dpi
		},
		data() {
			return {
				width: 300,
				height: 300,
				renderWidth: 300,
				renderHeight: 300,
				modelPath: ''
			}
		},
		methods: {}
	}
</script>
<style>
</style>
此方式不占用主包空间(该步骤可忽略)。
至此,关于uniapp微信小程序利用xr加载模型的操作方法介绍完毕。如需了解更多uniapp微信小程序xr相关内容,建议查阅本站过往文章或继续浏览后续文章,感谢支持!
作者最新文章
Three.js 使用 TransformControls 实现模型拖拽交互
2026-11-01 02:14:15
JS开发接入 DeepSeek 实现 AI 智能问诊
2026-10-31 18:58:41
Wiki.js 支持哪些编辑器?Markdown 与可视化编辑切换指南
2026-10-30 19:14:38
Java与JavaScript的核心差异:运行环境与执行机制对比
2026-10-30 19:01:40
为什么JavaScript基本数据类型是不可变的?
2026-10-30 18:46:50