

微信小程序Canvas绘制矩形选区与图片自适应实现
本文详解在微信小程序中利用Canvas实现图片显示与矩形选区绘制的完整流程。重点解析如何通过计算图片缩放比例实现图片适配,并结合touchStart、touchMove和touchEnd事件处理手指滑动,实时计算并绘制矩形选区坐标与尺寸,确保选区与实际图片区域精准对应。
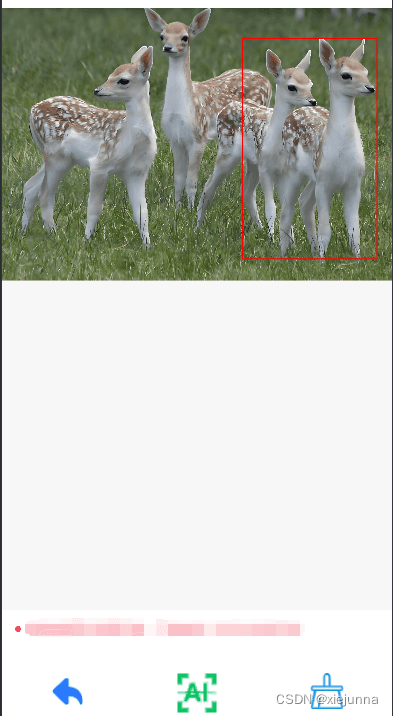
WXML与WXSS基础布局配置
在WXML文件中,需要定义一个Canvas组件用于绘图操作。设置canvas-id和id为"myCanvas",类型指定为"2d"以启用新版Canvas API。同时绑定三个触摸事件:bindtouchstart用于记录起始触摸点,bindtouchMove用于监听手指移动以更新选区坐标,bindtouchEnd用于结束触摸并确认最终选区范围。
<view class="page-body">
  <!-- 画布 -->
  <view class="page-body-wrapper">
    <canvas canvas-id="myCanvas" type="2d" id="myCanvas" class='myCanvas' bindtouchstart="touchStart" bindtouchmove="touchMove" bindtouchend="touchEnd"></canvas>
  </view>
  <!-- 操作 -->
  <view class="layout-bottom">
    <view class="page-bottom">
      <view class="pbottom pmiddle" bindtap="pre">
        <image src="/images/next2.png" style="height: 65rpx; width: 65rpx; " mode="aspectFit"></image>
        <view class="pictureBottomArea"><p>返回</p></view>
      </view>
      <view class="pbottom pmiddle" bindtap="detection">
        <image src="{{sbUrl}}" style="height: 100rpx; width: 100rpx; " mode="aspectFit"></image>
        <view class="pictureBottomArea1"><p>识别</p></view>
      </view>
      <view class="pbottom pmiddle" bindtap="clear">
        <image src="/images/qc3.png" style="height: 70rpx; width: 70rpx; " mode="aspectFit"></image>
        <view class="pictureBottomArea"><p>清除选区</p></view>
      </view>
    </view>
  </view>
</view>
在WXSS样式表中,主要对Canvas容器及页面背景进行基础布局设置。将.myCanvas类的宽高设置为100vw和100vh,使其占满整个屏幕。页面body及.page-body-wrapper也需设置为100%宽高,并清除默认padding和margin。背景色可设为浅灰色(如#F7F7F7或#F8F8F8),字体大小建议设为32rpx,行高1.6,确保界面清晰易读。
.myCanvas { background-color: #F7F7F7; width: 100vw; height: 100vh; }
page { width: 100%; height: 100%; padding: 0; margin: 0; background-color: #F8F8F8; font-size: 32rpx; line-height: 1.6; display: flex; display: -webkit-flex; flex-direction: column; flex-wrap: wrap; justify-content: center; align-items: center; }
.page-body { width: 100%; height: 100%; padding: 0; margin: 0; }  .page-body-wrapper { width: 100%; height: 80%; display: flex; flex-direction: column; align-items: center; width: 100%; }
.layout-bottom { width: 100%; height: 20%; background-color: white; }
.page-bottom { width: 100%; height: 75%; display: flex; display: -webkit-flex; flex-direction: row; flex-wrap: wrap; justify-content: center; align-items: center; }
.pbottom { width: 33.333333333%; height: 100%; }
.pmiddle{ display: flex; display: -webkit-flex; flex-direction: column; flex-wrap: wrap; justify-content: center; align-items: center; }
.pictureBottomArea { margin-top: 15rpx; font-size: small; }
.pictureBottomArea1 { font-size: 0.9rem; letter-spacing:4rpx; font-weight: 600; color: #585858; }
JS逻辑与Canvas上下文初始化
在JS逻辑层中,首先定义全局变量startX、startY、endX、endY、rectWidth和rectHeight,分别用于存储矩形选区的起始坐标、结束坐标以及宽度和高度。在Page的data中,初始化drawWidth、drawHeight、drawX、drawY、ratio(缩放比例)、imgSrc(图片路径)等状态。在onLoad生命周期中,获取Canvas上下文ctx和节点信息,并初始化上述坐标变量为0。核心逻辑在于根据图片实际尺寸与Canvas显示尺寸的比值计算ratio,确保后续绘制的选区坐标能正确映射到原图位置。
图片缩放比例计算与选区映射
图片适配画布显示的核心在于准确计算并应用缩放比例。当图片加载完成后,需对比图片原始宽高与Canvas可用宽高,得出统一的缩放因子ratio。在绘制选区时,所有触摸事件返回的屏幕坐标必须除以该ratio,转换为图片坐标系下的真实坐标。这样无论图片如何缩放显示,绘制出的矩形选区都能精确覆盖原图的对应区域,实现视觉与数据的一致性。
// 定义变量
let startX, startY, endX, endY, rectWidth, rectHeight
Page({
  data: {
    drawWidth: 0,
    drawHeight: 0,
    drawX: 0,
    drawY: 0,
    ratio: 0,//缩放比例
    sbUrl: '/images/a2.png',//按钮
    imgSrc: '/images/ll.png',
    area: [],
    ctx: null,
    canvas: null,
    drawimage: null,
  },
  onLoad(options) {
    startX = 0
    startY = 0
    endX = 0
    endY = 0
    rectWidth = 0
    rectHeight = 0
    //把图片绘制到画布上
    this.drawImage(this.data.imgSrc)
  },
  //把图片绘制到画布上
  drawImage(imgSrc){
    let _this = this
    wx.createSelectorQuery().select('#myCanvas').fields({ node: true, size: true }).exec((res0) => {
      //获取canvas宽高
      const canvas = res0[0].node
      console.log(canvas)
      let ctx = canvas.getContext('2d');
      const cw = res0[0].width
      const ch = res0[0].height
      console.log('Canvas宽度:'+cw, 'Canvas高度:'+ch)
      const dpr = wx.getSystemInfoSync().pixelRatio
      console.log(dpr)
      canvas.width = cw * dpr     // 获取宽
      canvas.height = ch * dpr  // 获取高
      console.log(cw * dpr, ch * dpr)
      ctx.scale(dpr, dpr)
      wx.getImageInfo({
        src: imgSrc,
        success: function (res) {
          //获取图片宽高
          let iw = res.width
          let ih = res.height
          console.log('图片宽度:'+iw, '图片高度:'+ih);
          // 计算绘制位置,保持原始比例
          let ratio = Math.min(cw / iw, ch / ih);
          console.log(ratio)
          // 图片适配画布显示,关键在于计数图片缩放比例
          let drawWidth = iw * ratio;
          let drawHeight = ih * ratio;
          console.log('图片缩放后宽度:'+drawWidth, '图片缩放后高度:'+drawHeight);
          let drawX = (cw - drawWidth) / 2;
          let drawY = (ch - drawHeight) / 2;
          // 到这里就可以直接绘制
          let image = canvas.createImage();//创建iamge实例
          image.src = imgSrc;  // 引入本地图片
          image.onload = function () {
            ctx.drawImage(image, 0, 0, drawWidth, drawHeight);
          }
          _this.setData({drawWidth: drawWidth,drawHeight: drawHeight,drawX: drawX,drawY: drawY,  ratio: ratio,ctx: ctx,canvas: canvas,drawimage: image})
        },
        fail: function (res) {
          console.error('获取图片信息失败', res);
        }
      });
    })
  },
  // 触摸开始事件
  touchStart(e) {
    startX = e.touches[0].x
    startY = e.touches[0].y
    console.log("触摸开始事件", e.touches[0], startX, startY)
  },
  // 触摸移动事件
  touchMove(e) {
    let imgSrc = this.data.imgSrc
    let drawWidth = this.data.drawWidth
    let drawHeight = this.data.drawHeight
    let ctx = this.data.ctx
    let image = this.data.drawimage
    endX = e.touches[0].x
    endY = e.touches[0].y
    ctx.clearRect(0, 0, drawWidth, drawHeight)
    ctx.drawImage(image, 0, 0, drawWidth, drawHeight);
    rectWidth = endX - startX
    rectHeight = endY - startY
    ctx.strokeRect(startX, startY, rectWidth, rectHeight)
    ctx.strokeStyle = 'red'
    ctx.stroke()
  },
  // 触摸结束事件
  touchEnd(e) {
    // 绘制完成后的操作
    // 可以将坐标框的位置和大小保存到全局变量或发送给服务器等
    console.log("触摸结束事件",e.changedTouches[0])
  },
  //清除绘制的图形
  clear(){
    console.log("清除绘制")
    let imgSrc = this.data.imgSrc
    let drawWidth = this.data.drawWidth
    let drawHeight = this.data.drawHeight
    let ctx = this.data.ctx
    let image = this.data.drawimage
    ctx.clearRect(0, 0, drawWidth, drawHeight)
    ctx.drawImage(image, 0, 0, drawWidth, drawHeight);
    startX = 0
    startY = 0
    endX = 0
    endY = 0
    rectWidth = 0
    rectHeight = 0
  },
  // 识别
  detection(e){
    console.log("开始识别")
    let ratio = this.data.ratio
    //获取绘制选区的相关信息,这里要除以图片缩放比例,才是真是图片上的框选区
    if (rectWidth != 0 && rectHeight != 0){
        console.log('矩形','x='+startX/ratio,'y='+startY/ratio,'Width='+rectWidth/ratio,'Height='+rectHeight/ratio)
     }
  },
  //上一页
  pre(){
    console.log("上一页")
  }
})
至此,关于微信小程序中利用Canvas显示图片并绘制矩形选区的功能介绍完毕。通过合理设置Canvas属性、绑定触摸事件以及精确计算图片缩放比例,可实现精准的选区操作。如需了解更多相关技术细节,可参考本站其他关于微信小程序图片处理与Canvas绘制的文章。
D3.js 处理大规模数据点的性能优化策略
2026-11-05 15:37:25
JS实现网页摄像头实时扫码:结合getUserMedia与jsQR教程
2026-11-05 15:27:28
D3.js v5 迁移到 v7 的 API 变更与注意事项
2026-11-05 11:57:17
使用 animate.js 实现多元素协同的序列动画
2026-11-04 22:27:53
JS拖拽排序时怎么添加平滑动画效果?FLIP技术实战
2026-11-04 10:12:22