

详解如何使用JSZip实现在浏览器中操作文件与文件夹
本文详细介绍如何在浏览器环境中使用JSZip库实现文件的创建、读写与打包下载。通过NPM安装或CDN引入,演示如何实例化JSZip、读取现有ZIP文件内容、写入指定文件夹及文件,并最终生成Blob对象触发下载。涵盖常见场景如批量图片文档分类打包,提供完整代码示例与API参考。
1. 引言
在浏览器环境中,如何实现文件夹的创建与文件的写入操作?
答案是利用JSZip库,该库允许在浏览器内存中构建文件与文件夹结构,最终只需下载生成的.zip文件即可获得结果。
此类应用场景包括:
- 批量下载图片,并按分类保存至不同文件夹,最终打包为一个zip文件进行下载。
- 批量下载文档,同样按分类存入各文件夹,最终合并为一个zip文件供用户下载。
这些场景的核心需求均在于让浏览器具备创建文件夹和文件的能力,并将它们整合为一个可下载的文件。
JSZip的官方GitHub仓库地址为:Stuk/jszip: Create, read and edit .zip files with Javascript (github.com)
此外,还有一个可用的中文参考站点:JSZip参考手册 (asprain.cn)
下文将重点记录基础使用方法,更详细的API文档请参考上述提供的链接。
2. 使用
2.1 安装
若使用NPM进行安装,命令如下:
npm install jszip若使用在线CDN方式引入,代码如下:
<script src="https://cdn.bootcdn.net/ajax/libs/jszip/3.10.1/jszip.js"></script>为了便于代码快速复现,本文示例采用CDN方式引入JSZip。
2.2 创建zip实例
创建一个JSZip实例是读写.zip文件的基础步骤。
const zip = new JSZip();2.3 读取zip文件
参考官方示例文件text.zip进行读取操作。
const zip = new JSZip();

fetch("https://stuk.github.io/jszip/test/ref/text.zip")       // 1) fetch the url
    .then(function (response) {                       // 2) filter on 200 OK
        if (response.status === 200 || response.status === 0) {
            return Promise.resolve(response.blob());
        } else {
            return Promise.reject(new Error(response.statusText));
        }
    })
    .then(data => zip.loadAsync(data))                            // 3) 加载数据
    .then(function (zip) {
        zip.forEach(function (relativePath, file) {  	// 4) 遍历压缩包内的文件
           console.log(`path: ${relativePath}, file: ${file.name}`)
           // 输出:path: Hello.txt, file: Hello.txt
        });
})由于Hello.txt是文本文件,可以直接使用string方法读取其内部数据。
const zip = new JSZip();

fetch("https://stuk.github.io/jszip/test/ref/text.zip")       // 1) fetch the url
    .then(function (response) {                       // 2) filter on 200 OK
        if (response.status === 200 || response.status === 0) {
            return Promise.resolve(response.blob());
        } else {
            return Promise.reject(new Error(response.statusText));
        }
    })
    .then(data => zip.loadAsync(data))                            // 3) chain with the zip promise
    .then(function (zip) {
        return zip.file("Hello.txt").async("string"); // 4) 读取Hello.txt文件
    })
    .then(function success(text) {
        console.log(text); // 输出:Hello World
    }, function error(e) {
        console.error(e);
    });
2.4 创建zip文件
演示如何写入文件与数据。
zip.file("file.txt", "content");
new Promise((resolve, reject) => {
    resolve(zip.file("file.txt").async("string"))
}).then(data => {
    console.log(data); // 输出:content
})
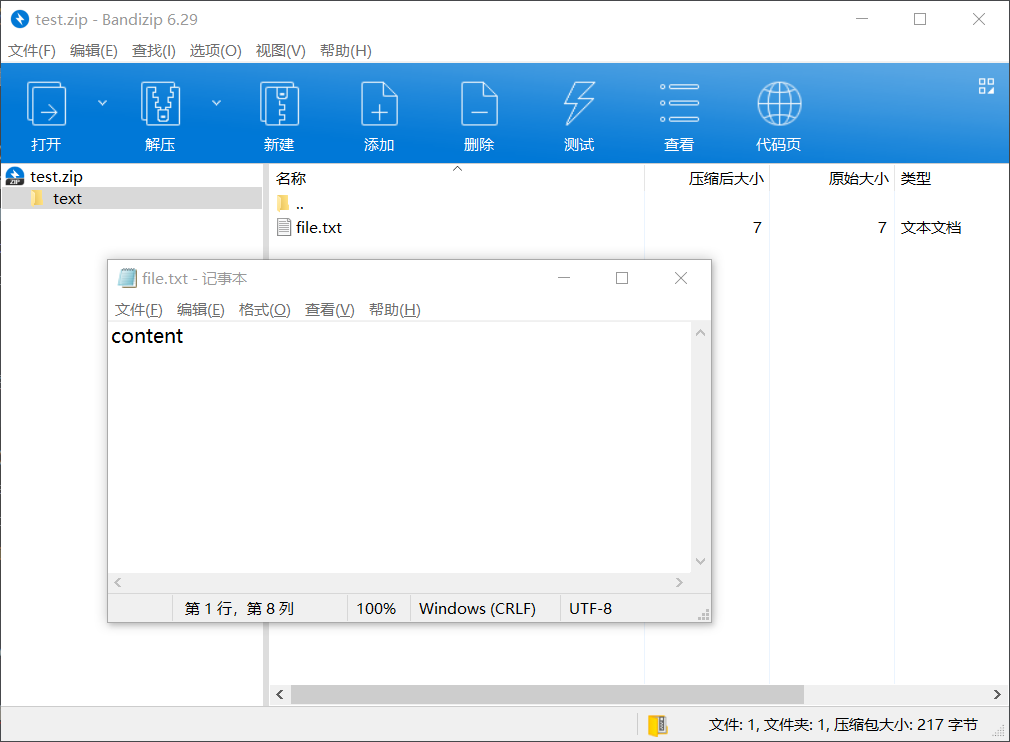
演示如何写入指定文件夹下的指定文件。
zip.file("text/file.txt", "content");
zip.forEach(function (relativePath, file) {
    console.log(`path: ${relativePath}, file: ${file.name}`)
    // 输出:path: text/file.txt, file: text/file.txt
});
最终的目录结构可参考下图展示。
2.5 下载zip文件
此处将上述生成的file.txt下载为zip格式,采用a链接方式触发下载。
zip.generateAsync({ type: "blob" }).then(function (content) {
    document.body.appendChild(document.createElement("a"));
    document.querySelector("a").href = URL.createObjectURL(content);
    document.querySelector("a").download = "test.zip";
    document.querySelector("a").click();
});
完整的代码示例如下:
<!DOCTYPE html>
<html lang="en">

<head>
    <meta charset="UTF-8">
    <meta name="viewport" content="width=device-width, initial-scale=1.0">
    <title>Document</title>
    <script src="https://cdn.bootcdn.net/ajax/libs/jszip/3.10.1/jszip.js"></script>
</head>

<body>

    <script>
        const zip = new JSZip();

        // fetch("https://stuk.github.io/jszip/test/ref/text.zip")       // 1) fetch the url
        //     .then(function (response) {                       // 2) filter on 200 OK
        //         if (response.status === 200 || response.status === 0) {
        //             return Promise.resolve(response.blob());
        //         } else {
        //             return Promise.reject(new Error(response.statusText));
        //         }
        //     })
        //     .then(data => zip.loadAsync(data))                            // 3) chain with the zip promise
        //     .then(function (zip) {
        //         return zip.file("Hello.txt").async("string"); // 4) chain with the text content
        //     })
        //     .then(function success(text) {
        //         console.log(text);
        //     }, function error(e) {
        //         console.error(e);
        //     });
        zip.file("text/file.txt", "content");
        zip.forEach(function (relativePath, file) {
           console.log(`path: ${relativePath}, file: ${file.name}`)
        });

        zip.generateAsync({ type: "blob" }).then(function (content) {
            document.body.appendChild(document.createElement("a"));
            document.querySelector("a").href = URL.createObjectURL(content);
            document.querySelector("a").download = "test.zip";
            document.querySelector("a").click();
        });
    </script>

</body>

</html>
至此,关于详解如何使用JSZip实现在浏览器中操作文件与文件夹的文章介绍完毕,更多相关JSZip操作文件与文件夹内容请搜索本站以前的文章或继续浏览下面的相关文章希望大家以后多多支持本站!
JS监听滚动事件:回到顶部按钮的显示与隐藏逻辑
2026-11-05 16:19:37
JavaScript怎么读写LocalStorage与SessionStorage
2026-11-05 15:40:11
anime.js 与 GSAP 对比:轻量级项目该怎么选择动画库
2026-11-05 11:24:55
flv.js 与 hls.js 在直播场景下的选型对比
2026-11-05 08:18:52
JavaScript能做什么?前端开发中的作用与应用场景解析
2026-11-04 23:17:54