

antd/fusion表格增加圈选复制功能思路详解
本文详解如何在基于DOM的antd或fusion表格中实现类似Excel的鼠标圈选与复制功能。通过清除默认样式、监听鼠标事件计算选中区域、自定义右键菜单及处理键盘快捷键,解决原生表格不支持圈选的问题,并提供完整代码思路与注意事项。
背景介绍
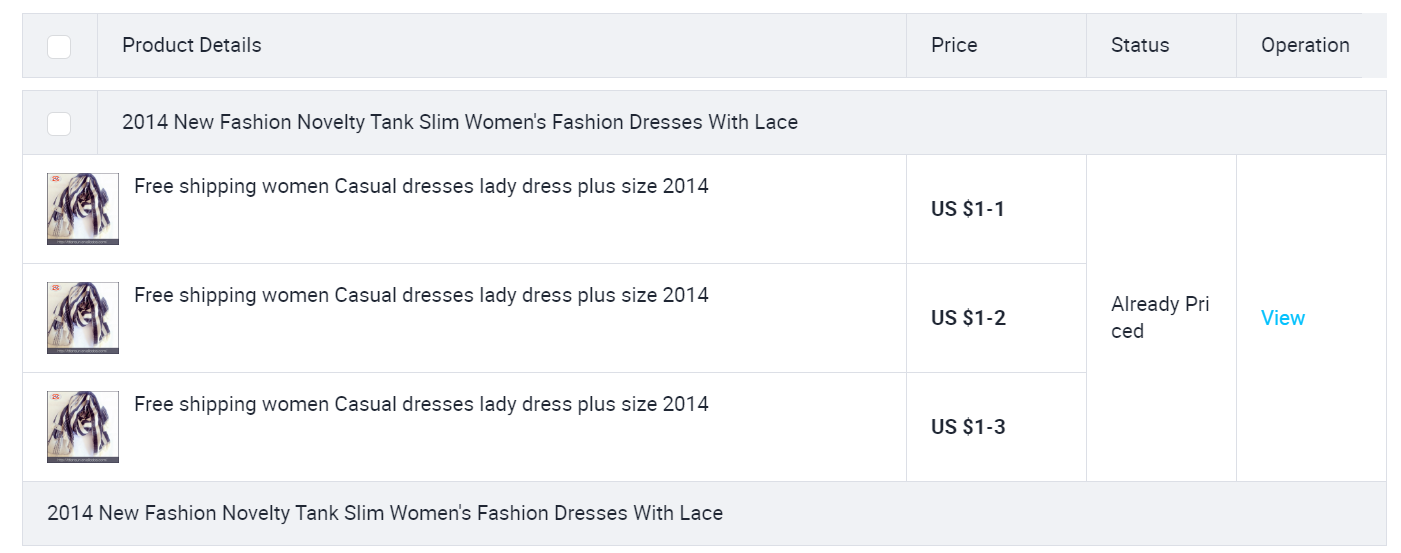
在PC端数据展示场景中,我们常需处理大量表格数据。这类表格主要分为两类:一类是如antd或fusion这类基于DOM元素构建的表格,另一类则是通过Canvas绘制的、外观与操作逻辑类似Excel的表格。
基于DOM的表格通常功能丰富且界面美观,支持多级表头、单元格合并以及多种自定义渲染组件(如图形、按钮、进度条、单选框、输入框等),主要以展示信息为主,但原生并不支持圈选或整列复制等操作。
相比之下,通过Canvas绘制的类Excel表格外观较为朴素,但实用性更强。它在渲染海量数据时保持流畅不卡顿,操作体验接近Excel,支持行列选中、区域圈选及内容复制等功能。
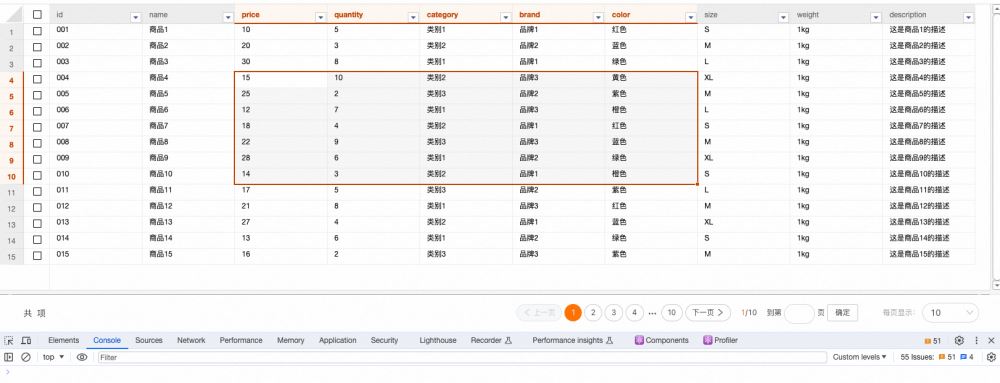
这两种表格各有优劣,适用场景也不同。然而,业务方通常不希望在同一系统中混合使用两种交互模式,而是期望将两者的优点融合:即在保持DOM表格美观与丰富功能的同时,增加圈选和复制能力。
圈选效果
业务方期望的圈选效果应类似于Excel:鼠标按下时选中起始元素,随后移动鼠标,鼠标轨迹形成的四边形区域即为选中范围。此时,用户可通过右键点击复制按钮,或按下Ctrl + C快捷键来复制选中的文本内容。
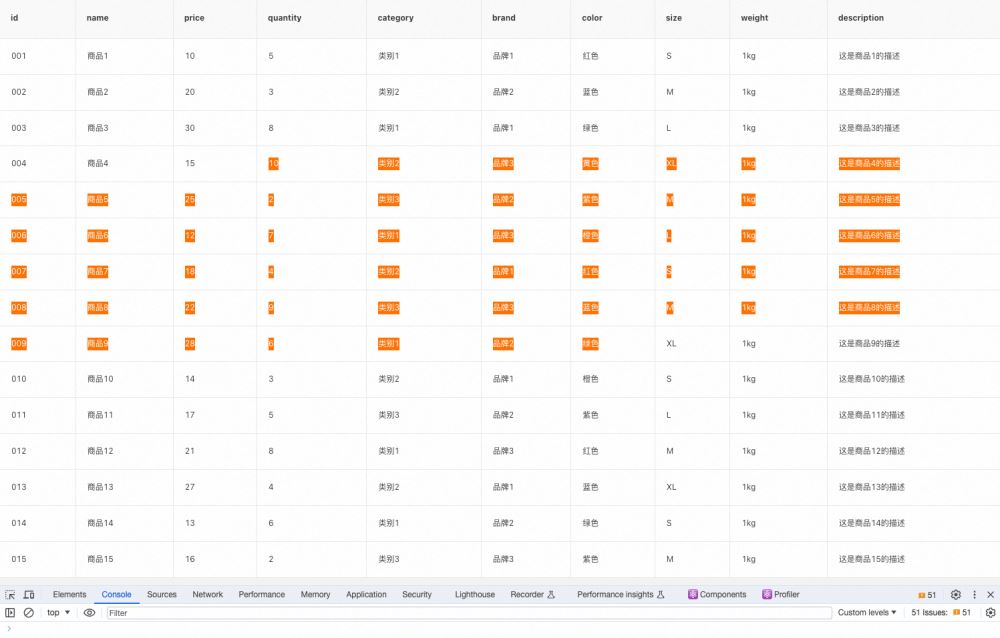
然而,在原生DOM表格中执行上述操作,通常会选中整行数据,这不符合业务人员的使用习惯与预期。
实现过程
去除默认样式
为了实现自定义交互,我们需要自行定义鼠标事件与元素样式。首先必须清除无用的默认样式,包括图中所示的悬停(hover)效果及选中元素的背景色。
同时,需禁用表格自带的鼠标点击选择功能,通过CSS设置 userSelect: none 来禁止文本选中。
<Table style={{ userSelect: 'none' }} ></Table>针对悬停(hover)样式的去除,若使用的是fusion组件,需进行特定处理。
.next-table-row:hover {
  background-color: transparent !important;
}
鼠标按下,记录选中元素
我们需要为表格绑定鼠标按键按下时触发的事件 mousedown 。
当鼠标按下瞬间,当前元素即为中心元素。无论后续向哪个方向拖动,最终形成的选中区域必然包含该初始选中的元素。
利用 getBoundingClientRect() 方法,可以获取页面中任意元素相对于浏览器视窗的上下左右坐标位置。
const onMouseDown = (event) => {
  const rect = event.target.getBoundingClientRect();
  // funsion 判断点击是否为表头元素,为否时才继续后面的逻辑。antd 不需要判断,因为点击表头不会触发该事件
  const isHeaderNode = event.target?.parentNode?.getAttribute('class')?.indexOf('next-table-header-node') > -1;
  if (isHeaderNode) return;
  originDir = {
    top: rect.top,
    left: rect.left,
    right: rect.right,
    bottom: rect.bottom,
  };
  // 渲染
  renderNodes(originDir);
};
<Table style={{ userSelect: 'none' }} onMouseDown={onMouseDown}></Table>
鼠标滑过
接着,为表格绑定鼠标移动(滑过)时触发的事件 mousemove 。
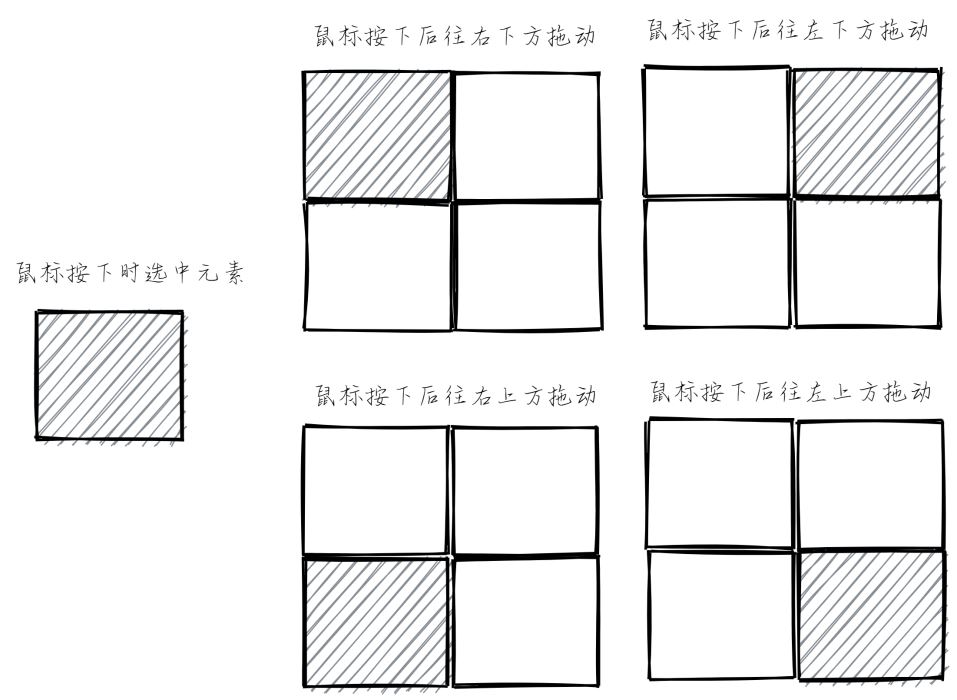
根据鼠标移动过程中元素的上下左右距离与按下时的初始位置进行比对,圈选区域涉及四个方向,以首次选中的元素为中心点。当滑动元素位于鼠标按下点的右下、左下、右上或左上方时,需根据具体情况动态设置四边形区域的四个角坐标。
const onMouseMove = (event) => {
  if (!originDir.top) return;
  const rect = event.target.getBoundingClientRect();
  let coordinates = {};
  // 鼠标按下后往右下方拖动
  if (
    rect.top <= originDir.top &&
    rect.left <= originDir.left &&
    rect.right <= originDir.left &&
    rect.bottom <= originDir.top
  ) {
    coordinates = {
      top: rect.top,
      left: rect.left,
      right: originDir.right,
      bottom: originDir.bottom,
    };
  }
  // 鼠标按下后往左下方拖动
  if (
    rect.top >= originDir.top &&
    rect.left <= originDir.left &&
    rect.right <= originDir.right &&
    rect.bottom >= originDir.bottom
  ) {
    coordinates = {
      top: originDir.top,
      left: rect.left,
      right: originDir.right,
      bottom: rect.bottom,
    };
  }
// 鼠标按下后往右上方拖动
   if (
    rect.top <= originDir.top &&
    rect.left >= originDir.left &&
    rect.right >= originDir.right &&
    rect.bottom <= originDir.bottom
    ) {
     coordinates = {
        top: rect.top,
        left: originDir.left,
        right: rect.right,
        bottom: originDir.bottom,
    };
}
  // 鼠标按下后往左上方拖动
  if (
    rect.top >= originDir.top &&
    rect.left >= originDir.left &&
    rect.right >= originDir.right &&
    rect.bottom >= originDir.bottom
  ) {
    coordinates = {
      top: originDir.top,
      left: originDir.left,
      right: rect.right,
      bottom: rect.bottom,
    };
  }
  renderNodes(coordinates);
};
<Table
    style={{ userSelect: 'none' }}
    onMouseDown={onMouseDown}
    onMouseMove={onMouseMove}
></Table>
渲染/清除样式
遍历表格中的DOM元素,若某元素位于圈选区域内,则为其添加选中背景色,并为整个四边形区域添加边框。
在实现方式上,直接设置style或添加classname均非最佳方案。若直接添加classname,antd在hover操作时会重置classname,导致之前设置的样式被覆盖;若直接设置style,则易与其他样式冲突,且后续获取所有圈选元素较为繁琐。
经过尝试,最终选择直接向DOM元素添加自定义属性。使用5个属性分别标记是否处于圈选状态,以及上下左右边框的状态。未合并这些属性是因为单个DOM元素可能同时具备这五种状态标记。
const renderNodes = (coordinates) => {
  const nodes = document.querySelectorAll('.next-table-cell-wrapper');
  nodes.forEach((item) => {
    const target = item?.getBoundingClientRect();
    clearStyle(item);
    if (
      target?.top >= coordinates.top &&
      target?.right <= coordinates.right &&
      target?.left >= coordinates.left &&
      target?.bottom <= coordinates.bottom
    ) {
      item.setAttribute('data-brush', 'true');
      if (target.top === coordinates.top) {
        item.setAttribute('brush-border-top', 'true');
      }
      if (target.right === coordinates.right) {
        item.setAttribute('brush-border-right', 'true');
      }
      if (target.left === coordinates.left) {
        item.setAttribute('brush-border-left', 'true');
      }
      if (target.bottom === coordinates.bottom) {
        item.setAttribute('brush-border-bottom', 'true');
      }
    }
  });
};
const clearStyle = (item) => {
  item.hasAttribute('data-brush') && item.removeAttribute('data-brush');
  item.hasAttribute('brush-border-top') && item.removeAttribute('brush-border-top');
  item.hasAttribute('brush-border-right') && item.removeAttribute('brush-border-right');
  item.hasAttribute('brush-border-left') && item.removeAttribute('brush-border-left');
  item.hasAttribute('brush-border-bottom') && item.removeAttribute('brush-border-bottom');
};
若使用fusion的table,需为每个元素添加透明边框,否则会出现布局抖动现象(antd表格无需此操作)。
 /* 为解决设置样式抖动而设置 */
 .next-table td .next-table-cell-wrapper {
  border: 1px solid transparent;
 }
[brush-border-top="true"] {
  border-top: 1px solid #b93d06 !important;
}
[brush-border-right="true"] {
  border-right: 1px solid #b93d06 !important;
}
[brush-border-left="true"] {
  border-left: 1px solid #b93d06 !important;
}
[brush-border-bottom="true"] {
  border-bottom: 1px solid #b93d06 !important;
}
[data-brush="true"] {
  background-color: #f5f5f5 !important;
}
.next-table-row:hover {
  background-color: transparent !important;
}
鼠标松开
最后,为表格绑定鼠标松开时触发的事件 mouseup 。
完整的圈选流程包括鼠标按下、滑动及松开三个阶段。在按下时保存初始方位,滑动时判断方位并计算坐标,松开时将初始方位置空,从而完成一次圈选操作。
const onMouseUp = () => {
  originDir = {};
};
 <Table
    style={{ userSelect: 'none' }}
    onMouseDown={onMouseDown}
    onMouseMove={onMouseMove}
    onMouseUp={onMouseUp}
    ></Table>
至此,鼠标圈选功能已实现。
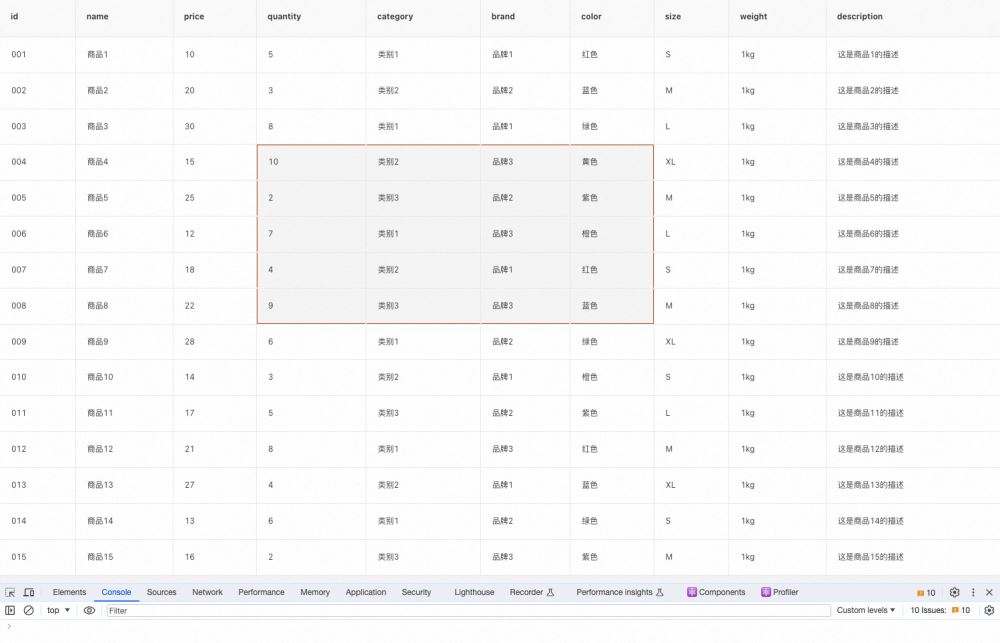
复制功能
实现表格圈选的交互效果,本质上是为后续的复制功能做铺垫。
鼠标右键复制
原生表格在选中元素时,右键菜单会显示【复制】按钮。点击后,复制效果是将圈选到的每个元素换行展示,这种格式既不符合使用需求,也无法保持页面原有的行列布局。
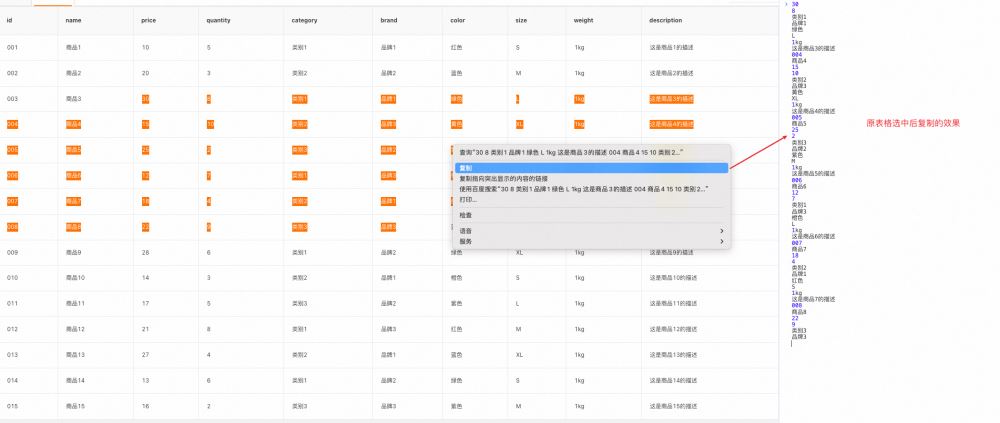
而在我们实现圈选功能后,由于使用了CSS属性 "user-select: none" 禁止了文本选择,此时鼠标右键菜单中已不再出现复制按钮。
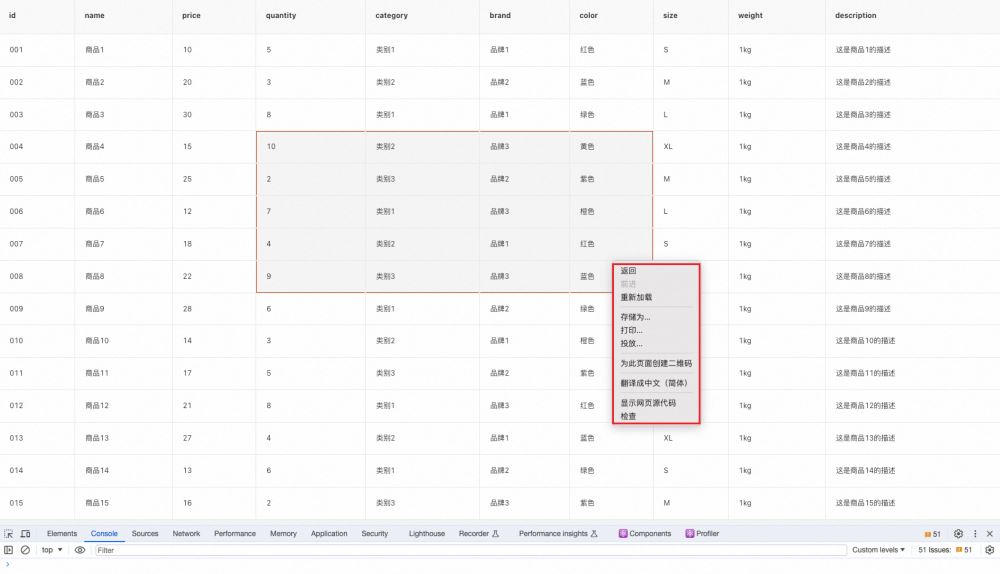
为了在鼠标右键时出现复制按钮,我们需要覆盖原有的鼠标右键事件,并自定义复制逻辑。
具体步骤如下:1、为表格绑定鼠标右键事件 contextMenu;
<Table
    style={{ userSelect: 'none' }}
    onMouseDown={onMouseDown}
    onMouseMove={onMouseMove}
    onMouseUp={onMouseUp}
    onContextMenu={onContextMenu}
></Table>
2、创建一个包含复制按钮的自定义上下文菜单;
<div id="contextMenu" className="context-menu" style={{ cursor: 'pointer' }}>
<div onClick={onClickCopy}>复制</div>
</div>
3、阻止默认的右键菜单弹出,将自定义上下文菜单添加到页面中,并将其定位在鼠标右键点击的位置。
const onContextMenu = (event) => {
  event.preventDefault(); // 阻止默认右键菜单弹出
  const contextMenu = document.getElementById('contextMenu');
  // 定位上下文菜单的位置
  contextMenu.style.left = `${event.clientX}px`;
  contextMenu.style.top = `${event.clientY}px`;
  // 显示上下文菜单
  contextMenu.style.display = 'block';
};
此处复制按钮未做特殊样式调整,开发者可根据实际项目需求进行美化。
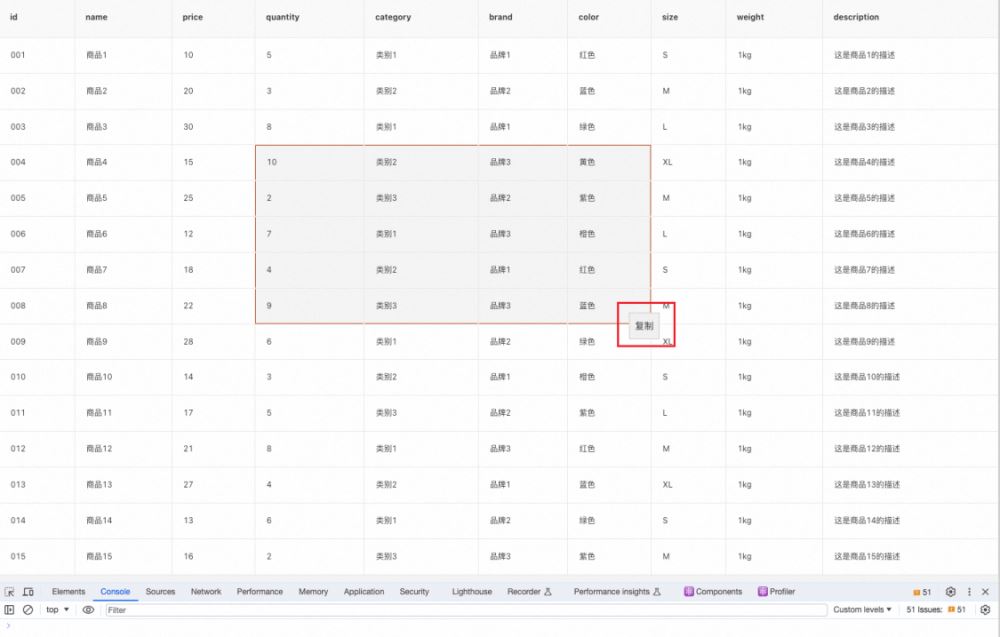
4、当点击复制按钮时,保存当前的行列格式并执行复制操作。
关于复制内容的格式保留,曾考虑通过保存DOM元素的样式来实现,但该方案存在两个问题:一是保存HTML样式的API document.execCommand('copy') 已不被现代浏览器支持;二是表格元素多为行内元素,即使复制了样式,最终粘贴出的布局也与页面显示不一致。
最终采取的方案是自行处理换行逻辑:遍历元素时判断当前元素的top属性与下一个元素的距离,若相同则添加空字符串,若不同则添加换行符 \n。
const onClickCopy = () => {
    const contextMenu = document.getElementById('contextMenu');
    const copyableElements = document.querySelectorAll('[data-brush=true]');
    // 遍历保存文本
    let copiedContent = '';
    copyableElements.forEach((element, index) => {
       let separator = ' ';
       if (index < copyableElements.length - 1) {
          const next = copyableElements?.[index + 1];
          if (next?.getBoundingClientRect().top !== element.getBoundingClientRect().top) {
              separator = '\n';
           }
        }
        copiedContent += `${element.innerHTML}${separator}`;
    });
    // 执行复制操作
    navigator.clipboard.writeText(copiedContent).then(() => {
       console.log('已复制内容:', copiedContent);
    }) .catch((error) => {
        console.error('复制失败:', error);
    });
    // 隐藏上下文菜单
    contextMenu.style.display = 'none';
};
5、对鼠标按下事件 onMouseDown 的处理
- 点击右键也会触发 onMouseDown 事件,这可能导致选中区域错乱。因此,需通过 event.button 判断当前触发事件的鼠标按键,以区分左键与右键操作。
- 若鼠标右键点击后未点击复制按钮而是滑走,或使用鼠标左键重新选中,这相当于执行取消复制操作,此时需清除复制按钮的上下文菜单。
const onMouseDown = (event) => {
  //  0:表示鼠标左键。2:表示鼠标右键。1:表示鼠标中键或滚轮按钮
  if (event.button !== 0) return;
  // 隐藏复制按钮
  const contextMenu = document.getElementById('contextMenu');
  contextMenu.style.display = 'none';
};
至此,鼠标圈选及右键复制功能已完整实现。
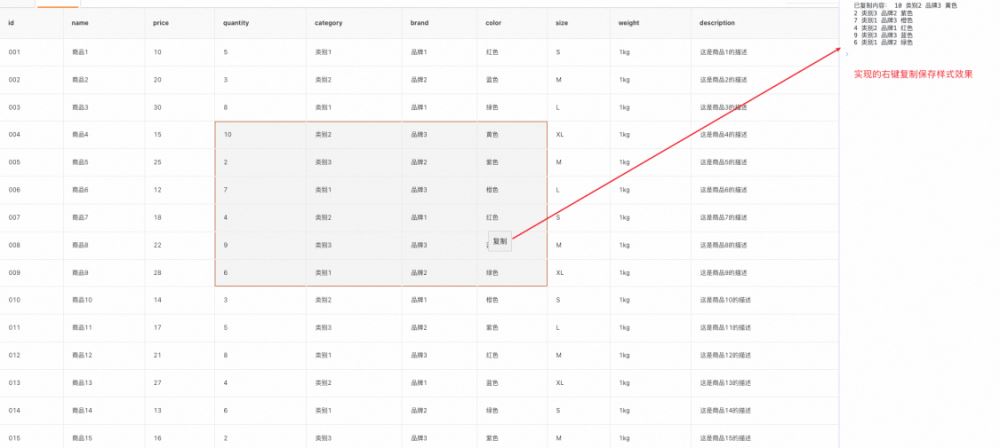
ctrl+s / command+s 复制
使用 event.ctrlKey 检查 Ctrl 键是否按下,使用 event.metaKey 检查 Command 键是否按下,并使用 event.key 检查按下的键是否为 c 键,从而实现 Ctrl/Cmd + C 的复制快捷键功能。
useEffect(() => {
    const clickSave = (event) => {
      if ((event.ctrlKey || event.metaKey) && event.key === 'c') {
        onClickCopy();
        event.preventDefault(); // 阻止默认的保存操作
      }
    };
    document.addEventListener('keydown', clickSave);
    return () => {
      document.removeEventListener('keydown', clickSave);
    };
}, []);
antd 也可以使用
上述功能最初在 fusion design 中实现,但在 antd 中同样适用,仅语法细节略有不同。
在antd表格中,鼠标事件需绑定在 onRow 函数中;
 <Table
  style={{ userSelect: 'none' }}
  onRow={() => {
    return {
      onContextMenu,
      onMouseDown,
      onMouseMove,
      onMouseUp,
    };
  }}
>
获取所有表格DOM元素的类名并进行相应替换;
const nodes = document.querySelectorAll('.ant-table-cell');同时需覆盖表格在hover状态下的默认样式。
.ant-table-cell-row-hover {
    background: transparent;
  }
  .ant-table-wrapper .ant-table .ant-table-tbody > tr.ant-table-row:hover > td,
  .ant-table-wrapper .ant-table .ant-table-tbody > tr > td.ant-table-cell-row-hover {
    background: transparent;
  }
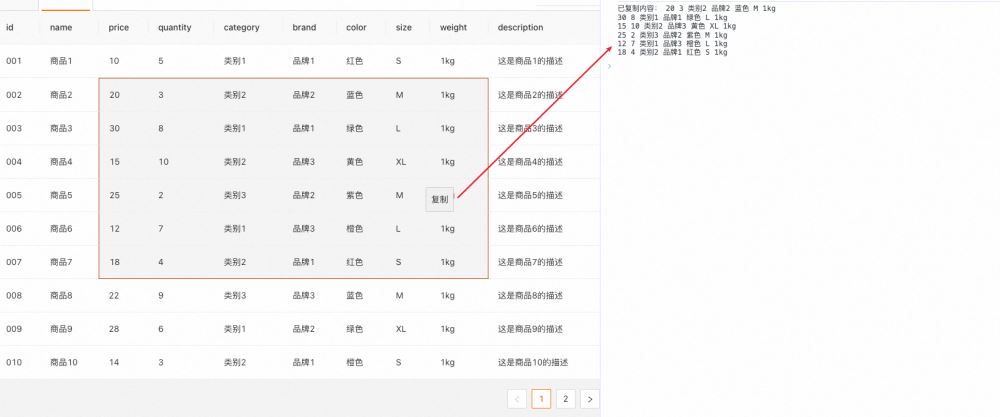
最终实现效果如图所示。
完整代码
完整代码托管于 table-brush-copy,包含 fusion design 和 ant design 两个版本的实现。
总结
表格圈选复制功能的实现主要包含以下五个步骤:
- mousedown 按下鼠标,记录初始坐标;
- mousemove 滑动鼠标,计算所形成的四边形区域;
- mouseup 松开鼠标,清空初始坐标;
- contextmenu 自定义鼠标右键事件,定位上下文菜单;
- keydown 监听键盘按键,判断是否为复制操作;
该方案集合了多种鼠标与键盘事件,以及JavaScript获取属性与元素的操作。
到此这篇关于antd/fusion表格增加圈选复制功能的文章就介绍到这了,更多相关antd/fusion表格圈选复制内容请搜索本站以前的文章或继续浏览下面的相关文章希望大家以后多多支持本站!
JS中使用位运算(~~)和一元加号(+)快速转换字符串为整数
2026-11-03 22:41:12
怎么使用命令行批量格式化项目中的JS文件
2026-11-03 19:04:42
JS代码美化后报错怎么办?常见格式化冲突解决方法
2026-11-03 18:47:01
不用moment.js,怎么用原生JS Intl API格式化时间戳
2026-11-03 18:10:30
原生JS与dayjs获取当前日期的代码对比
2026-11-03 17:57:26