

JavaScript模拟拖拽实现原理与常见异常处理
本文详解JavaScript中模拟拖拽的实现逻辑,通过计算鼠标与元素偏移量的差值确定位置。针对鼠标快速移动导致脱离元素、文本选中触发默认行为及IE兼容性问题,提供了绑定document事件、使用return false及setCapture全局捕获等具体解决方案,并封装了通用拖拽函数。
模拟拖拽基本原理
模拟拖拽的核心在于计算鼠标按下时与元素左上角的相对位置差。
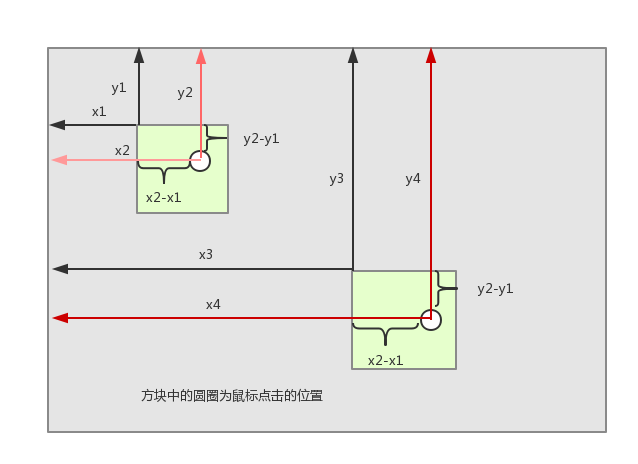
记录初始状态,x1为div当前的offsetLeft值,y1为div当前的offsetTop值。
y1等于div.offsetTop
记录鼠标按下时的纵坐标,y2为event事件的clientY值。
在鼠标按下瞬间,计算出鼠标相对于div左上角的偏移量,即x2减x1以及y2减y1,该差值在拖拽过程中保持不变。
当鼠标移动时,获取当前鼠标坐标x4和y4,用当前坐标减去之前计算的相对偏移量(x2-x1和y2-y1),即可得到div元素应更新的新位置。
基础实现代码如下:
 <!DOCTYPE html>
 <html lang="en">
 <head>
  <meta charset="UTF-8">
  <title>Document</title>
  <style>
   #box{
    width: 100px;
    height: 100px;
    background: red;
   position: absolute;
   }
  </style>
 </head>
 <body>
  <div id="box"></div>
  <script type="text/javascript">
  var oBox = document.getElementById('box');
  oBox.onmousedown = function(ev){
  // 鼠标按下
  var ev = ev || event;
  // 获取鼠标离div得距离
  var mouseBoxleft = ev.clientX - this.offsetLeft;
  var mouseBoxTop = ev.clientY - this.offsetTop;
  oBox.onmousemove = function(ev){
   // 鼠标按下左键并移动
  var ev = ev || event;
   // 设置div移动时,它的位置
   oBox.style.left = ev.clientX - mouseBoxleft + 'px';
   oBox.style.top = ev.clientY - mouseBoxleft + 'px';
   }
   oBox.onmouseup = function(){
   // 鼠标左键抬起
   oBox.onmousemove = oBox.onmouseup = null;
   }
  }
  </script>
 </body>
 </html>
鼠标移出问题的优化方案
对基础代码进行优化,提升兼容性和稳定性。
问题一:当鼠标移动速度过快时,鼠标指针可能移出目标div区域,导致mousemove事件不再触发,拖拽随之停止。
解决方案:将onmousemove和onmouseup事件监听器绑定到document对象上,而非div元素本身,确保鼠标移出div后仍能捕获移动和释放事件。
优化后的代码如下:
 <!DOCTYPE html>
 <html lang="en">
 <head>
  <meta charset="UTF-8">
 <title>Document</title>
  <style>
   #box{
   width: 100px;
    height: 100px;
   background: red;
    position: absolute;
   }
  </style>
 </head>
 <body>
  <div id="box"></div>
  <script>
 var oBox = document.getElementById('box');
 oBox.onmousedown = function(ev){
  // 鼠标按下
  var ev = ev || event;
  // 获取鼠标离div得距离
  var mouseBoxleft = ev.clientX - this.offsetLeft;
  var mouseBoxTop = ev.clientY - this.offsetTop;
  document.onmousemove = function(ev){
  // 鼠标按下左键并移动
   var ev = ev || event;
   // 设置div移动时,它的位置
   oBox.style.left = ev.clientX - mouseBoxleft + 'px';
   oBox.style.top = ev.clientY - mouseBoxleft + 'px';
   }
   document.onmouseup = function(){
   // 鼠标左键抬起
   document.onmousemove = document.onmouseup = null;
   }
  }
  </script>
 </body>
 </html>
文本选中与IE兼容处理
问题二:若拖拽的目标元素内部包含文本,浏览器会默认触发文本选中行为,干扰拖拽体验。
解决方案一:在onmousedown事件中返回false,以阻止浏览器的默认行为(此方法在IE浏览器中无效)。
解决方案二:利用IE特有的全局捕获机制(setCapture)来解决。
具体实施:在onmousedown事件中执行return false,以阻止非IE浏览器的默认选中行为。
相关代码如下:
 <!DOCTYPE html>
 <html lang="en">
 <head>
  <meta charset="UTF-8">
  <title>Document</title>
  <style>
   #box{
    width: 100px;
    height: 100px;
    background: red;
    position: absolute;
    top: 0;
    left: 0;
  }
 </style>
 </head>
 <body>
  <div id="box">模拟拖拽</div>
  <script>
 var oBox = document.getElementById('box');
 oBox.onmousedown = function(ev){
   // 鼠标按下
   var ev = ev || event;
   // 获取鼠标离div得距离
   var mouseBoxleft = ev.clientX - this.offsetLeft;
   var mouseBoxTop = ev.clientY - this.offsetTop;
   document.onmousemove = function(ev){
   // 鼠标按下左键并移动
    var ev = ev || event;
    // 设置div移动时,它的位置
    oBox.style.left = ev.clientX - mouseBoxleft + 'px';
    oBox.style.top = ev.clientY - mouseBoxleft + 'px';
   }
   document.onmouseup = function(){
  // 鼠标左键抬起
   document.onmousemove = document.onmouseup = null;
  }
   // 阻止默认行为
   return false;
  }
  </script>
 </body>
 </html>
具体实施:利用IE的全局捕获功能。
全局捕获机制:当为元素设置全局捕获后,该元素将监听后续发生的所有鼠标事件,无论鼠标指针位于页面何处,相关事件都会触发该元素绑定的处理函数。
示例代码如下:
 <!DOCTYPE html>
 <html lang="en">
 <head>
  <meta charset="UTF-8">
  <title>Document</title>
 </head>
 <body>
  <input type="button" id="button1" value="弹出1" />
  <input type="button" id="button2" value="弹出2" />
  <script type="text/javascript">
  window.onload = function(){
  var Btn1 = document.getElementById('button1');
   var Btn2 = document.getElementById('button2');
   Btn1.setCapture();
   Btn1.onclick = function(){
    alert(1);
  }
   Btn2.onclick = function(){
   alert(2);
  }
 }
 </script>
 </body>
</html>
演示效果:为Btn1设置全局捕获后,即使点击Btn2,也会触发Btn1绑定的点击事件。
在拖拽场景中的应用:在目标div的onmousedown事件中调用setCapture()启用全局捕获,并在onmouseup事件中调用releaseCapture()取消全局捕获,以解决IE下的文本选中问题。
应用全局捕获的代码如下:
 <!DOCTYPE html>
 <html lang="en">
 <head>
  <meta charset="UTF-8">
  <title>Document</title>
  <style>
  #box{
    width: 100px;
    height: 100px;
    background: red;
    position: absolute;
  }
  </style>
</head>
 <body>
  <div id="box">模拟拖拽</div>
  <script>
 var oBox = document.getElementById('box');
  oBox.onmousedown = function(ev){
  // 鼠标按下
   var ev = ev || event;
  // 获取鼠标离div得距离
   var mouseBoxleft = ev.clientX - this.offsetLeft;
   var mouseBoxTop = ev.clientY - this.offsetTop;
   // IE浏览器,全局捕获
   if(oBox.setCapture){
   oBox.setCapture();
   }
   document.onmousemove = function(ev){
  // 鼠标按下左键并移动
    var ev = ev || event;
    // 设置div移动时,它的位置
    oBox.style.left = ev.clientX - mouseBoxleft + 'px';
    oBox.style.top = ev.clientY - mouseBoxleft + 'px';
   }
   document.onmouseup = function(){
   // 鼠标左键抬起
    document.onmousemove = document.onmouseup = null;
    //IE下,释放全局捕获 releaseCapture();
   if ( oBox.releaseCapture ) {
     oBox.releaseCapture();
    }
   }
   // 阻止默认行为
   return false;
  }
  </script>
 </body>
 </html>
通用拖拽函数封装
问题三:将上述逻辑封装为通用的模拟拖拽函数,提高代码复用性。
封装后的通用拖拽函数代码如下:
 <!DOCTYPE html>
 <html lang="en">
 <head>
  <meta charset="UTF-8">
  <title>Document</title>
  <style>
   #box{
    width: 100px;
    height: 100px;
    background: red;
    position: absolute;
   }
  </style>
 </head>
 <body>
  <div id="box">模拟拖拽</div>
  <script>
  var oBox = document.getElementById('box');
  drag(oBox);
  function drag(obj){
   obj.onmousedown = function(ev){
    // 鼠标按下
   var ev = ev || event;
    // 获取鼠标离div得距离
    var mouseBoxleft = ev.clientX - this.offsetLeft;
    var mouseBoxTop = ev.clientY - this.offsetTop;
    // IE浏览器,全局捕获
    if(obj.setCapture){
     obj.setCapture();
    }
    document.onmousemove = function(ev){
    // 鼠标按下左键并移动
     var ev = ev || event;
     // 设置div移动时,它的位置
     obj.style.left = ev.clientX - mouseBoxleft + 'px';
     obj.style.top = ev.clientY - mouseBoxleft + 'px';
    }
    document.onmouseup = function(){
    // 鼠标左键抬起
     document.onmousemove = document.onmouseup = null;
    //IE下,释放全局捕获 releaseCapture();
     if ( obj.releaseCapture ) {
      obj.releaseCapture();
    }
    }
    // 阻止默认行为
    return false;
  }
 }
  </script>
 </body>
</html>
以上内容涵盖了JavaScript模拟拖拽的基本原理及常见兼容性问题的处理方法,希望对学习与实践有所帮助。
JavaScript将图片转换为Base64编码的两种途径
2026-11-05 16:43:05
怎么在 Vue 或 React 项目中正确集成 animate.js
2026-11-05 10:23:38
JS注册事件:addEventListener基础语法与参数详解
2026-11-05 08:44:56
JSP和JS的区别:运行环境与服务端/客户端职责解析
2026-11-04 23:34:36
pdf.js 官方下载地址:GitHub Release 获取预编译包
2026-11-04 23:07:27