

jQuery插件bootstrapValidator数据验证详解
本文详细介绍jQuery插件bootstrapValidator在数据验证中的应用。涵盖必要的CSS和JS文件引用、基础非空与长度验证配置、自定义正则表达式匹配规则,以及包含实时用户名存在性检查、密码一致性校验和Ajax提交验证的完整注册功能实现。
bootstrapValidator简介与文件引用
由于项目涉及数据验证需求,经评估认为bootstrapValidator表现良好,遂进行集成测试,结果显示兼容性良好。
Bootstrap是一个能够增强兼容性的强大前端框架。
使用插件前需引入以下CSS样式文件:
bootstrap.min.css
bootstrapValidator.min.css
同时需引入以下JavaScript脚本文件:
jquery-1.10.2.min.js
bootstrap.min.js
bootstrapValidator.min.js
(下载实例)
上述文件均为运行所必需。
基础验证示例与配置
首先展示一个基础示例,导入对应文件后即可直接运行:
<!DOCTYPE html>
<html>
<head>
 <title>Using Ajax to submit data</title>

 <link rel="stylesheet" href="../vendor/bootstrap/css/bootstrap.css"/>
 <link rel="stylesheet" href="../dist/css/bootstrapValidator.css"/>

 <script type="text/javascript" src="../vendor/jquery/jquery-1.10.2.min.js"></script>
 <script type="text/javascript" src="../vendor/bootstrap/js/bootstrap.min.js"></script>
 <script type="text/javascript" src="../dist/js/bootstrapValidator.js"></script>
</head>
<body>
<div class="container">
 <!-- class都是bootstrap定义好的样式,验证是根据input中的name值 -->
 <form id="defaultForm" method="post" class="form-horizontal" action="ajaxSubmit.php">
 <!-- 下面这个div必须要有,插件根据这个进行添加提示 -->
 <div class="form-group">
  <label class="col-lg-3 control-label">Username</label>
  <div class="col-lg-5">
  <input type="text" class="form-control" name="username" />
  </div>
 </div>

 <div class="form-group">
  <label class="col-lg-3 control-label">Email address</label>
  <div class="col-lg-5">
  <input type="text" class="form-control" name="email" />
  </div>
 </div>

 <div class="form-group">
  <label class="col-lg-3 control-label">Password</label>
  <div class="col-lg-5">
  <input type="password" class="form-control" name="password" />
  </div>
 </div>

 <div class="form-group">
  <div class="col-lg-9 col-lg-offset-3">
  <button type="submit" class="btn btn-primary">Sign up</button>
  </div>
 </div>
 </form>

</div>
<script type="text/javascript">
$(document).ready(function() {
 /**
 * 下面是进行插件初始化
 * 你只需传入相应的键值对
 * */
 $('#defaultForm').bootstrapValidator({
 message: 'This value is not valid',
 feedbackIcons: {/*输入框不同状态,显示图片的样式*/
 valid: 'glyphicon glyphicon-ok',
 invalid: 'glyphicon glyphicon-remove',
 validating: 'glyphicon glyphicon-refresh'
 },
 fields: {/*验证*/
 username: {/*键名username和input name值对应*/
  message: 'The username is not valid',
  validators: {
  notEmpty: {/*非空提示*/
  message: '用户名不能为空'
  },
  stringLength: {/*长度提示*/
  min: 6,
  max: 30,
  message: '用户名长度必须在6到30之间'
  }/*最后一个没有逗号*/
  }
 },
 password: {
  message:'密码无效',
  validators: {
  notEmpty: {
  message: '密码不能为空'
  },
  stringLength: {
  min: 6,
  max: 30,
  message: '用户名长度必须在6到30之间'
  }
  }
 },
 email: {
  validators: {
  notEmpty: {
  message: 'The email address is required and can\'t be empty'
  },
  emailAddress: {
  message: 'The input is not a valid email address'
  }
  }
 }
 }
 });
});
</script>
</body>
</html>
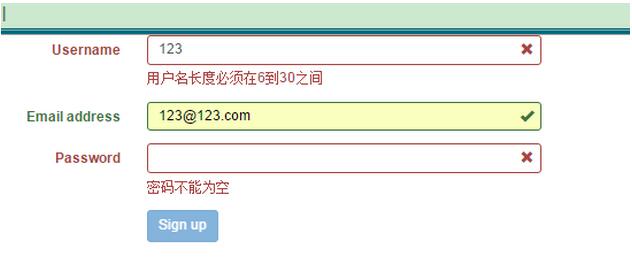
这是最基础的配置,将示例代码复制到本地并导入所需的CSS和JS文件即可运行。注意JS配置中的键名(如username、password)需与HTML中input标签的name属性值保持一致,运行后即可实现非空及长度验证,无需额外处理CSS样式。
运行效果如下图所示:
自定义正则表达式验证
上述示例使用了插件内置规则,若需添加自定义匹配规则该如何操作?
只需在对应input的键值配置中加入regexp:{}键值对(基于上述JS代码修改)即可实现:
username: {/*键名和input name值对应*/
  message: 'The username is not valid',
  validators: {
  notEmpty: {/*非空提示*/
  message: '用户名不能为空'
  },
  regexp: {/* 只需加此键值对,包含正则表达式,和提示 */
  regexp: /^[a-zA-Z0-9_\.]+$/,
  message: '只能是数字和字母_.'
  },
  stringLength: {/*长度提示*/
  min: 6,
  max: 30,
  message: '用户名长度必须在6到30之间'
  }/*最后一个没有逗号*/
  }
 },
自定义规则验证效果如下:
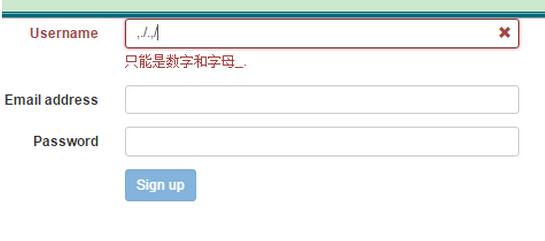
通过运行和观察示例,可掌握大部分验证场景,操作简便,仅需编写相应的键值对配置即可,无需从零编写验证逻辑。接下来演示更复杂的应用场景,即用户注册功能的实现:
用户注册功能完整实现
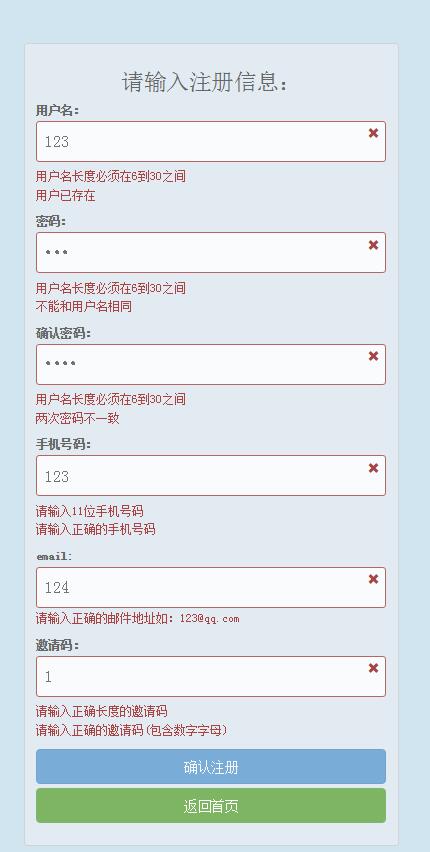
具体需求如下:
1. 实时验证用户名是否已存在;2. 密码不能与用户名相同;3. 两次输入的密码必须一致;4. 提交后需验证服务器返回值。
HTML代码(直接替换示例中的form部分):
<form id="defaultForm" role="form" class="form-signin" action="registerAccount.do"
 method="post">
 <h2 class="form-signin-heading">请输入注册信息:</h2>

 <div class="form-group">
  <label for="username">用户名:</label><input class="form-control"
  type="text" name="username" id="username" />
 </div>
 <div class="form-group">
  <label for="password">密码:</label><input class="form-control"
  type="password" name="password" id="password"/>
 </div>
 <div class="form-group">
  <label for="repassword">确认密码:</label><input class="form-control"
  type="password" name="repassword" id="repassword" />
 </div>
 <div class="form-group">
  <label for="phone">手机号码:</label><input class="form-control"
  type="text" name="phone" id="phone" />
 </div>
 <div class="form-group">
  <label for="email">email:</label><input class="form-control"
  type="email" name="email" id="email" />
 </div>
 <div class="form-group">
  <label for="invite">邀请码:</label><input class="form-control"
  type="text" name="invite" id="invite">
 </div>
 <div class="form-group">
  <button class="btn btn-lg btn-primary btn-block" type="submit">确认注册</button>
  <a class="btn btn-lg btn-primary btn-block" href="../">返回首页</a>
  </div>
 </form>
JS代码(直接替换示例中的JS部分):
$(function(){/* 文档加载,执行一个函数*/
 $('#defaultForm')
 .bootstrapValidator({
 message: 'This value is not valid',
 feedbackIcons: {/*input状态样式图片*/
 valid: 'glyphicon glyphicon-ok',
 invalid: 'glyphicon glyphicon-remove',
 validating: 'glyphicon glyphicon-refresh'
 },
 fields: {/*验证:规则*/
 username: {//验证input项:验证规则
  message: 'The username is not valid',

  validators: {
  notEmpty: {//非空验证:提示消息
  message: '用户名不能为空'
  },
  stringLength: {
  min: 6,
  max: 30,
  message: '用户名长度必须在6到30之间'
  },
  threshold : 6 , //有6字符以上才发送ajax请求,(input中输入一个字符,插件会向服务器发送一次,设置限制,6字符以上才开始)
  remote: {//ajax验证。server result:{"valid",true or false} 向服务发送当前input name值,获得一个json数据。例表示正确:{"valid",true}
  url: 'exist2.do',//验证地址
  message: '用户已存在',//提示消息
  delay : 2000,//每输入一个字符,就发ajax请求,服务器压力还是太大,设置2秒发送一次ajax(默认输入一个字符,提交一次,服务器压力太大)
  type: 'POST'//请求方式
  /**自定义提交数据,默认值提交当前input value
  * data: function(validator) {
  return {
   password: $('[name="passwordNameAttributeInYourForm"]').val(),
   whatever: $('[name="whateverNameAttributeInYourForm"]').val()
  };
  }
  */
  },
  regexp: {
  regexp: /^[a-zA-Z0-9_\.]+$/,
  message: '用户名由数字字母下划线和.组成'
  }
  }
 },
 password: {
  message:'密码无效',
  validators: {
  notEmpty: {
  message: '密码不能为空'
  },
  stringLength: {
  min: 6,
  max: 30,
  message: '用户名长度必须在6到30之间'
  },
  identical: {//相同
  field: 'password', //需要进行比较的input name值
  message: '两次密码不一致'
  },
  different: {//不能和用户名相同
  field: 'username',//需要进行比较的input name值
  message: '不能和用户名相同'
  },
  regexp: {
  regexp: /^[a-zA-Z0-9_\.]+$/,
  message: 'The username can only consist of alphabetical, number, dot and underscore'
  }
  }
 },
 repassword: {
  message: '密码无效',
  validators: {
  notEmpty: {
  message: '用户名不能为空'
  },
  stringLength: {
  min: 6,
  max: 30,
  message: '用户名长度必须在6到30之间'
  },
  identical: {//相同
  field: 'password',
  message: '两次密码不一致'
  },
  different: {//不能和用户名相同
  field: 'username',
  message: '不能和用户名相同'
  },
  regexp: {//匹配规则
  regexp: /^[a-zA-Z0-9_\.]+$/,
  message: 'The username can only consist of alphabetical, number, dot and underscore'
  }
  }
 },
 email: {
  validators: {
  notEmpty: {
  message: '邮件不能为空'
  },
  emailAddress: {
  message: '请输入正确的邮件地址如:123@qq.com'
  }
  }
 },
 phone: {
  message: 'The phone is not valid',
  validators: {
  notEmpty: {
  message: '手机号码不能为空'
  },
  stringLength: {
  min: 11,
  max: 11,
  message: '请输入11位手机号码'
  },
  regexp: {
  regexp: /^1[3|5|8]{1}[0-9]{9}$/,
  message: '请输入正确的手机号码'
  }
  }
 },
 invite: {
  message: '邀请码',
  validators: {
  notEmpty: {
  message: '邀请码不能为空'
  },
  stringLength: {
  min: 8,
  max: 8,
  message: '请输入正确长度的邀请码'
  },
  regexp: {
  regexp: /^[\w]{8}$/,
  message: '请输入正确的邀请码(包含数字字母)'
  }
  }
 },
 }
 })
 .on('success.form.bv', function(e) {//点击提交之后
 // Prevent form submission
 e.preventDefault();

 // Get the form instance
 var $form = $(e.target);

 // Get the BootstrapValidator instance
 var bv = $form.data('bootstrapValidator');

 // Use Ajax to submit form data 提交至form标签中的action,result自定义
 $.post($form.attr('action'), $form.serialize(), function(result) {
//do something...
});
 });
});
注册功能运行效果如下:
常见异常及解决方法:
Uncaught RangeError: Maximum call stack size exceeded。此错误通常因未添加class="form-group"导致。
以上为本文全部内容,希望对读者学习有所帮助,欢迎继续支持本站。
JS中使用位运算(~~)和一元加号(+)快速转换字符串为整数
2026-11-03 22:41:12
怎么使用命令行批量格式化项目中的JS文件
2026-11-03 19:04:42
JS代码美化后报错怎么办?常见格式化冲突解决方法
2026-11-03 18:47:01
不用moment.js,怎么用原生JS Intl API格式化时间戳
2026-11-03 18:10:30
原生JS与dayjs获取当前日期的代码对比
2026-11-03 17:57:26