

AngularJS实现图片放大镜效果的技术解析
本文介绍在AngularJS中实现图片放大镜效果的方案。针对原生AngularJS无法直接获取图片宽高(winth/height)的问题,通过引入jQuery解决。核心在于利用同级指令间的通信机制,避免创建独立作用域,并借助$q服务延迟异步获取数据,最终提供完整源码与注意事项。
前言与问题背景
前言
最初尝试使用原生AngularJS进行开发,但发现无法直接获取图片的宽度和高度。这是因为AngularJS内置的jQuery方法中并不包含winth()和height()这两个用于获取尺寸的方法。
最终解决方案是引入jQuery,并在同一scope上绑定图片的宽度和高度。接下来将展示相关源码,并对其中需要注意的关键点进行说明。
效果图
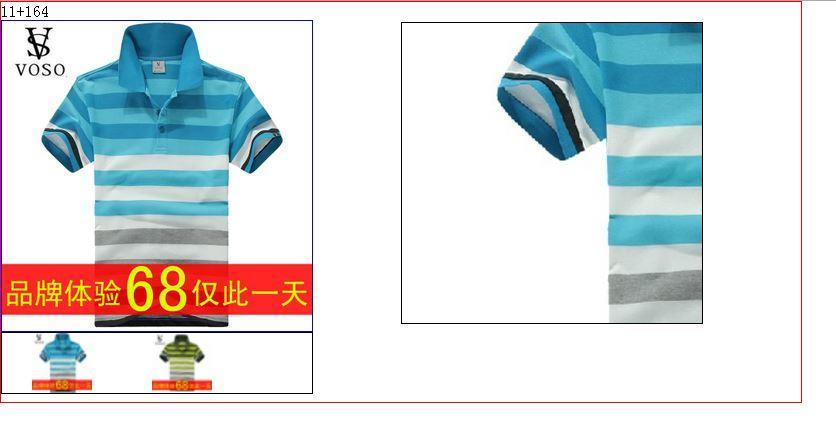
技术实现关键点
首先说明下
第一点,使用了两个同级指令,并在它们之间进行通信。实现同级指令间通信的关键在于避免让同级指令生成独立的scope,从而确保它们处于同一个作用域下完成交互。如果指令scope没有特殊声明,它将默认使用父scope。指令生成的模板如果没有在特定的scope下编译,默认情况下并不会创建新的子scope,而是更多地使用父scope。也就是说,如果指令存在一个controller下,它会使用controller下的scope。
第二点,使用了$q来延迟异步获取数据。读者也可以参考$q的相关用法以加深理解。
源码示例
完整源码示例
<!DOCTYPE html>
<html lang="en" ng-app="magnifierAPP">
<head>
  <meta charset="UTF-8">
  <title></title>
  <script src="lib/angular.min.js" type="text/javascript"></script>
  <script src="lib/angular-animate.js" type="text/javascript"></script>
  <script src="lib/jquery-2.1.4.min.js" type="text/javascript"></script>
</head>
<style>
  *{
    padding: 0px;
    margin: 0px;
  }
  .content{
    width: 800px;
    height: 400px;
    position: relative;
    border: 1px solid red;
  }
  .left{
    width: 310px;
    height: 380px;
  }
  .top{
    width: 310px;
    height: 310px;
    border: 1px solid blue;
    cursor: pointer;
  }
  .top img{
    width: 310px;
    height: 310px;
  }
  .bottom{
    position: relative;
    width: 310px;
    height: 60px;
    border: 1px solid black;
  }
  .bottom img{
    display: inline-block;
    width: 60px;
    height: 60px;
    float: left;
    margin: 0 30px;
    cursor: pointer;
  }
  .right{
    border: 1px solid ;
    width: 300px;
    height: 300px;
    position: absolute;
    left: 400px;
    top: 20px;
    overflow: hidden;
  }
  .right img{
    position: absolute;
    width: 700px;
    height: 600px;
  }
  .show{
    display: block;
  }
  .hidden{
    display: none;
  }
</style>
<body>
<div ng-controller="magnifierController">
  <div class="content">
    <div class="left" ng-init="isActive=0">
      <div>{{x}}+{{y}}</div>
      <div magnifier-top></div>
      <div class="bottom" >
        <img src="img/blue_1.jpg" alt="1" ng-mouseover="isActive=0"/>
        <img src="img/yellow_1.jpg" alt="1" ng-mouseover="isActive=1"/>
      </div>
    </div>
    <div magnifier-right>
      <div>{{x}}+{{y}}</div>
    </div>
  </div>
  <script type="text/ng-template" id="magnifier-top.html">
    <div class="top" ng-mousemove="getPosition($event.offsetX,$event.offsetY)" ng-mouseover="isshow=true" ng-mouseleave="isshow=false">
      <img src="img/blue_2.jpg" alt="0" ng-class="{true:'show',false:'hidden'}[isActive==0]"/>
      <img src="img/yellow_2.jpg" alt="1" ng-class="{true:'show',false:'hidden'}[isActive==1]"/>
    </div>
  </script>

  <script type="text/ng-template" id="magnifier-right.html" >
    <div class="right" >
      <img src="{{img1.src}}" alt="1" ng-class="{true:'show',false:'hidden'}[isActive==0]" id="img1"/>
      <img src="{{img2.src}}" alt="1" ng-class="{true:'show',false:'hidden'}[isActive==1]"/>
    </div>
  </script>
</div>
</body>
<script>
  var app=angular.module('magnifierAPP',[]);
  app.controller('magnifierController',['$scope', function ($scope) {

  }]);
  app.directive('magnifierRight',['readJson',function (readJson) {
    return {
      restrict: 'EA',
      replace:true,
      templateUrl:'magnifier-right.html',

      link: function (scope,element,attr) {
        var promise=readJson.getJson();
        promise.then(function (data) {
          scope.img1=data[0];
          scope.img2=data[1];
        });
        //右侧容器内照片宽度、高度
        scope.rightWidth=$(element).find("img").eq(scope.isActive).width();
        scope.rightHeight=$(element).find("img").eq(scope.isActive).height();
        //右侧容器宽度、高度
        scope.rightBoxWidth=$(element).width();
        scope.rightBoxHeight=$(element).height();
        //移动比例
        var radX=(scope.rightWidth-scope.rightBoxWidth)/scope.topWidth;
        var radY=(scope.rightHeight-scope.rightBoxHeight)/scope.topHeight;

        console.log(radX);
        console.log(radY);
        setInterval(function (){
          scope.$apply(function (){
            element.find("img").eq(scope.isActive).css({
              "left":-scope.x*radX+"px",
              "top":-scope.y*radY+"px"
            });
          })
        },30)
      }
    }
  }]);
  app.directive('magnifierTop',[function () {
    return{
      restrict:'EA',
      replace:true,
      templateUrl:'magnifier-top.html',
      link: function (scope,element,attr) {
        scope.topWidth=$(element).find("img").eq(scope.isActive).width();
        scope.topHeight=$(element).find("img").eq(scope.isActive).height();
        scope.getPosition= function (x,y) {
          scope.x=x;
          scope.y=y;
        }
      }
    }
  }]);
  app.factory('readJson',['$http','$q', function ($http,$q) {
    return{
      getJson: function (){
        var deferred=$q.defer();
        $http({
          method:'GET',
          url:'magnifier.json'
        }).success(function (data, status, header, config) {
          deferred.resolve(data);
        }).error(function (data, status, header, config) {
          deferred.reject(data);
        });
        return deferred.promise;
      }
    }
  }]);
</script>
</html>
总结
总结
以上就是这篇文章的全部内容,不知道大家都学会了吗?希望这篇文章对大家的学习或者工作能带来一定帮助,如果有问题欢迎大家留言交流。
JS空字符串、null和undefined转数字的结果是什么
2026-11-05 14:49:16
CodePen、JSFiddle与StackBlitz:主流JS在线编辑器对比
2026-11-05 13:38:29
JS怎么将时间戳转换为“刚刚”、“几分钟前”等相对时间
2026-11-05 12:55:14
JavaScript将儒略日逆向还原为公历日期时间的实现方法
2026-11-04 23:51:05
能在我的世界手机版直接修改JS代码吗
2026-11-04 19:02:53