

JavaScript实现前端验证码:基础生成与高级防机器人技巧
本文详细介绍如何使用JavaScript在前端实现验证码功能。首先讲解基础版,通过数组随机抽取四位字符生成验证码并实现验证逻辑。随后进阶介绍利用CSS3 transform属性实现字符旋转及随机干扰线,并通过透明DIV层覆盖防止机器自动识别,从而提升前端验证的安全性。
基础版验证码实现
基础版
基于日常上网经验,验证码通常由四位数字和字母组成。接下来将逐步演示如何使用JavaScript编写一个验证码脚本。首先展示成品效果,以便直观理解:
<!DOCTYPE html>
<html lang="en">
<head>
  <meta charset="UTF-8">
   <style>
    #securityCode{
      background-color: #008000;
      width:70px;
      height:30px;
      font-family: '楷体', serif;
      font-size: 20px;
      color:white;
    }
  </style>
  <script language="JavaScript" type="text/javascript">
   function createCode(){
      var code=new Array(0,1,2,3,4,5,6,7,8,9,
          'A','B','C','D','E','F','G','H','I','J','K','L','M','N','O','P','Q','R','S','T','U','V','W','X','Y','Z');
      var codeNumber;
      securityCode="";//全局变量,方便后续验证
      for(var i=0;i<4;i++){
        codeNumber=Math.floor(Math.random()*36);
        securityCode+=code[codeNumber];
      }
      document.getElementById("securityCode").value=securityCode;
    }
    function verify(){
      var enterCode=document.getElementById("enterCode").value;
      if(enterCode.toUpperCase()==securityCode){
        alert("输入正确,通过验证!");
      }
      else{
        enterCode.value="";
        createCode();
      }
    }
  </script>
    <title>Jizhen Tan</title>
</head>
<body onLoad="checkCookie()" >
   <input type="text" id="enterCode"><br/>
   <input type="button" id="securityCode"  onclick="createCode()">
   <a href="###" onclick="createCode()">看不清楚</a><br/>
   <input type="button" style="background-color: #0099FF; font-size: 20px;"value="验证" onclick="verify()">
</body>
</html>
1. 既然需要生成四位验证码,思路需适当拓展。首先,我们需要创建一个数组,用于存储可用的字母和数字字符。
 var code=new Array(0,1,2,3,4,5,6,7,8,9,
          'A','B','C','D','E','F','G','H','I','J','K','L','M','N','O','P','Q','R','S','T','U','V','W','X','Y','Z');
2. 接下来,需要实现从数组中随机选取元素的功能。这里定义一个变量 codeNumber 用于存储随机生成的数字索引。由于我们需要四位验证码,而数组元素是单个字符,因此可以建立另一个变量 securityCode 来拼接这些字符。具体代码如下:
 var codeNumber;
      securityCode="";//全局变量,方便后续验证
      for(var i=0;i<4;i++){
        codeNumber=Math.floor(Math.random()*36);
        securityCode+=code[codeNumber];
      }
可以看出,此时 securityNumber 变量(注:原文此处指代 securityCode 逻辑)存储的即为一个由四位随机字符组成的验证码。3. 经过上述简单两步,我们便得到了四位验证码。最后,将其封装在 createCode 函数中。
function createCode(){
      var code=new Array(0,1,2,3,4,5,6,7,8,9,
          'A','B','C','D','E','F','G','H','I','J','K','L','M','N','O','P','Q','R','S','T','U','V','W','X','Y','Z');
      var codeNumber;
      securityCode="";//全局变量,方便后续验证
      for(var i=0;i<4;i++){
        codeNumber=Math.floor(Math.random()*36);
        securityCode+=code[codeNumber];
      }
      document.getElementById("securityCode").value=securityCode;
    }
4. 接下来,我们创建一个验证机制:
 function verify(){
      var enterCode=document.getElementById("enterCode").value;
      if(enterCode.toUpperCase()==securityCode){
        alert("输入正确,通过验证!");
      }
      else{
        enterCode.value="";
        createCode();
      }
    }
5. 对验证码进行简单的美化修饰:
 <style>
    #securityCode{
      background-color: #008000;
      width:70px;
      height:30px;
      font-family: '楷体', serif;
      font-size: 20px;
      color:white;
    }
  </style>
高级防机器人技巧
进阶:进一步阻止机器人的高级技巧 在接触的大部分项目中,验证码通常由后台处理。近期遇到一个需要验证码的页面,起初考虑后台实现,但考虑到部分项目对安全性要求不高且需具备一定防机器人技巧,因此决定使用前端实现。该方案利用CSS3的transform属性中的rotate设置字符旋转,并随机添加干扰线。最后,为了在所有DOM节点上方叠加一层 opacity=0 的DIV,从而构建出一个前端验证码。
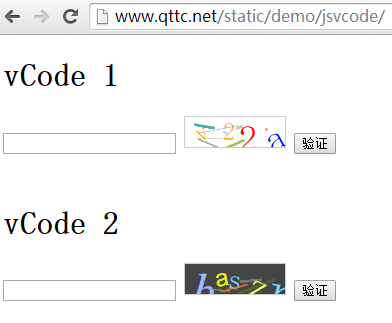
vCode代码:
(function(){
  var randstr = function(length){
    var key = {

      str : [
        'a','b','c','d','e','f','g','h','i','j','k','l','m',
        'o','p','q','r','s','t','x','u','v','y','z','w','n',
        '0','1','2','3','4','5','6','7','8','9'
      ],

      randint : function(n,m){
        var c = m-n+1;
        var num = Math.random() * c + n;
        return Math.floor(num);
      },

      randStr : function(){
        var _this = this;
        var leng = _this.str.length - 1;
        var randkey = _this.randint(0, leng);
        return _this.str[randkey];
      },

      create : function(len){
        var _this = this;
        var l = len || 10;
        var str = '';

        for(var i = 0 ; i<l ; i++){
          str += _this.randStr();
        }

        return str;
      }

    };

    length = length ? length : 10;

    return key.create(length);
  };

  var randint = function(n,m){
    var c = m-n+1;
    var num = Math.random() * c + n;
    return Math.floor(num);
  };

  var vCode = function(dom, options){
    this.codeDoms = [];
    this.lineDoms = [];
    this.initOptions(options);
    this.dom = dom;
    this.init();
    this.addEvent();
    this.update();
    this.mask();
  };

  vCode.prototype.init = function(){
    this.dom.style.position = "relative";
    this.dom.style.overflow = "hidden";
    this.dom.style.cursor = "pointer";
    this.dom.title = "点击更换验证码";
    this.dom.style.background = this.options.bgColor;
    this.w = this.dom.clientWidth;
    this.h = this.dom.clientHeight;
    this.uW = this.w / this.options.len;
  };

  vCode.prototype.mask = function(){
    var dom = document.createElement("div");
    dom.style.cssText = [
      "width: 100%",
      "height: 100%",
      "left: 0",
      "top: 0",
      "position: absolute",
      "cursor: pointer",
      "z-index: 9999999"
    ].join(";");

    dom.title = "点击更换验证码";

    this.dom.appendChild(dom);
  };

  vCode.prototype.addEvent = function(){
    var _this = this;
    _this.dom.addEventListener("click", function(){
      _this.update.call(_this);
    });
  };

  vCode.prototype.initOptions = function(options){

    var f = function(){
      this.len = 4;
      this.fontSizeMin = 20;
      this.fontSizeMax = 48;
      this.colors = [
        "green",
        "red",
        "blue",
        "#53da33",
        "#AA0000",
        "#FFBB00"
      ];
      this.bgColor = "#FFF";
      this.fonts = [
        "Times New Roman",
        "Georgia",
        "Serif",
        "sans-serif",
        "arial",
        "tahoma",
        "Hiragino Sans GB"
      ];
      this.lines = 8;
      this.lineColors = [
        "#888888",
        "#FF7744",
        "#888800",
        "#008888"
      ];

      this.lineHeightMin = 1;
      this.lineHeightMax = 3;
      this.lineWidthMin = 1;
      this.lineWidthMax = 60;
    };

    this.options = new f();

    if(typeof options === "object"){
      for(i in options){
        this.options[i] = options[i];
      }
    }
  };

  vCode.prototype.update = function(){
    for(var i=0; i<this.codeDoms.length; i++){
      this.dom.removeChild(this.codeDoms[i]);
    }
    for(var i=0; i<this.lineDoms.length; i++){
      this.dom.removeChild(this.lineDoms[i]);
    }
    this.createCode();
    this.draw();
  };

  vCode.prototype.createCode = function(){
    this.code = randstr(this.options.len);
  };

  vCode.prototype.verify = function(code){
    return this.code === code;
  };

  vCode.prototype.draw = function(){
    this.codeDoms = [];
    for(var i=0; i<this.code.length; i++){
      this.codeDoms.push(this.drawCode(this.code[i], i));
    }

    this.drawLines();
  };

  vCode.prototype.drawCode = function(code, index){
    var dom = document.createElement("span");

    dom.style.cssText = [
      "font-size:" + randint(this.options.fontSizeMin, this.options.fontSizeMax) + "px",
      "color:" + this.options.colors[randint(0, this.options.colors.length - 1)],
      "position: absolute",
      "left:" + randint(this.uW * index, this.uW * index + this.uW - 10) + "px",
      "top:" + randint(0, this.h - 30) + "px",
      "transform:rotate(" + randint(-30, 30) + "deg)",
      "-ms-transform:rotate(" + randint(-30, 30) + "deg)",
      "-moz-transform:rotate(" + randint(-30, 30) + "deg)",
      "-webkit-transform:rotate(" + randint(-30, 30) + "deg)",
      "-o-transform:rotate(" + randint(-30, 30) + "deg)",
      "font-family:" + this.options.fonts[randint(0, this.options.fonts.length - 1)],
      "font-weight:" + randint(400, 900)
    ].join(";");

    dom.innerHTML = code;
    this.dom.appendChild(dom);

    return dom;
  };

  vCode.prototype.drawLines = function(){
    this.lineDoms = [];
    for(var i=0; i<this.options.lines; i++){
      var dom = document.createElement("div");

      dom.style.cssText = [
        "position: absolute",
        "opacity: " + randint(3, 8) / 10,
        "width:" + randint(this.options.lineWidthMin, this.options.lineWidthMax) + "px",
        "height:" + randint(this.options.lineHeightMin, this.options.lineHeightMax) + "px",
        "background: " + this.options.lineColors[randint(0, this.options.lineColors.length - 1)],
        "left:" + randint(0, this.w - 20) + "px",
        "top:" + randint(0, this.h) + "px",
        "transform:rotate(" + randint(-30, 30) + "deg)",
        "-ms-transform:rotate(" + randint(-30, 30) + "deg)",
        "-moz-transform:rotate(" + randint(-30, 30) + "deg)",
        "-webkit-transform:rotate(" + randint(-30, 30) + "deg)",
        "-o-transform:rotate(" + randint(-30, 30) + "deg)",
        "font-family:" + this.options.fonts[randint(0, this.options.fonts.length - 1)],
        "font-weight:" + randint(400, 900)
      ].join(";");
      this.dom.appendChild(dom);

      this.lineDoms.push(dom);
    }
  };

  this.vCode = vCode;

}).call(this);
用法:
//container 为 验证码的DOM节点
var code = new vCode(container);

// 验证是否正确
// inputCode为用户输入的验证码
code.verify(inputCode); // return true or false
JavaScript闭包与类(Class)的区别及适用场景对比
2026-11-05 15:48:57
JavaScript入门要学ES6吗?let与箭头函数等新特性解析
2026-11-05 14:49:16
JavaScript 8种数据类型详解:基本类型与引用类型的区别
2026-11-05 14:25:15
怎么在JavaScript中使用async/await优化Ajax异步流程
2026-11-05 13:56:15
JavaScript replace回调函数实现动态正则替换逻辑
2026-11-05 13:52:13