

HTML5 Canvas实现本地图片裁剪与头像上传教程
本文详解如何利用HTML5 Canvas与File API实现本地图片的裁剪与预览功能。通过FileReader读取本地文件,使用Canvas绘制图片并生成遮罩层,结合鼠标事件实现动态裁剪框拖动。文章提供完整代码示例,并优化了鼠标移动时的性能,采用background-position预览与Canvas最终裁剪相结合的策略,适用于头像上传等场景。
HTML5 Canvas本地图片裁剪与头像上传实现
近期深入研究了HTML5的各项API,注意到新浪微博的头像设置功能正是基于Canvas实现截图。此前曾接触过利用File API中的FileReader进行文件上传的《JavaScript File API文件上传预览》,这更让我感受到HTML5的魅力,因此尝试编写此功能以深入学习Canvas。以下是一个简单的Demo,代码量不多,细节处理尚显粗糙,如有不当之处恳请指正。实现步骤如下:
- 一、获取文件,读取文件并生成url
- 二、根据容器的大小使用canvas绘制图片
- 三、使用canvas绘制遮罩层
- 四、使用canvas绘制裁剪后的图片
- 五、拖动裁剪框,重新裁剪图片
获取文件与生成URL
注:由于是先完成Demo再撰写文章,分段粘贴的代码直接源自代码块,请注意this对象的指向。第一步:获取文件,读取文件并生成url。此处采用HTML5的File API处理本地文件上传,优势在于无需将图片上传至服务器即可获取预览地址,具体可参考:使用File API 之FileReader实现文件上传。
document.getElementById('post_file').onchange = function() {
 var fileList = this.files[0];
 var oFReader = new FileReader();
 oFReader.readAsDataURL(fileList);
 oFReader.onload = function (oFREvent) { //当读取操作成功完成时调用.
  postFile.paintImage(oFREvent.target.result);//把预览图片url传给函数
 };
}
Canvas绘制图片与自适应处理
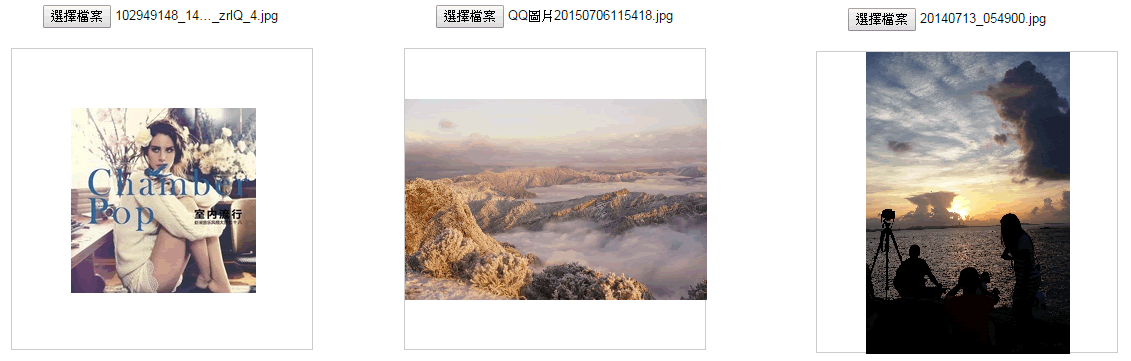
第二步:根据容器的大小使用canvas绘制图片
在利用File API的FileReader获取图片地址后,需使用Canvas将图片绘制出来。为何不直接插入img标签而要用Canvas重绘?这并非多此一举。若直接插入img,难以实现自适应居中;而使用Canvas绘制图片,不仅能实现图片的自适应居中与等比例缩放,还能方便地将图片的坐标和尺寸传递给后续的遮罩层,从而根据这些参数绘制遮罩层。此处需特别注意Canvas的drawImage方法。
paintImage: function(url) {
 var t = this;
 var createCanvas = t.getImage.getContext("2d");
 var img = new Image();
 img.src = url;
 img.onload = function(){

  //等比例缩放图片(如果图片宽高都比容器小,则绘制的图片宽高 = 原图片的宽高。)
  //如果图片的宽度或者高度比容器大,则宽度或者高度 = 容器的宽度或者高度,另一高度或者宽度则等比例缩放
  //t.imgWidth:绘制后图片的宽度;t.imgHeight:绘制后图片的高度;t.px:绘制后图片的X轴;t.py:绘制后图片的Y轴
  if ( img.width < t.regional.offsetWidth && img.height < t.regional.offsetHeight) {
   t.imgWidth = img.width;
   t.imgHeight = img.height;

  } else {
   var pWidth = img.width / (img.height / t.regional.offsetHeight);
   var pHeight = img.height / (img.width / t.regional.offsetWidth);
   t.imgWidth = img.width > img.height ? t.regional.offsetWidth : pWidth;
   t.imgHeight = img.height > img.width ? t.regional.offsetHeight : pHeight;
  }
  //图片的坐标
  t.px = (t.regional.offsetWidth - t.imgWidth) / 2 + 'px';
  t.py = (t.regional.offsetHeight - t.imgHeight) / 2 + 'px';

  t.getImage.height = t.imgHeight;
  t.getImage.width = t.imgWidth;
  t.getImage.style.left = t.px;
  t.getImage.style.top = t.py;

  createCanvas.drawImage(img,0,0,t.imgWidth,t.imgHeight);//没用直接插入背景图片而用canvas绘制图片,是为了调整所需框内图片的大小
  t.imgUrl = t.getImage.toDataURL();//储存canvas绘制的图片地址
  t.cutImage();
  t.drag();
 };
},
效果如下所示:
绘制遮罩层与裁剪区域显示
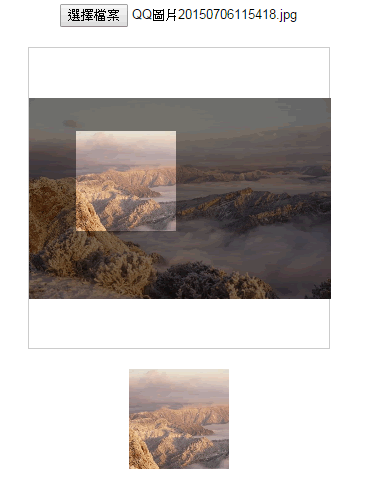
第三步:使用canvas绘制遮罩层。在上一步已绘制好背景图的基础上,需根据背景图的坐标和尺寸绘制遮罩层覆盖于其上,并利用Canvas的clearRect方法清空出一块裁剪区域,通过明暗对比区分裁剪区与非裁剪区。注:此处的遮罩层仅用于显示效果,并未执行实际的图片裁剪操作。不知此步骤是否可省略?如有了解者请赐教。
//绘制遮罩层:
t.editBox.height = t.imgHeight;
t.editBox.width = t.imgWidth;
t.editBox.style.display = 'block';
t.editBox.style.left = t.px;
t.editBox.style.top = t.py;

var cover = t.editBox.getContext("2d");
cover.fillStyle = "rgba(0, 0, 0, 0.5)";
cover.fillRect (0,0, t.imgWidth, t.imgHeight);
cover.clearRect(t.sx, t.sy, t.sHeight, t.sWidth);
执行图片裁剪与结果输出
第四步:使用canvas绘制裁剪后的图片。第三步中虽绘制了遮罩层,但其仅用于显示裁剪区域与非裁剪区域的对比,并无实际裁剪能力。因此,此处开始实现图片裁剪功能,同样用到Canvas的drawImage方法。
//绘制剪切图片:
t.editPic.height = t.sHeight;
t.editPic.width = t.sWidth;
var ctx = t.editPic.getContext('2d');
var images = new Image();
images.src = t.imgUrl;
images.onload = function(){
 ctx.drawImage(images,t.sx, t.sy, t.sHeight, t.sWidth, 0, 0, t.sHeight, t.sWidth); //裁剪图片
 document.getElementById('show_edit').getElementsByTagName('img')[0].src = t.editPic.toDataURL(); //把裁剪后的图片使用img标签显示出来
}
动态裁剪框与鼠标交互实现
第五步:拖动裁剪框,重新裁剪图片。在使用截图上传头像功能时,用户期望能裁剪出满意的图片,因此裁剪框需随鼠标移动实时变化以调整裁剪结果。前几步已实现基本裁剪功能,现在需使裁剪框跟随鼠标移动实时重绘图片。
drag: function() {
 var t = this;
 var draging = false;
 var startX = 0;
 var startY = 0;

 document.getElementById('cover_box').onmousemove = function(e) {
  //获取鼠标到背景图片的距离
  var pageX = e.pageX - ( t.regional.offsetLeft + this.offsetLeft );
  var pageY = e.pageY - ( t.regional.offsetTop + this.offsetTop );
  //判断鼠标是否在裁剪区域里面:
  if ( pageX > t.sx && pageX < t.sx + t.sWidth && pageY > t.sy && pageY < t.sy + t.sHeight ) {
   this.style.cursor = 'move';

   this.onmousedown = function(){
    draging = true;
    //记录上一次截图的坐标
    t.ex = t.sx;
    t.ey = t.sy;
    //记录鼠标按下时候的坐标
    startX = e.pageX - ( t.regional.offsetLeft + this.offsetLeft );
    startY = e.pageY - ( t.regional.offsetTop + this.offsetTop );
   }
   window.onmouseup = function() {
    draging = false;
   }

   if (draging) {
    //移动时裁剪区域的坐标 = 上次记录的定位 + (当前鼠标的位置 - 按下鼠标的位置),裁剪区域不能超出遮罩层的区域;
    if ( t.ex + (pageX - startX) < 0 ) {
     t.sx = 0;
    } else if ( t.ex + (pageX - startX) + t.sWidth > t.imgWidth) {
     t.sx = t.imgWidth - t.sWidth;
    } else {
     t.sx = t.ex + (pageX - startX);
    };

    if (t.ey + (pageY - startY) < 0) {
     t.sy = 0;
    } else if ( t.ey + (pageY - startY) + t.sHeight > t.imgHeight ) {
     t.sy = t.imgHeight - t.sHeight;
    } else {
     t.sy = t.ey + (pageY - startY);
    }

    t.cutImage();
   }
  } else{
   this.style.cursor = 'auto';
  }
 };
}
功能实现完毕,效果如下:
性能优化与完整代码示例
有读者指出,每移动一下鼠标就裁剪一张图片会消耗大量性能,为何不采用background-position进行预览,仅在保存时使用Canvas裁剪?此建议颇具道理,因此对第四步代码进行了调整。鼠标移动时的预览效果改为改变图片的background-position,点击保存按钮时才进行图片裁剪,并将裁剪后的图片生成新的URL以传输至服务器。以下为修正后的代码,欢迎提出更多建议。完整Demo代码如下:注意:代码基于seajs编写,请留意文件加载情况。CSS部分:
body{text-align:center;}
#label{border:1px solid #ccc;background-color:#fff;text-align:center;height:300px; width:300px;margin:20px auto;position:relative;}
#get_image{position:absolute;}
#edit_pic{position:absolute;display:none;background:#000;}
#cover_box{position: absolute;z-index: 9999;display:none;top:0px;left:0px;}
#show_edit{margin: 0 auto;display:inline-block;}
#show_pic{height:100px;width:100px;border:2px solid #000;overflow:hidden;margin:0 auto;display:inline-block; }
HTML部分:
<input type="file" name="file" id="post_file">
<button id="save_button">保存</button>
<div id="label">
 <canvas id="get_image"></canvas>
 <p>
  <canvas id="cover_box"></canvas>
  <canvas id="edit_pic"></canvas>
 </p>
</div>
<p>
 <span id="show_edit"></span>
 <span id="show_pic"><img src=""></span>
</p>


<script type="text/javascript" src="../../lib/seajs/sea.js"></script>
<script type="text/javascript">
seajs.use(['_example/fileAPI/index_v2.js'], function(clipFile) {
 clipFile.init({
  clipPos: {  //裁剪框的默认尺寸与定位
   x: 15,
   y: 15,
   height: 100,
   width: 100,
  },
 });
});

</script>
JavaScript部分:
define(function(require, exports, module) {

 'use strict';

 var postFile = {
  init: function(options) {
   var t = this;
   t.regional = document.getElementById('label');
   t.getImage = document.getElementById('get_image');
   t.clipPic = document.getElementById('edit_pic');
   t.coverBox = document.getElementById('cover_box');
   t.achieve = document.getElementById('show_edit');

   t.clipPos = options.clipPos;

   //初始化图片基本参数
   t.bgPagePos = {
    x: 0,
    y: 0,
    height: 0,
    width: 0
   };

   //传进图片
   document.getElementById('post_file').addEventListener("change", t.handleFiles, false);

   //点击保存按钮后再裁剪图片
   document.getElementById('save_button').onclick = function() {

    //绘制剪切后的图片:
    t.clipPic.height = t.clipPos.height;
    t.clipPic.width = t.clipPos.width;

    var ctx = t.clipPic.getContext('2d');
    var images = new Image();
    images.src = t.imgUrl;
    images.onload = function(){

     //drawImage(images,相对于裁剪图片的X, 相对于裁剪图片的Y, 裁剪的高度, 裁剪的宽度, 显示在画布的X, 显示在画布的Y, 显示在画布多高, 显示在画布多宽);
     ctx.drawImage(images,t.clipPos.x, t.clipPos.y, t.clipPos.height, t.clipPos.width, 0, 0, t.clipPos.height, t.clipPos.width); //裁剪图片

     document.getElementById('show_pic').getElementsByTagName('img')[0].src = t.clipPic.toDataURL();
    }
   };

   t.drag();
  },
  handleFiles: function() {

   var fileList = this.files[0];
   var oFReader = new FileReader();

   //读取文件内容
   oFReader.readAsDataURL(fileList);

   //当读取操作成功完成时调用.
   oFReader.onload = function (oFREvent) {

    //把预览图片URL传给函数
    postFile.paintImage(oFREvent.target.result);
   };
  },
  paintImage: function(url) {
   var t = this;
   var createCanvas = t.getImage.getContext("2d");

   var img = new Image();
   img.src = url;

   //把传进来的图片进行等比例缩放
   img.onload = function(){
    //等比例缩放图片(如果图片宽高都比容器小,则绘制的图片宽高 = 原图片的宽高。)
    //如果图片的宽度或者高度比容器大,则宽度或者高度 = 容器的宽度或者高度,另一高度或者宽度则等比例缩放

    //t.bgPagePos.width:绘制后图片的宽度;
    //t.bgPagePos.height:绘制后图片的高度;
    //t.bgPagePos.x:绘制后图片的X轴;
    //t.bgPagePos.y:绘制后图片的Y轴
    if ( img.width < t.regional.offsetWidth && img.height < t.regional.offsetHeight) {
     t.bgPagePos.width = img.width;
     t.bgPagePos.height = img.height;

    } else {
     var pWidth = img.width / (img.height / t.regional.offsetHeight);
     var pHeight = img.height / (img.width / t.regional.offsetWidth);

     t.bgPagePos.width = img.width > img.height ? t.regional.offsetWidth : pWidth;
     t.bgPagePos.height = img.height > img.width ? t.regional.offsetHeight : pHeight;
    }

    //图片的坐标
    t.bgPagePos.x = (t.regional.offsetWidth - t.bgPagePos.width) / 2 + 'px';
    t.bgPagePos.y = (t.regional.offsetHeight - t.bgPagePos.height) / 2 + 'px';

    t.getImage.height = t.bgPagePos.height;
    t.getImage.width = t.bgPagePos.width;
    t.getImage.style.left = t.bgPagePos.x;
    t.getImage.style.top = t.bgPagePos.y;

    createCanvas.drawImage(img,0,0,t.bgPagePos.width,t.bgPagePos.height);//没用直接插入背景图片而用canvas绘制图片,是为了调整所需框内图片的大小

    t.imgUrl = t.getImage.toDataURL();//储存canvas绘制的图片地址

    t.clipImg();
   };
  },
  clipImg: function() {
   var t = this;

   //绘制遮罩层:
   t.coverBox.height = t.bgPagePos.height;
   t.coverBox.width = t.bgPagePos.width;
   t.coverBox.style.display = 'block';
   t.coverBox.style.left = t.bgPagePos.x;
   t.coverBox.style.top = t.bgPagePos.y;

   var cover = t.coverBox.getContext("2d");
   cover.fillStyle = "rgba(0, 0, 0, 0.5)";
   cover.fillRect (0,0, t.bgPagePos.width, t.bgPagePos.height);
   cover.clearRect(t.clipPos.x, t.clipPos.y, t.clipPos.height, t.clipPos.width);

   t.achieve.style.background = 'url(' + t.imgUrl + ')' + -t.clipPos.x + 'px ' + -t.clipPos.y + 'px no-repeat';
   t.achieve.style.height = t.clipPos.height + 'px';
   t.achieve.style.width = t.clipPos.width + 'px';
  },
  drag: function() {
   var t = this;
   var draging = false;
   var _startPos = null;

   t.coverBox.onmousemove = function(e) {
    e = e || window.event;

    if ( e.pageX == null && e.clientX != null ) {

     var doc = document.documentElement, body = document.body;

     e.pageX = e.clientX + (doc && doc.scrollLeft || body && body.scrollLeft || 0) - (doc && doc.clientLeft || body && body.clientLeft || 0);
     e.pageY = e.clientY + (doc && doc.scrollTop || body && body.scrollTop);
    }

    //获取鼠标到背景图片的距离
    var _mousePos = {
     left: e.pageX - ( t.regional.offsetLeft + this.offsetLeft ),
     top: e.pageY - ( t.regional.offsetTop + this.offsetTop )
    }

    //判断鼠标是否在裁剪区域里面:
    if ( _mousePos.left > t.clipPos.x && _mousePos.left < t.clipPos.x + t.clipPos.width && _mousePos.top > t.clipPos.y && _mousePos.top < t.clipPos.y + t.clipPos.height ) {
     this.style.cursor = 'move';

     this.onmousedown = function(){
      draging = true;
      //记录上一次截图的坐标
      t.ex = t.clipPos.x;
      t.ey = t.clipPos.y;

      //记录鼠标按下时候的坐标
      _startPos = {
       left: e.pageX - ( t.regional.offsetLeft + this.offsetLeft ),
       top: e.pageY - ( t.regional.offsetTop + this.offsetTop )
      }
     }

     if (draging) {
      //移动时裁剪区域的坐标 = 上次记录的定位 + (当前鼠标的位置 - 按下鼠标的位置),裁剪区域不能超出遮罩层的区域;
      if ( t.ex + ( _mousePos.left - _startPos.left ) < 0 ) {
       t.clipPos.x = 0;
      } else if ( t.ex + ( _mousePos.left - _startPos.left ) + t.clipPos.width > t.bgPagePos.width ) {
       t.clipPos.x = t.bgPagePos.width - t.clipPos.width;
      } else {
       t.clipPos.x = t.ex + ( _mousePos.left - _startPos.left );
      };

      if (t.ey + ( _mousePos.top - _startPos.top ) < 0) {
       t.clipPos.y = 0;
      } else if ( t.ey + ( _mousePos.top - _startPos.top ) + t.clipPos.height > t.bgPagePos.height ) {
       t.clipPos.y = t.bgPagePos.height - t.clipPos.height;
      } else {
       t.clipPos.y = t.ey + ( _mousePos.top - _startPos.top );
      }

      t.clipImg();
     }

     document.body.onmouseup = function() {
      draging = false;
      document.onmousemove = null;
      document.onmouseup = null;
     }
    } else{
     this.style.cursor = 'auto';
    }
   };
  }
 }
 return postFile;
});
以上就是本文的全部内容,希望对大家的学习有所帮助。
sigma.js 怎么实现节点点击、拖拽与悬停提示交互
2026-11-05 15:03:27
Matter.js 与 PixiJS/Three.js 集成:分离物理计算与渲染
2026-11-05 13:43:48
主流JS弹幕库选型指南:Danmaku.js等库的功能与体积对比
2026-11-05 09:28:19
JavaScript点击事件监听与交互效果实例
2026-11-05 09:10:19
自定义JS颜色选择器UI样式与交互细节
2026-11-05 09:09:06