

Node.js 中使用 Canvas 拼接瓦片并导出地图图片
本文详解在 Node.js 环境下,利用 canvas 库实现地图瓦片的动态拼接与 GeoJSON 矢量数据叠加,并最终导出为高清图片的完整流程。通过封装 Canvas 绘制与切片坐标转换工具类,代码涵盖了从工程初始化、依赖配置到核心逻辑实现的全过程,提供了可直接运行的源代码参考。
概述
本文介绍如何在 Node.js 环境中,利用 canvas 库根据指定的出图范围和缩放级别,将地图瓦片进行拼接,并叠加 GeoJSON 矢量数据,最终导出为图片文件。
实现效果
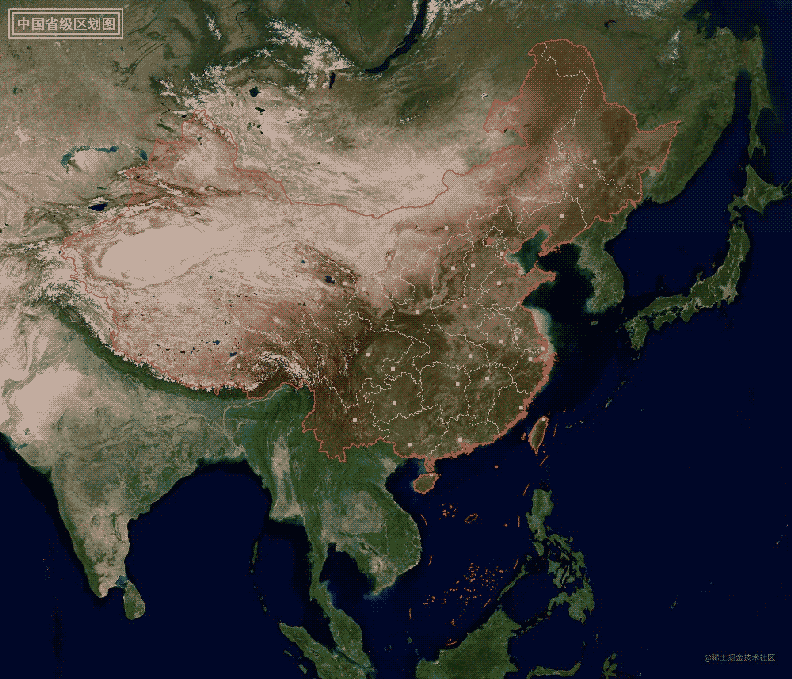
实现步骤
1. 初始化工程
通过执行命令 npm init -y 初始化项目并安装相关依赖,生成的 package.json 配置文件内容如下所示:
{
  "name": "map",
  "version": "1.0.0",
  "description": "",
  "main": "map.js",
  "scripts": {
    "map": "node ./map.js"
  },
  "keywords": ["canvas", "map"],
  "author": "lzugis<niujp08@qq.com>",
  "license": "ISC",
  "dependencies": {
    "canvas": "^2.9.3",
    "proj4": "^2.8.0",
    "ora": "^5.4.0"
  }
}
2. 编写工具类
文件 canvas.js 定义了 Canvas 操作工具类,主要功能包括 canvas 的初始化,以及添加图片、绘制点、线、面等绘图方法的支持。
const { createCanvas, loadImage } = require('canvas')
class CanvasUtil {
  constructor(width = 1000, height = 1000) {
    this.canvas = createCanvas(width, height)
    this.ctx = this.canvas.getContext('2d')
  }
  /**
   * 绘制多个图片
   * @param imgsData, [{url: '', x: '', y: ''}]
   * @return {Promise<unknown>}
   */
  drawImages(imgsData) {
    const that = this
    let promises = []
    imgsData.forEach(data => {
      promises.push(new Promise(resolve => {
        loadImage(data.url).then(img => {
            resolve({
              ...data,
              img
            })
        })
      }))
    })
    return new Promise(resolve => {
      Promise.all(promises).then(imgDatas => {
        imgDatas.forEach(imgData => {
          that.drawImage(imgData.img, imgData.x, imgData.y)
        })
        resolve(imgDatas)
      })
    })
  }
  /**
   * 绘制一张图片
   * @param image
   * @param x
   * @param y
   * @param width
   * @param height
   */
  drawImage(image, x, y, width, height) {
    const that = this
    width = width || image.width
    height = height || image.height
    that.ctx.drawImage(image, x, y, width, height)
  }
  /**
   * 绘制多个点
   * @param pointsData,[{type: 'circle', size: 4, x: 100, y: 100, icon: ''}]
   */
  drawPoints(pointsData = []) {
    const that = this
    return new Promise(resolve => {
      let promises = []
      pointsData.forEach(pointData => {
        that.ctx.beginPath()
        that.ctx.save()
        that.ctx.fillStyle = pointData.color || 'rgba(255, 0, 0, 1)'
        const type = pointData.type || 'circle'
        const size = pointData.size || 4
        let {x, y} = pointData
        pointData.x = x
        pointData.y = y
        switch (type) {
          case "rect": {
            x -= size
            y -= size
            that.ctx.fillRect(x, y, size * 2, size * 2)
            promises.push(Promise.resolve(pointData))
            break
          }
          case "circle": {
            that.ctx.arc(x, y, size, 0, Math.PI * 2)
            that.ctx.fill()
            promises.push(Promise.resolve(pointData))
            break
          }
          case "marker": {
            promises.push(new Promise(resolve1 => {
              loadImage(pointData.icon).then(img => {
                const w = img.width * pointData.size
                const h = img.height * pointData.size
                x -= w / 2
                y -= h / 2
                that.drawImage(img, x, y, w, h)
                resolve(pointData)
              })
            }))
            break
          }
        }
        that.ctx.restore()
      })
      Promise.all(promises).then(res => {
        resolve({
          code: '200'
        })
      })
    })
  }
  /**
   * 绘制线
   * @param linesData [{}]
   * @return {Promise<unknown>}
   */
  drawLines(linesData) {
    const that = this
    return new Promise(resolve => {
      linesData.forEach(lineData => {
        that.ctx.beginPath()
        that.ctx.save()
        that.ctx.strokeStyle = lineData.color || 'red'
        that.ctx.lineWidth = lineData.width || 2
        that.ctx.setLineDash(lineData.dasharray || [5, 0]);
        lineData.coords.forEach((coord, index) => {
          const [x, y] = coord
          index === 0 ? that.ctx.moveTo(x, y) : that.ctx.lineTo(x, y)
        })
        that.ctx.stroke()
        that.ctx.restore()
      })
      resolve({
        code: '200'
      })
    })
  }
  /**
   * 绘制多边形
   * @param polygonsData
   * @return {Promise<unknown>}
   */
  drawPolygons(polygonsData) {
    const that = this
    return new Promise(resolve => {
      polygonsData.forEach(polygonData => {
        that.ctx.beginPath()
        that.ctx.save()
        polygonData.coords.forEach((coord, index) => {
          const [x, y] = coord
          index === 0 ? that.ctx.moveTo(x, y) : that.ctx.lineTo(x, y)
        })
        that.ctx.closePath()
        if(polygonData.isFill) {
          that.ctx.fillStyle = polygonData.fillStyle || 'rgba(255, 0, 0,  0.2)'
          that.ctx.fill()
        }
        if(polygonData.isStroke) {
          that.ctx.strokeStyle = polygonData.strokeStyle || 'red'
          that.ctx.lineWidth =  polygonData.lineWidth || 2
          that.ctx.setLineDash(polygonData.lineDash || [5, 0]);
          that.ctx.stroke()
        }
        that.ctx.restore()
      })
      resolve({
        code: '200'
      })
    })
  }
  /**
   * 获取canvas数据
   * @return {string}
   */
  getDataUrl() {
    return this.canvas.toDataURL().replace(/^data:image\/\w+;base64,/, '')
  }
  /**
   * 添加标题
   * @param title
   */
  addTitle(title) {
    this.ctx.save()
    this.ctx.strokeStyle = '#fff'
    this.ctx.lineWidth = 3
    this.ctx.fillStyle = '#fff'
    let x = 20, y = 20, offset = 8
    let h = 32
    this.ctx.font = `bold ${h}px 微软雅黑`
    this.ctx.textAlign = 'left'
    this.ctx.textBaseline = 'top'
    let w = this.ctx.measureText(title).width
    // 外边框
    this.ctx.strokeRect(x, y, offset * 4 + w, offset * 4 + h)
    // 内边框
    this.ctx.strokeRect(x + offset, y + offset, offset * 2 + w, offset * 2 + h)
    // 文字
    this.ctx.fillText(title, x + offset * 2, y + offset * 2)
    this.ctx.restore()
  }
}
module.exports = CanvasUtil
文件 tile.js 提供了切片操作工具类,实现了坐标转换、获取指定范围内的切片行列范围,以及将地理坐标转换为屏幕坐标等功能。
const proj4 = require('proj4')
const { randomNum } = require('./common')
class TileUtil {
  constructor(tileSize = 256) {
    this.tileSize = tileSize
    this.origin = 20037508.34
    this.resolutions = []
    let resolution = (this.origin * 2) / this.tileSize
    for (let i = 0; i < 23; i++) {
      this.resolutions.push(resolution)
      resolution /= 2
    }
    this.tileUrl = 'https://webst0{domain}.is.autonavi.com/appmaptile?style=6&x={x}&y={y}&z={z}'
  }
  /**
   * 4326转3857
   * @param lonlat
   * @return {*}
   */
  fromLonLat(lonlat) {
    return proj4('EPSG:4326', 'EPSG:3857', lonlat)
  }
  /**
   * 3857转4326
   * @param coords
   * @return {*}
   */
  toLonLat(coords) {
    return proj4('EPSG:3857', 'EPSG:4326', coords)
  }
  /**
   * 获取范围内的切片的行列号的范围
   * @param zoom
   * @param extent
   * @return {number[]}
   */
  getTilesInExtent(zoom, extent) {
    extent = this.getExtent(extent)
    const [xmin, ymin, xmax, ymax] = extent
    const res = this.resolutions[zoom] * 256
    const xOrigin = -this.origin, yOrigin = this.origin
    const _xmin = Math.floor((xmin - xOrigin) / res)
    const _xmax = Math.ceil((xmax - xOrigin) / res)
    const _ymin = Math.floor((yOrigin - ymax) / res)
    const _ymax = Math.ceil((yOrigin - ymin) / res)
    return [_xmin, _ymin, _xmax, _ymax]
  }
  /**
   * 获取切片地址
   * @param x
   * @param y
   * @param z
   * @return {string}
   */
  getTileUrl(x, y, z) {
    let url = this.tileUrl.replace(/\{x\}/g, x)
    url = url.replace(/\{y\}/g, y)
    url = url.replace(/\{z\}/g, z)
    return url.replace(/\{domain\}/g, randomNum())
  }
  /**
   * 获取切片大小
   * @return {number}
   */
  getTileSize() {
    return this.tileSize
  }
  /**
   * 地理坐标转换为屏幕坐标
   * @param extent
   * @param zoom
   * @param lonLat
   * @return {*[]}
   */
  project(extent, zoom, lonLat) {
    const [xmin, ymin, xmax, ymax] = this.getTilesInExtent(zoom, extent)
    const res = this.resolutions[zoom]
    const resMap = this.tileSize * res
    const topLeft = [
      resMap * xmin - this.origin,
      this.origin - resMap * ymin
    ]
    const coords = this.fromLonLat(lonLat)
    const x = (coords[0] - topLeft[0]) / res
    const y = (topLeft[1] - coords[1]) / res
    return [x, y]
  }
  /**
   * 处理四至
   * @param extent
   * @return {*[]}
   */
  getExtent(extent) {
    if(Boolean(extent)) {
      const min = this.fromLonLat([extent[0], extent[1]])
      const max = this.fromLonLat([extent[2], extent[3]])
      extent = [...min, ...max]
    } else {
      extent = [-this.origin, -this.origin, this.origin, this.origin]
    }
    return extent
  }
  /**
   * 判断是否在范围内
   * @param extent
   * @param lonLat
   * @return {boolean}
   */
  isInExtent(extent, lonLat) {
    const [xmin, ymin, xmax, ymax] = extent
    const [lon, lat] = lonLat
    return lon >= xmin && lon <= xmax && lat >=ymin && lat <= ymax
  }
}
module.exports = TileUtil
文件 map.js 负责实现地图导出逻辑,该模块调用了上述两个工具类来完成最终的地图生成与保存。
const fs = require('fs');
const ora = require('ora'); // loading
const TileUtil = require('./utils/tile')
const CanvasUtil = require('./utils/canvas')
const spinner = ora('tile joint').start()
const tileUtil = new TileUtil()
const z = 5
// const extent = undefined
const extent = [73.4469604492187500,6.3186411857604980,135.0858306884765625,53.5579261779785156]
const [xmin, ymin, xmax, ymax] = tileUtil.getTilesInExtent(z, extent)
const width = (xmax - xmin) * tileUtil.getTileSize()
const height = (ymax - ymin) * tileUtil.getTileSize()
const canvasUtil = new CanvasUtil(width, height)
let urls = []
for(let i = xmin; i < xmax; i++) {
  const x = (i - xmin) * tileUtil.getTileSize()
  for(let j = ymin; j < ymax; j++) {
    const y = (j - ymin) * tileUtil.getTileSize()
    const url = tileUtil.getTileUrl(i, j, z)
    urls.push({
      i, j, x, y, url
    })
  }
}
// 添加点数据
function addCapitals() {
  let geojson = fs.readFileSync('./data/capital.json')
  geojson = JSON.parse(geojson)
  let pointsData = []
  geojson.features.forEach(feature => {
    const coords = feature.geometry.coordinates
    if(!extent || tileUtil.isInExtent(extent, coords)) {
      const [x, y] = tileUtil.project(extent, z, coords)
      const { name } = feature.properties
      if(name === '北京') {
        pointsData.push({type: 'marker', size: 0.35, x, y, icon: './icons/icon-star.png'})
      } else {
        pointsData.push({type: 'rect', size: 4, x, y, color: '#ff0'})
      }
    }
  })
  return canvasUtil.drawPoints(pointsData)
}
// 添加线数据
function addLines() {
  let geojson = fs.readFileSync('./data/boundry.json')
  geojson = JSON.parse(geojson)
  let linesData = []
  geojson.features.forEach(feature => {
    const {type, coordinates} = feature.geometry
    if(type === 'LineString') {
      linesData.push({
        width: 2,
        color: 'rgba(255,0,0,0.8)',
        coords: coordinates.map(coords => {
          return tileUtil.project(extent, z, coords)
        })
      })
    } else {
      coordinates.forEach(_coordinates => {
        linesData.push({
          width: 2,
          color: 'rgba(255,0,0,0.8)',
          coords: _coordinates.map(coords => {
            return tileUtil.project(extent, z, coords)
          })
        })
      })
    }
  })
  return canvasUtil.drawLines(linesData)
}
// 添加面数据
function addPolygons() {
  let geojson = fs.readFileSync('./data/province.geojson')
  geojson = JSON.parse(geojson)
  let polygonsData = []
  geojson.features.forEach(feature => {
    const { name } = feature.properties
    const {type, coordinates} = feature.geometry
    if(type === 'Polygon') {
      const coords = coordinates[0].map(coords => {
        return tileUtil.project(extent, z, coords)
      })
      polygonsData.push({
        isStroke: true,
        isFill: true,
        lineWidth: 1,
        lineDash: [5, 5],
        strokeStyle: 'rgb(240,240,240)',
        fillColor: 'rgba(255, 0, 0,  0.1)',
        coords,
        name
      })
    } else {
      coordinates[0].forEach(_coordinates => {
        const coords = _coordinates.map(coords => {
          return tileUtil.project(extent, z, coords)
        })
        polygonsData.push({
          isStroke: true,
          isFill: true,
          lineWidth: 1,
          lineDash: [5, 5],
          strokeStyle: 'rgb(240,240,240)',
          fillStyle: 'rgba(255, 0, 0,  0.1)',
          coords,
          name
        })
      })
    }
  })
  return canvasUtil.drawPolygons(polygonsData)
}
// 1.拼接切片,2.添加面数据,3.添加点数据,4.添加线数据,5.导出图片
canvasUtil.drawImages(urls).then(() => {
  addPolygons().then((a) => {
    addCapitals().then(() => {
      addLines().then(() => {
        canvasUtil.addTitle('中国省级区划图')
        let base64Data = canvasUtil.getDataUrl()
        let dataBuffer = Buffer.from(base64Data, 'base64')
        fs.writeFileSync(`./result/map${z}.png`, dataBuffer)
        spinner.succeed()
        spinner.color = 'green'
      })
    })
  })
})
本文完整源代码可通过扫描下方二维码或直接访问代码仓库获取。
以上就是 Node.js 切片拼接及地图导出实例详解的详细内容,更多关于 Node.js 切片拼接与地图导出的技术资料,欢迎关注本站其他相关文章。
在 NestJS 中使用管道验证数据与守卫控制访问权限
2026-11-05 12:43:41
Node.js后端生成高强度随机字符串的方法
2026-11-04 16:29:54
Node.js环境中怎么使用axios或http模块发送GET请求
2026-11-03 21:57:15
Node.js环境下怎么实现JS反混淆自动化?常用库与CLI工具推荐
2026-11-03 21:15:54
解决JS逆向常见报错:缺少DOM环境导致代码运行失败
2026-11-03 20:41:59