

JavaScript实现模态框拖拽效果
本文详细讲解如何使用JavaScript实现模态框的拖拽功能。通过监听mousedown、mousemove和mouseup事件,计算鼠标与容器的坐标差值,动态更新模态框的left和top属性,从而实现自由拖拽。
模态框拖拽功能概述
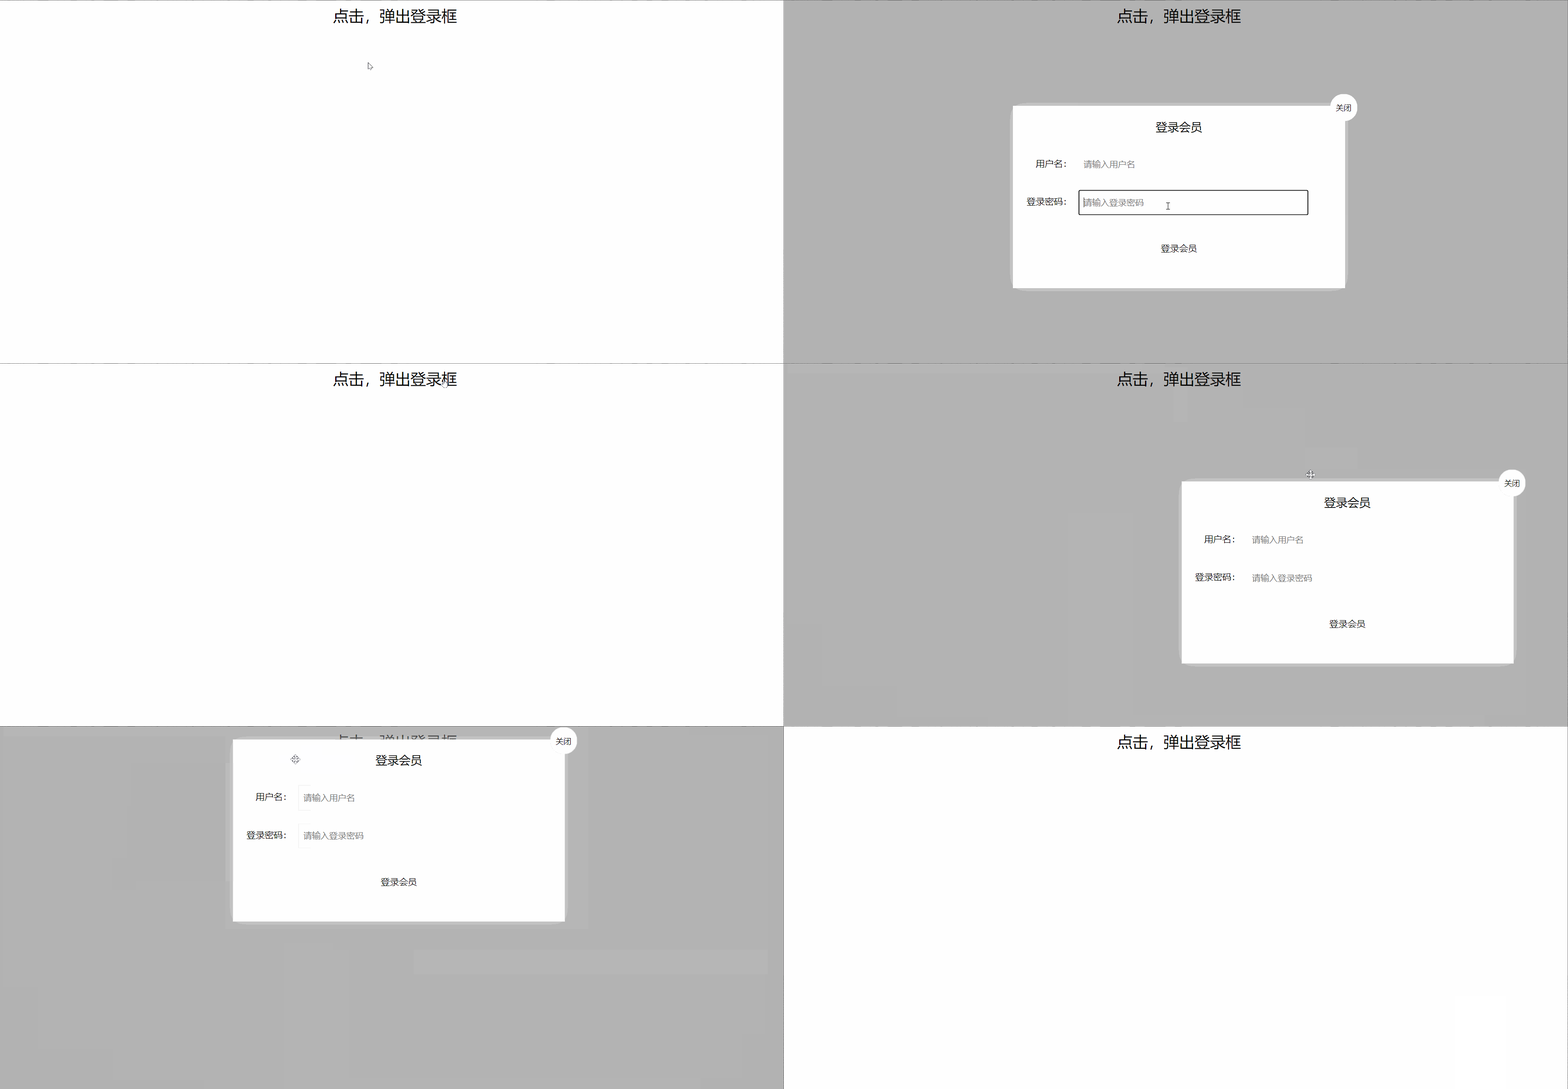
本节将演示如何使用JavaScript实现模态框的拖拽功能。
具体需要实现以下功能:
1. 点击触发元素后,模态框及半透明遮罩层显示。
2. 点击关闭按钮,隐藏模态框及半透明遮罩层。
3. 鼠标按下模态框顶部区域并移动时,模态框跟随鼠标移动。
实现思路与事件原理
4. 鼠标松开后,停止拖拽操作。
实现逻辑如下:
触发显示时,将模态框和遮罩层的display属性设置为block。
触发关闭时,将模态框和遮罩层的display属性设置为none。
拖拽的核心原理是:按下鼠标并移动,最后松开鼠标。
涉及的关键事件包括:按下(mousedown)、移动(mousemove)和松开(mouseup)。
在拖拽过程中,需获取鼠标移动后的最新坐标,并将其赋值给模态框的left和top样式属性,使模态框跟随鼠标位置变化。
拖拽的事件源为模态框顶部的标题栏,即<div id="title" class="login-title">登录会员</div>。
模态框的实际位置等于鼠标坐标减去鼠标在模态框内部的初始偏移坐标。
在鼠标按下(mousedown)事件中,需记录鼠标相对于模态框左上角的偏移量。
在鼠标移动(mousemove)事件中,将模态框的坐标设置为:当前鼠标坐标减去初始偏移量。注意,移动事件的处理函数应绑定在按下事件内部。
代码实现与效果展示
在鼠标松开(mouseup)事件中,移除移动事件监听器,从而停止拖拽。
<!DOCTYPE html>
<html>

<head lang="en">
    <meta charset="UTF-8">
    <title></title>
    <style>
        .login-header {
            width: 100%;
            text-align: center;
            height: 30px;
            font-size: 24px;
            line-height: 30px;
        }

        ul,
        li,
        ol,
        dl,
        dt,
        dd,
        div,
        p,
        span,
        h1,
        h2,
        h3,
        h4,
        h5,
        h6,
        a {
            padding: 0px;
            margin: 0px;
        }

        .login {
            display: none;
            width: 512px;
            height: 280px;
            position: fixed;
            border: #ebebeb solid 1px;
            left: 50%;
            top: 50%;
            background: #ffffff;
            box-shadow: 0px 0px 20px #ddd;
            z-index: 9999;
            transform: translate(-50%, -50%);
        }

        .login-title {
            width: 100%;
            margin: 10px 0px 0px 0px;
            text-align: center;
            line-height: 40px;
            height: 40px;
            font-size: 18px;
            position: relative;
            cursor: move;
        }

        .login-input-content {
            margin-top: 20px;
        }

        .login-button {
            width: 50%;
            margin: 30px auto 0px auto;
            line-height: 40px;
            font-size: 14px;
            border: #ebebeb 1px solid;
            text-align: center;
        }

        .login-bg {
            display: none;
            width: 100%;
            height: 100%;
            position: fixed;
            top: 0px;
            left: 0px;
            background: rgba(0, 0, 0, .3);
        }

        a {
            text-decoration: none;
            color: #000000;
        }

        .login-button a {
            display: block;
        }

        .login-input input.list-input {
            float: left;
            line-height: 35px;
            height: 35px;
            width: 350px;
            border: #ebebeb 1px solid;
            text-indent: 5px;
        }

        .login-input {
            overflow: hidden;
            margin: 0px 0px 20px 0px;
        }

        .login-input label {
            float: left;
            width: 90px;
            padding-right: 10px;
            text-align: right;
            line-height: 35px;
            height: 35px;
            font-size: 14px;
        }

        .login-title span {
            position: absolute;
            font-size: 12px;
            right: -20px;
            top: -30px;
            background: #ffffff;
            border: #ebebeb solid 1px;
            width: 40px;
            height: 40px;
            border-radius: 20px;
        }
    </style>
</head>

<body>
    <div class="login-header"><a id="link" href="javascript:;" rel="external nofollow" >点击,弹出登录框</a></div>
    <div id="login" class="login">
        <div id="title" class="login-title">登录会员
            <span><a id="closeBtn" href="javascript:void(0);" rel="external nofollow"  rel="external nofollow"  class="close-login">关闭</a></span>
        </div>
        <div class="login-input-content">
            <div class="login-input">
                <label>用户名:</label>
                <input type="text" placeholder="请输入用户名" name="info[username]" id="username" class="list-input">
            </div>
            <div class="login-input">
                <label>登录密码:</label>
                <input type="password" placeholder="请输入登录密码" name="info[password]" id="password" class="list-input">
            </div>
        </div>
        <div id="loginBtn" class="login-button"><a href="javascript:void(0);" rel="external nofollow"  rel="external nofollow"  id="login-button-submit">登录会员</a></div>
    </div>
    <!-- 遮盖层 -->
    <div id="bg" class="login-bg"></div>
    <script>
        // 1. 获取元素
        var login = document.querySelector('.login');
        var mask = document.querySelector('.login-bg');
        var link = document.querySelector('#link');
        var closeBtn = document.querySelector('#closeBtn');
        var title = document.querySelector('#title');
        // 2. 点击弹出层这个链接 link  让mask 和login 显示出来
        link.addEventListener('click', function() {
                mask.style.display = 'block';
                login.style.display = 'block';
            })
            // 3. 点击 closeBtn 就隐藏 mask 和 login
        closeBtn.addEventListener('click', function() {
                mask.style.display = 'none';
                login.style.display = 'none';
            })
            // 4. 开始拖拽
            // (1) 鼠标按下, 获得鼠标在盒子内的坐标
        title.addEventListener('mousedown', function(e) {
            var x = e.pageX - login.offsetLeft;
            var y = e.pageY - login.offsetTop;
            // (2) 鼠标移动的时候,把鼠标在页面中的坐标,减去 鼠标在盒子内的坐标就是模态框的left和top值
            document.addEventListener('mousemove', move)

            function move(e) {
                login.style.left = e.pageX - x + 'px';
                login.style.top = e.pageY - y + 'px';
            }
            // (3) 鼠标弹起,就让鼠标移动事件移除
            document.addEventListener('mouseup', function() {
                document.removeEventListener('mousemove', move);
            })
        })
    </script>
</body>

</html>
具体代码实现如下:
至此,关于JavaScript实现模态框拖拽效果的教程已介绍完毕。如需了解更多JavaScript模态框拖拽相关内容,建议查阅本站过往文章或继续阅读下文。感谢大家的支持!
JS语法错误会阻止加载吗?区分SyntaxError与资源加载失败
2026-11-05 16:08:46
JavaScript常见SyntaxError语法错误排查与修复方法
2026-11-05 13:58:44
JS中slice、substring和substr截取字符串的区别
2026-11-05 13:43:47
JS 转 TS 手动迁移最佳实践:从配置 tsconfig 到消除 any 类型
2026-11-05 11:53:32
为什么JS数组push后得到的是数字而不是数组?
2026-11-05 09:59:18