

JavaScript 实现网页瀑布流布局:原理与代码详解
作者:异步漫步时间:2026-10-24 09:47:12浏览:551
本文详细解析如何使用 JavaScript 实现网页瀑布流布局。通过获取图片元素、计算列数、比较高度及定位插入位置等步骤,结合 HTML 结构与 CSS 样式,提供完整代码示例。旨在帮助开发者掌握多行等宽不等高元素的动态排列技巧,提升页面展示效果。
前言:
瀑布流布局(又称瀑布流式布局)是一种流行的网站页面设计方式。其核心特征是多行排列等宽元素,后续元素依次追加至前序元素之后。由于元素高度不等,系统会根据图片原始比例进行缩放,直至宽度符合设定要求,随后按照特定规则将其放置于指定位置。
什么是瀑布流布局:
先看效果:
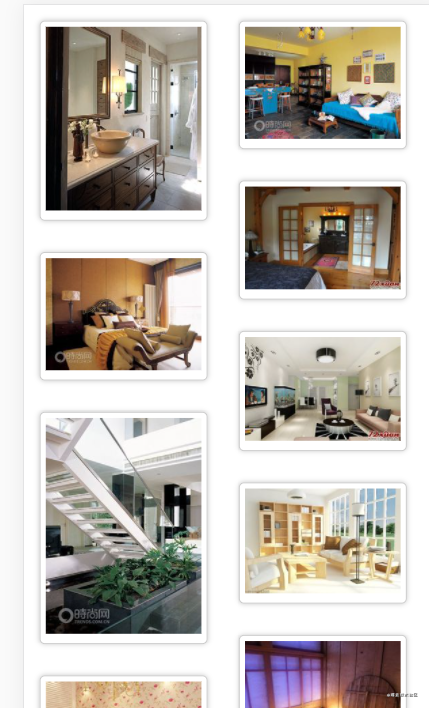
- 该布局模式下,图片以多行等宽形式排列,后续元素依次添加。元素宽度一致但高度各异,系统依据图片原始比例缩放至指定宽度,再按既定规则将其放置于合适位置。
- 为便于理解,此处先提供基础的 HTML 与 CSS 代码示例。
不完整 html 代码:
<div id="container">
        <div class="box">
            <div class="box-img">
                <img src="./img/1.jpg" alt="">
            </div>
        </div>
        <div class="box">
            <div class="box-img">
                <img src="./img/2.jpg" alt="">
            </div>
        </div>
        <div class="box">
            <div class="box-img">
                <img src="./img/3.jpg" alt="">
            </div>
        </div>
     </div>
     ......<!-- 省略了图片,多少张图片自行决定-->
完整的 css 代码
*{
        padding: 0;
        margin: 0;
    }
    #container{
        position: relative;
    }
    .box{
        float: left;
        padding: 15px;
    }
    .box-img {
        width: 150px;
        padding: 5px;
        border: 1px solid #ccc ;
        box-shadow: 0 0 5px #ccc;
        border-radius: 5px;
    }
    .box-img img{
        width: 100%;
        height: auto;
    }
如何实现:
简而言之,实现瀑布流布局需完成以下关键步骤✍
1. 获取图片
function getChildElemnt() {
    const contentArr = []//定义数组准备装图
    const parent = document.getElementById(container)//得到整个页面
    const allContent = parent.getElementsByTagName('*')//得到整个标签
    console.log(allContent);
    for (var i = 0; i < allContent.length; i++) {
      if (allContent[i].className == 'box') {
        contentArr.push(allContent[i])//将class='box'的标签装入数组
      }
    }
    console.log(contentArr);
    return contentArr//返回数组
 }
2. 设置图片宽带
 var ccontent = getChildElemnt()
  var imgWidth = ccontent[0].offsetWidth//令所有图片宽度等于第一张图片
3. 计算浏览器页面一行最多能存放图片的数量
var dWidth=document.documentElement.clientWidth//页面宽度
var num = Math.floor(dWidth/ imgWidth)
//Math.floor()向下取整
4. 比较图片高度
在瀑布流布局中,当第一行图片排满后,第二行的第一张图片需放置在第一行中高度最小的图片下方。
var BoxHeightArr = []//定义一个数组,把每张图片的高度依次放进去
    for (var i = 0; i < ccontent.length; i++) {
      if (i < num) {
        BoxHeightArr[i] = ccontent[i].offsetHeight//将图片的高度存入数组
      } else {//当第一行已经存放不了图片后
        var minHeight = Math.min.apply(null, BoxHeightArr)//比较出上一行最小的高度

      }
    }
5. 得到上一行中最小高度图片的位置
//定义一个getMinHeightLocation函数,给它传入BoxHeightArr上一行全部图片,和minHeight上一行图片的最小高度
  function getMinHeightLocation(BoxHeightArr, minHeight) {
    for (var i in BoxHeightArr) {
      if (BoxHeightArr[i] === minHeight) {//当图片高度等于最小高度时,该图片的位置为最小高度图片的位置
        return i
      }
    }
  }
6. 插图
    for (var i = 0; i < ccontent.length; i++) {
    if (i < num) {
      BoxHeightArr[i] = ccontent[i].offsetHeight
    } else {
      var minHeight = Math.min.apply(null, BoxHeightArr)
      var minIndex = getMinHeightLocation(BoxHeightArr, minHeight)
      ccontent[i].style.position = 'absolute'//将要插入的图片绝对定位,即元素的位置通过 "left", "top", "right" 以及 "bottom" 属性进行规定
      ccontent[i].style.top = minHeight + 'px'//令插入的图片到顶端的距离刚好等于要插其下面图片的高度
      ccontent[i].style.left = ccontent[minIndex].offsetLeft + 'px'//令插入的图片到最左边的距离刚好等于要插其下面图片到最左边的距离
      BoxHeightArr[minIndex] = BoxHeightArr[minIndex] + ccontent[i].offsetHeight//插入图片后,得将这位置的高度设为两张图片的高度和
    }
  }
完整代码如下:
优化代码,提高性能
window.onload = function() {
  imgLocation('container', 'box')//构造函数imgLocation
}
//用window.onload = function() {}函数就不用等着body页面中调用就可以执行了

// 获取到当前有多少张图片要摆放
function imgLocation(parent, content) {//令parent='container',content='box'
  // 将parent下所有的内容全部取出
  var cparent = document.getElementById(parent)
  var ccontent = getChildElemnt(cparent, content)
  var imgWidth = ccontent[0].offsetWidth
  var num = Math.floor(document.documentElement.clientWidth / imgWidth)
  cparent.style.cssText = `width: ${imgWidth * num} px`

  var BoxHeightArr = []
  for (var i = 0; i < ccontent.length; i++) {
    if (i < num) {
      BoxHeightArr[i] = ccontent[i].offsetHeight
    } else {
      var minHeight = Math.min.apply(null, BoxHeightArr)
      var minIndex = getMinHeightLocation(BoxHeightArr, minHeight)
      ccontent[i].style.position = 'absolute'
      ccontent[i].style.top = minHeight + 'px'
      ccontent[i].style.left = ccontent[minIndex].offsetLeft + 'px'
      BoxHeightArr[minIndex] = BoxHeightArr[minIndex] + ccontent[i].offsetHeight
    }
  }
  // console.log(BoxHeightArr);
}


function getChildElemnt(parent, content) {parent='container',content='box'
  const contentArr = []
  const allContent = parent.getElementsByTagName('*')
  console.log(allContent);
  for (var i = 0; i < allContent.length; i++) {
    if (allContent[i].className == content) {
      contentArr.push(allContent[i])
    }
  }
  console.log(contentArr);
  return contentArr
}

function getMinHeightLocation(BoxHeightArr, minHeight) {
  for (var i in BoxHeightArr) {
    if (BoxHeightArr[i] === minHeight) {
      return i
    }
  }
}
以上就是如何用JS实现网页瀑布流布局的详细内容,更多关于JS实现网页瀑布流布局的资料请关注本站其它相关文章!
作者最新文章
D3.js 比例尺与坐标轴的配置详解
2026-11-05 16:54:46
JavaScript怎么遍历对象的Symbol键和不可枚举属性
2026-11-05 13:13:39
封装一个健壮的JS字符串判空工具函数
2026-11-05 12:16:14
JavaScript合并数组的三种常用方法:concat、扩展运算符与push
2026-11-05 11:22:29
JavaScript立即执行函数(IIFE)是什么及基本语法
2026-11-05 10:51:19